As more Oracle Fusion applications move to the Redwood user experience, many organizations are exploring ways to adapt these pages to their business needs. While Redwood introduces a modern interface, there are often small adjustments required to ensure the application behaves in line with internal processes and data requirements.
Oracle Visual Builder Studio (VB Studio) provides a way to extend Redwood pages without modifying the underlying application code. Using Advanced Mode, developers and administrators can configure page behaviour through Business Rules, allowing them to control things like field properties and conditional behaviour directly from the UI layer.
In this blog, we will look at how Business Rules in VB Studio can be used to adjust field behaviour such as making fields required, read-only, hidden, or setting default values using examples from the Service Request page in Oracle Fusion Service.
Editing a Redwood Page in Visual Builder Studio
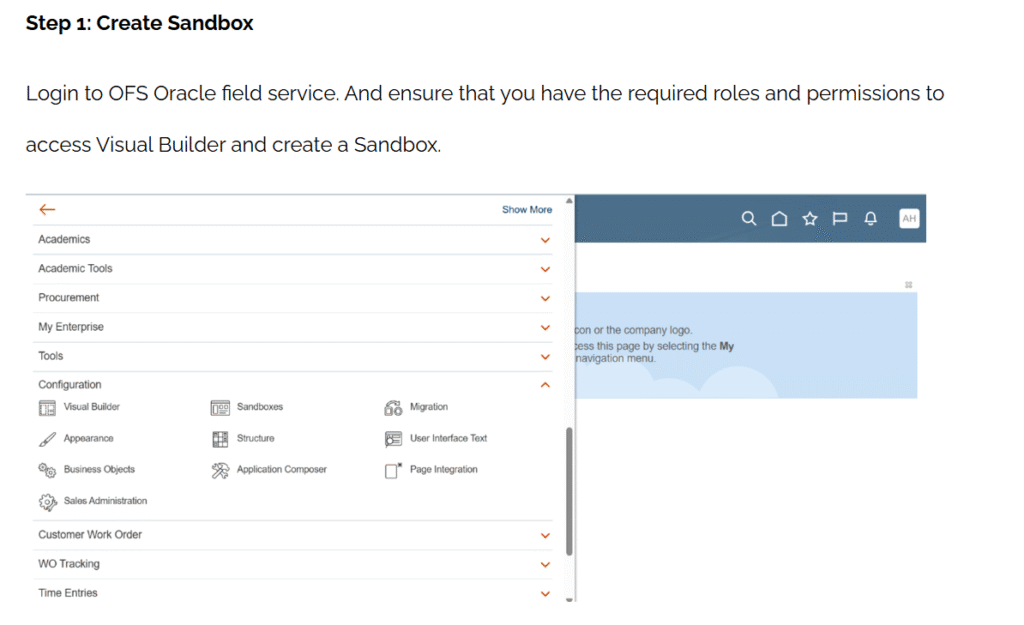
Once you identify the page that requires customization, the first step is to open it in Visual Builder Studio.
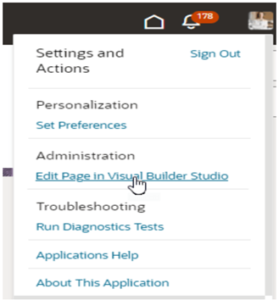
From the target Redwood page (for example, the Service Request page in Service Center), select Edit Page in Visual Builder Studio. This action launches the page extension in VB Studio where you can configure UI behaviour in Advanced Mode.
To access and modify the page, users must have the Application Developer role assigned.
Understanding Business Rules in Advanced Mode
Business Rules allow you to override the appearance and behaviour of fields dynamically at runtime.
Every Business Rule consists of two main components:
Condition
This defines when the rule should apply. The condition evaluates field values on the page. For example, a rule may trigger only when the Status field equals Closed or Open.
Action
This defines what should happen when the condition is met.
In the Business Rules editor, actions are configured directly in a grid of fields, where each field has several configurable properties. For every field listed, you will see columns such as:
- Required – makes the field mandatory for the user
- Hidden – hides the field from the UI
- Read Only – prevents users from editing the field
- Value – allows you to assign a default value or an expression
Instead of writing code, you simply select the field and enable the appropriate property in the corresponding column.
A key advantage of Business Rules is that they are defined at the object level. This means if a field appears in multiple forms or dynamic tables, the rule applies consistently across all regions where that object is used.
This centralized approach ensures consistency, reduces duplication, and simplifies maintenance.

Accessing Business Rules in Advanced Mode
After opening the page in VB Studio, Business Rules can be accessed directly from the page extension.
Step 1: Open the Page Extension
From the Redwood page, select Edit Page in Visual Builder Studio to launch the page in the VB Studio Designer.

Step 2: Identify the Data Object
Business Rules are defined at the object level, not directly on individual UI components.
In the Designer:
- Use the Structure panel to identify the form or dynamic table
- Locate the underlying business object (for example, Service Request)
- Select the object to view its configuration options

Step 3: Open the Business Rules Editor
Once the object is selected:
- Navigate to the Properties pane
- Locate the Business Rules section
- Click Open Business Rules Editor
This opens the Business Rules interface where you can:
- View existing rules
- Create new rules
- Define conditions
- Configure actions

Creating a New Business Rule
Inside the Business Rules editor:
- Click Create Rule
- Provide a meaningful Rule Name
- Define the Condition
- Ensure that the rule is active by checking the toggle in the top-right corner of the Business Rules editor. Rules can also be enabled or disabled at any time depending on the requirement. If your logic involves multiple scenarios, you can use If/Else or Switch conditions to handle different outcomes within the same rule.
- Add one or more Actions to the fields that you want to control, such as:
- Set field to Required
- Set field to Read-Only
- Set field to Hidden
- Assign a default value
You can also combine multiple conditions and actions within a single rule depending on the requirement.
Understanding Rule Scope
One important concept when working with Business Rules is scope.
When you configure a property through a Business Rule:
- It applies to the selected business object
- The behaviour is enforced across all forms and tables that use that object on the page
- You do not need to configure the same rule separately for each region
- When a rule is created without any conditions, it is applied in all scenarios.
This object-level configuration ensures consistent behaviour across the application.
Example 1: Making specific fields REQUIRED
Let’s walk through a common Service Centre requirement.
Scenario
In Service Centre, a Service Request should not be closed unless the contact information is given for an SR in open status. This ensures data completeness and improves reporting accuracy.
Step 1: Open the Business Rules Editor
- Open the Service Request page in VB Studio
- Identify the Service Request object
- Launch the Business Rules editor
Step 2: Create the Rule
Rule Name
Contact fields mandatory when SR status is Open
Condition
Status = Open
This means that whenever the Status field changes to Open, the rule will trigger and apply the configured actions to the specified fields.
Action
In the Business Rules grid, Set Contact fields → Required = True

Step 3: Save and Test
Now preview the page, the SR cannot be saved unless the contact fields are entered when the status is open.

Example 2: Making a Field Read-Only
Business Rules can also restrict users from editing fields once certain conditions are met.
Scenario
Once a Service Request is marked Resolved, the Contact field should no longer be editable. This prevents users from modifying the urgency level after the issue has been resolved.
Condition
Status = Resolved
This ensures that once the Status field is updated to Resolved, the rule will automatically apply the configured action.
Action
In the Business Rules grid, locate the Contact field and enable the Read Only option.
Set Contact → Read-Only = True
After saving the rule:
- Update the Service Request status to Resolved

Step 3: Save and Test
Now preview the page, the contact fields remain read only when status is resolved.

Example 3: Setting a Default Value
Business Rules can also automatically populate field values to reduce manual input and maintain consistency.
Scenario
When a Service Request is created, the Channel field can automatically default to a predefined value.
Step 1: Create a New Rule
Click Create Rule and configure the rule without defining a condition so that it applies always.
Step 2: Define the Action
In the Value section, search for the Channel field and enter the default value you want to assign.

Step 3: Save and Test
After saving the rule:
- Preview the page
- Create a new Service Request
- Notice that the Channel field automatically populates with the configured value

Using Advanced Expressions for Default Values
In some situations, default values may depend on other fields rather than being static. In such cases, Advanced Expressions can be used to dynamically determine the value.
Example Scenario
Suppose you want the Title field to automatically populate using the Account Name along with the current date.
For example, if the Account Name is ABC Corporation, the Title could automatically appear as:
ABC Corporation – 03/09/2026
This can be achieved using an expression that retrieves the AccountPartyName field and combines it with the current date. Use the advanced expression option while setting the default value.

You can write any custom code and also use other component variables values.

Test the changes, on change of account the title defaults to the custom value needed.

Example 4: Hiding a Field Using Business Rules
Fields can also be hidden when certain conditions are met.
To configure this:
- Open the Business Rules editor
- Create a rule with the required condition
- In the Action section, locate the field
- Enable the Hidden property
Once applied, the field will not appear to the user when the rule condition is satisfied.

Conclusion
Business Rules in Oracle Visual Builder Studio provide a flexible way to control UI behaviour in Oracle Redwood applications without modifying backend logic. They are particularly useful for smaller UI adjustments such as restricting edits, assigning default values, enforcing validations, or hiding fields while keeping the application upgrade-safe.
However, Redwood page extensions do have limitations. The available customization options can vary across Oracle Fusion modules, and in some areas, such as parts of Oracle HCM, not all fields or behaviours can be controlled through Business Rules. As a result, these rules are best suited for minor UI-level changes rather than complex functional modifications.
If a requirement cannot be achieved through Business Rules or page extensions, it may be necessary to check the module’s extension capabilities, raise a request with Oracle Support, or post the requirement in the Oracle Customer Connect community for guidance or possible product enhancements.