Uploading journal data efficiently is crucial for maintaining accurate financial records in Oracle Financials. This blog post will guide you through the process of using ADFDi (Application Development Framework Desktop Integration) to streamline journal data uploads.
Whether you’re a financial analyst or an accountant, our step-by-step instructions will help you leverage ADFDi’s powerful features to simplify and automate your journal data entry, ensuring accuracy and saving time.
There are two kinds of spreadsheets provided by Oracle to do bulk uploading of the data.
- ADFDi: Application Development Framework Desktop Integration
- FBDI: File Based Data Integration
Prerequisite for Uploading ADFDi:
- ADFDi plugin needs to be downloaded & installed in your desktop/laptop to upload journals using these spreadsheets.
Instance connect:
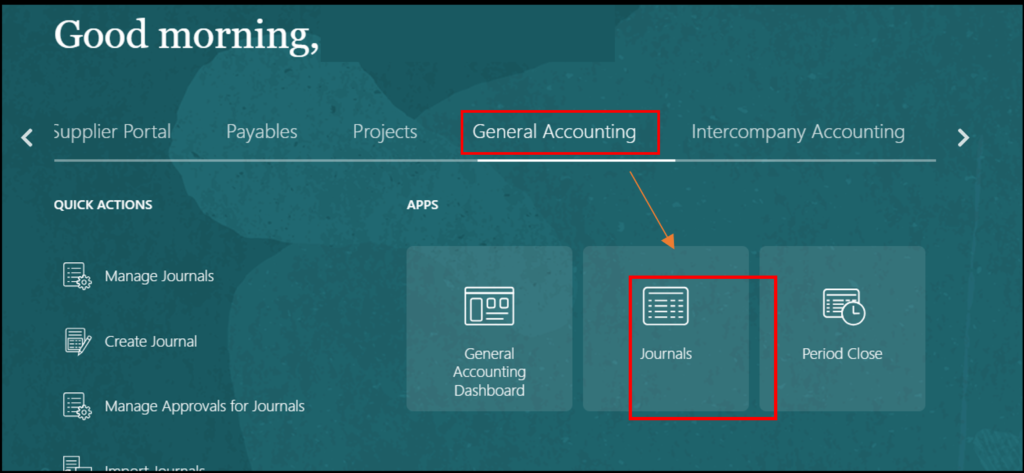
Step-1: Download the Spreadsheet to fill in the Journal data.
Navigation > Home > General Accounting > Journals >
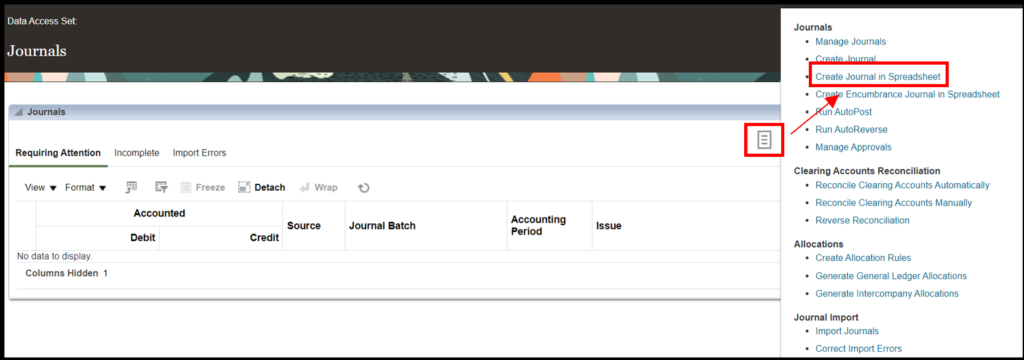
Task list> Create Journal Using Spreadsheet
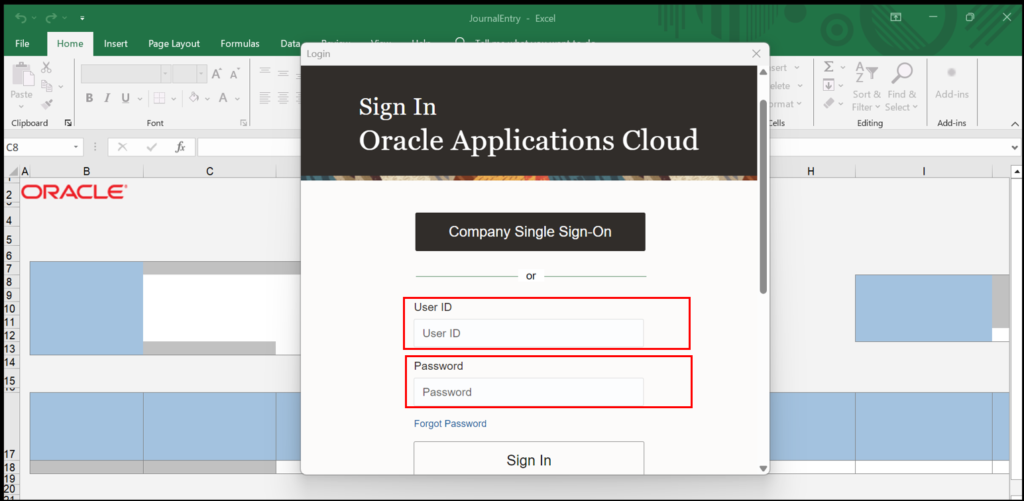
Step-2: Connect to the instance by entering your Oracle credentials:
An Excel Sheet will be downloaded and (After the ADFDi plugin is installed in the system) the system will ask for login credentials. These credentials will connect the excel sheet to Oracle Applications Cloud.
Step-3: Fill in all the details related to Journal Batch and Journal level:
Journal, Description, Ledger*, Accounting Date*, Group ID, Source*, Category etc.
Journal: Name of the Journal for which entry has to be passed.
Description: Short description about the journal.
Ledger: Double-clicking on this will pop-up all the ledgers linked with this instance. You can select the ledger where you want to pass the entry.
Accounting Date: The date on which the entry needs to be passed in the ledger.
Recommended Reading: Creating an FBDI File for Journal Upload in Oracle Cloud
Group ID: It is an identification number allotted to all the Journals that are entered in the instance through this spreadsheet. It is auto-created by the instance.
Source: It defines how the entry is created in the Instance. Source can be Spreadsheet, manual or Auto-copy. In the spreadsheet, it is auto-created by the instance as Spreadsheet.
Category: This reflects as to which category the journal belongs to. For example: Accrual, Prepaid, allocation etc.

Step-4: Fill in the Journal Line information:
The line information includes details like: Accounting combination, currency, conversion type, conversion rate, accounted debit and credit, line description.
Accounting Combinations: It is the string of values that is debited or credited in the journal entry in Oracle Cloud ERP. It consists of values, codes and description. It is meant to fulfil the reporting needs of the entity.
Currency: The currency in which the transaction is taking place.
Conversion rate and conversion type: It may happen that sometimes the reporting currency is different from the entered currency. For such scenarios, the user needs to add the conversion rate. Or they can even take the corporate rate that are already filled in the system.
Accounted debit/credit: The amount that needs to be reflected in the instance for which the reporting has to be done.
Line description: The details regarding the line that is entered in the spreadsheet.

Note: Data can be uploaded by either Single Journal or Multiple Journals using the same spreadsheet. There are different tabs available in the same spreadsheet.
Step-5: Click on the view status and submit button:
Once the data is filled the user can first view the details before uploading it to the instance. After the review is completed, data can be uploaded thought the submit button located in the toolbox under the ‘Create Journal’, visible at the top of the spreadsheet.
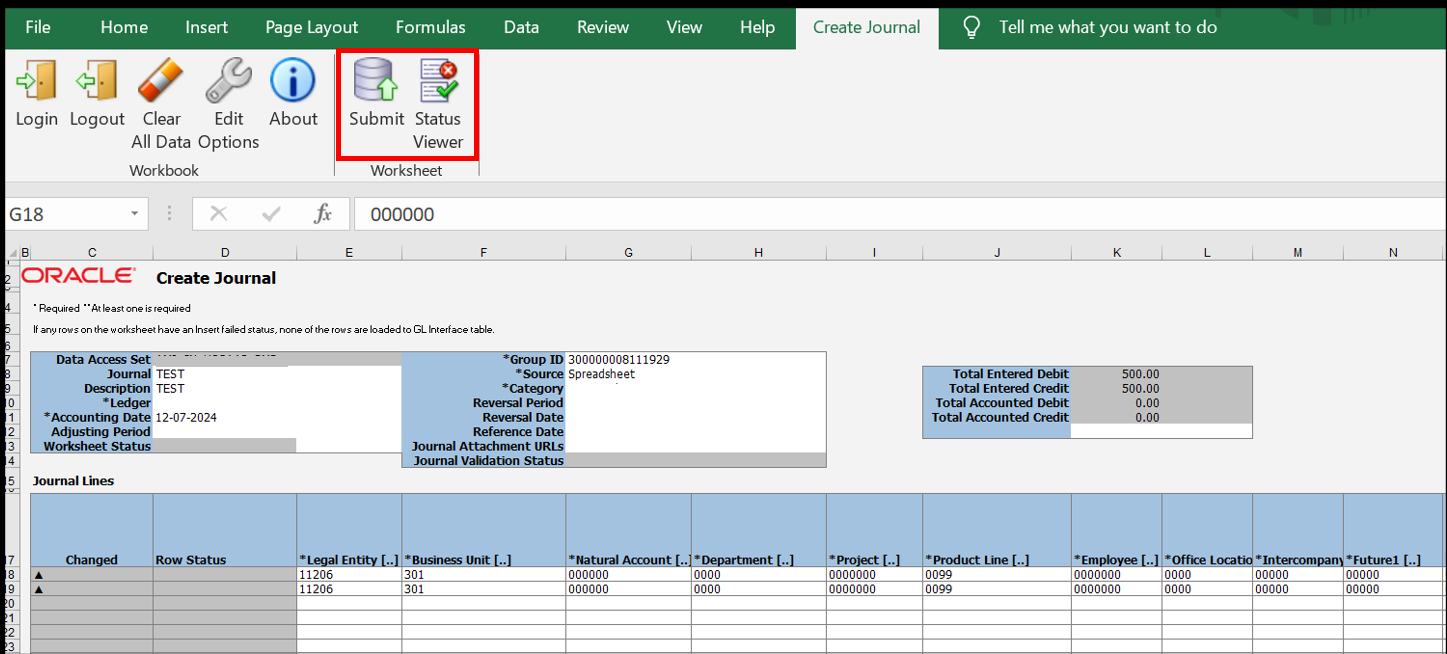
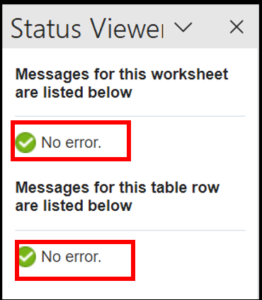
After reviewing the status if there is no error, the user can click on the submit button.
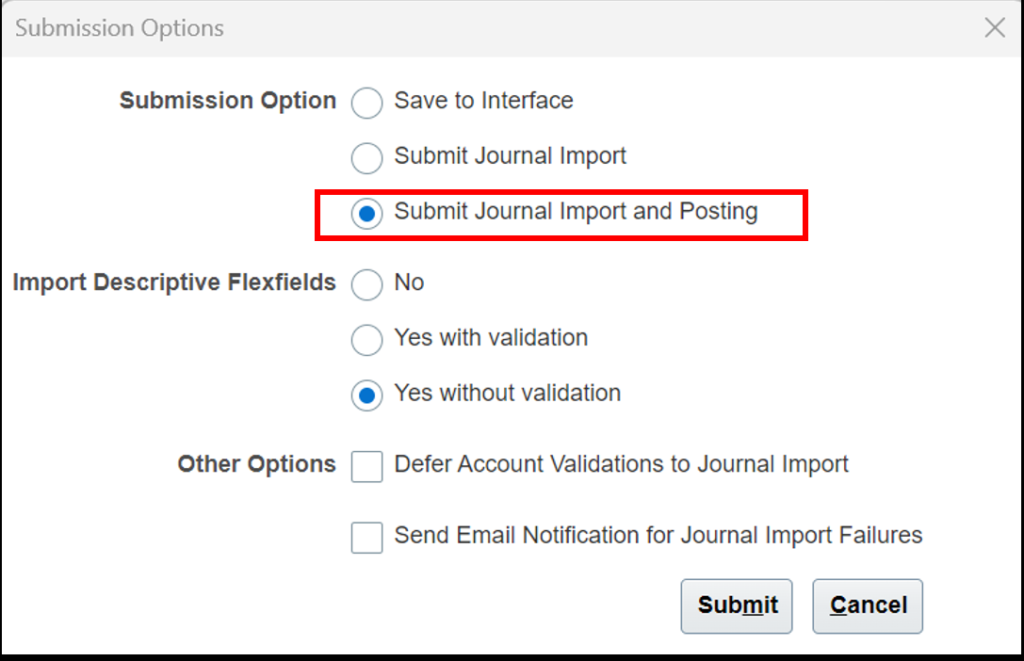
While submitting, the system will provide an option to
a) Save to Interface
b) Submit Journal Import
c) Submit Journal Import and Posting.
It is advisable to select the third option as it will lead to auto-posting the Journal uploaded thought the spreadsheet.

Once the file is successfully uploaded, the Process number will get generated. This can be seen on the monitor processes in the instance. Also, the Row status will now change to ‘Row inserted successfully’.
Step-6: Check the Journal upload in the Oracle Fusion application:
Navigation – Monitor Process> Home>Navigator> Tools> Schedule Process> search with schedule process
Two scheduled processes that are run as a part of spreadsheet journal upload process:
- 1.Import Journals: Child process
- 2.Post Journal for single ledger (which processes will be triggered here depend on the submission option selected in spreadsheets).
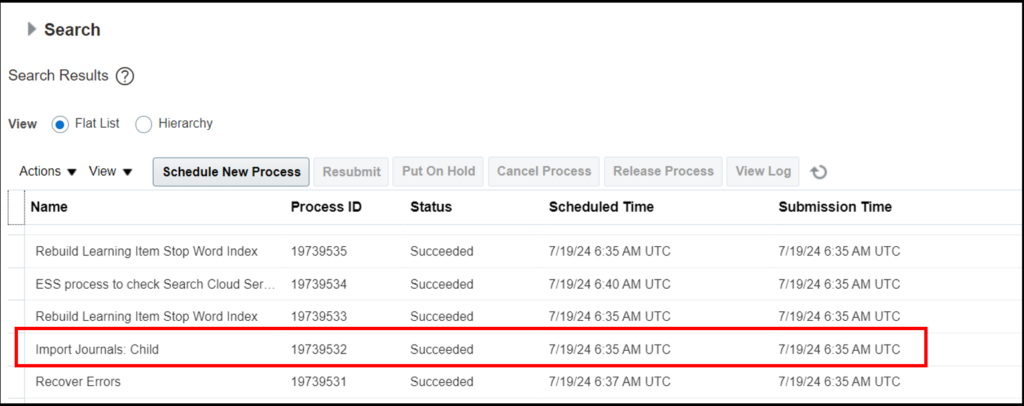
Step-7: Check the Journal upload on the Journal screen:
Navigation – General Journal >Journal > Task list> Manage Journal> Search by Journal date

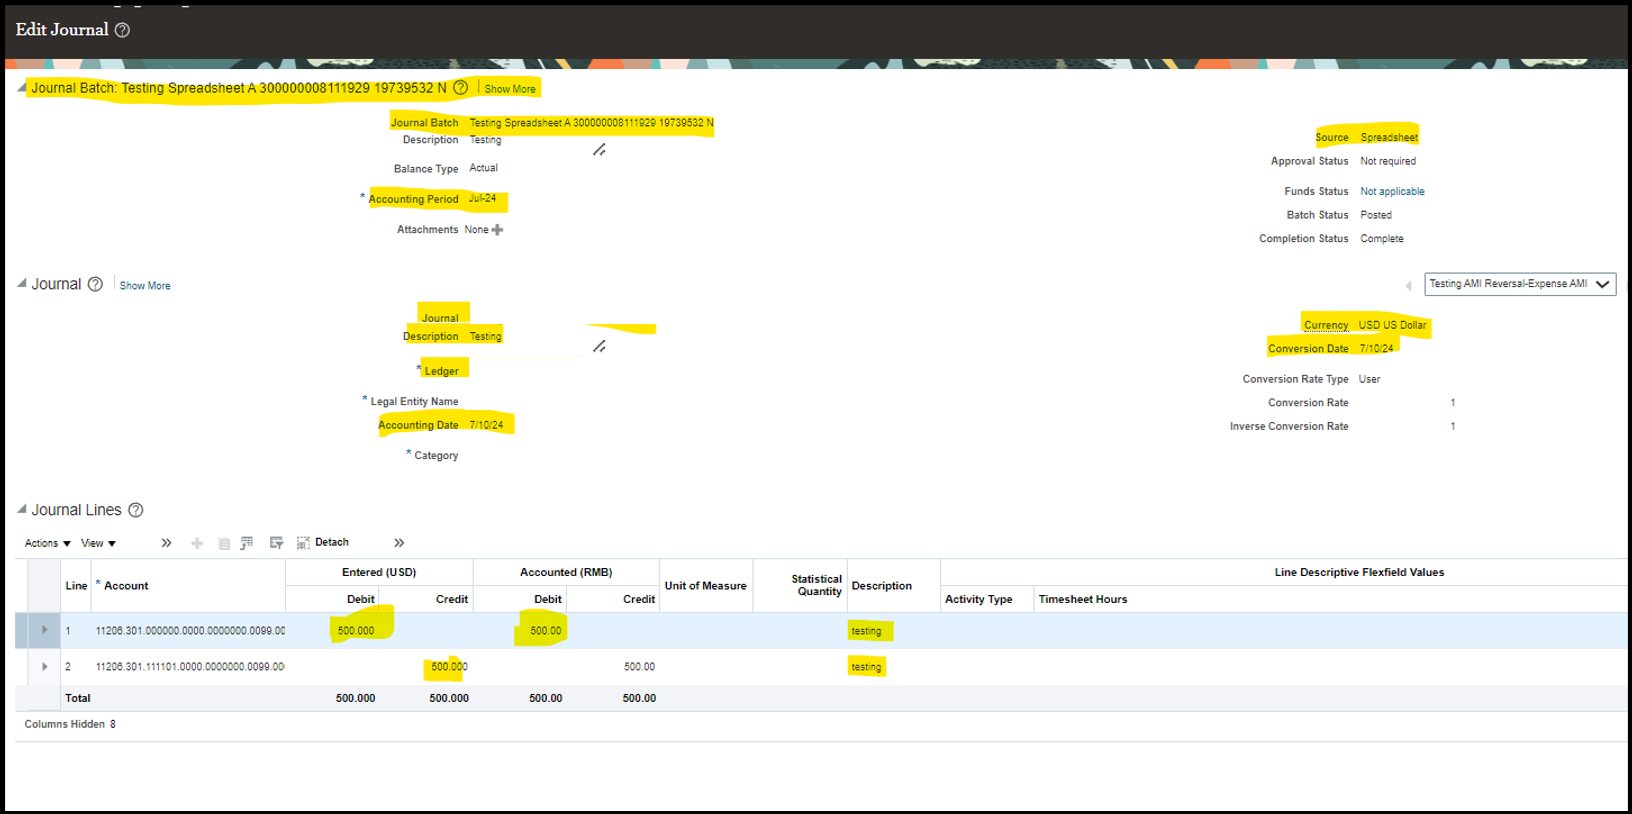
Clicking on the link, the Journal will be visible as shown below:
Difference between ADFDi and FBDI:
- ADFDi spreadsheet provides more validations that data uploaded through FBDI: This is because the ADFDi spreadsheets are directly downloaded from the Specific Oracle Cloud Instance, hence they have specific field information and Specific validations compared to FBDI which is downloaded from oracle.com and is a generic spreadsheet to upload mass data.
- Some fields will be double-clickable in ADFDi and not in FBDI– i.e. If you double click on those links, it will open an Oracle Cloud instance with a pre-defined list of values eg- categories, account, department etc it is the same list as we find in create journal.
- FBDI needs a ledger ID instead of ledger name, whereas ADFDi is instance specific where only those ledgers can be selected that are available on the instance been logged in.
- In FDBI, any journal source can be selected (provided it is defined in your Oracle Cloud ERP instance), as against the only option available in ADFDi – which is spreadsheet.
If you have any questions or concerns, please get in touch with us on [email protected].


