In this continuation of our blog series on setting up Accounts Payable (AP) in Oracle Financials, we dive deeper into the essential configurations.
In Part 1, we covered the foundational steps, including creating a Business Unit, assigning Business Functions, and managing Common Options for Procurement and Payables.
Now, in Part 2, our focus shifts to Setting Up Invoice Options, a critical step in streamlining your AP processes. Let’s dive in!
Manage Invoice Options
Navigation – Setup and maintenance -> Payables -> Manage Invoice options
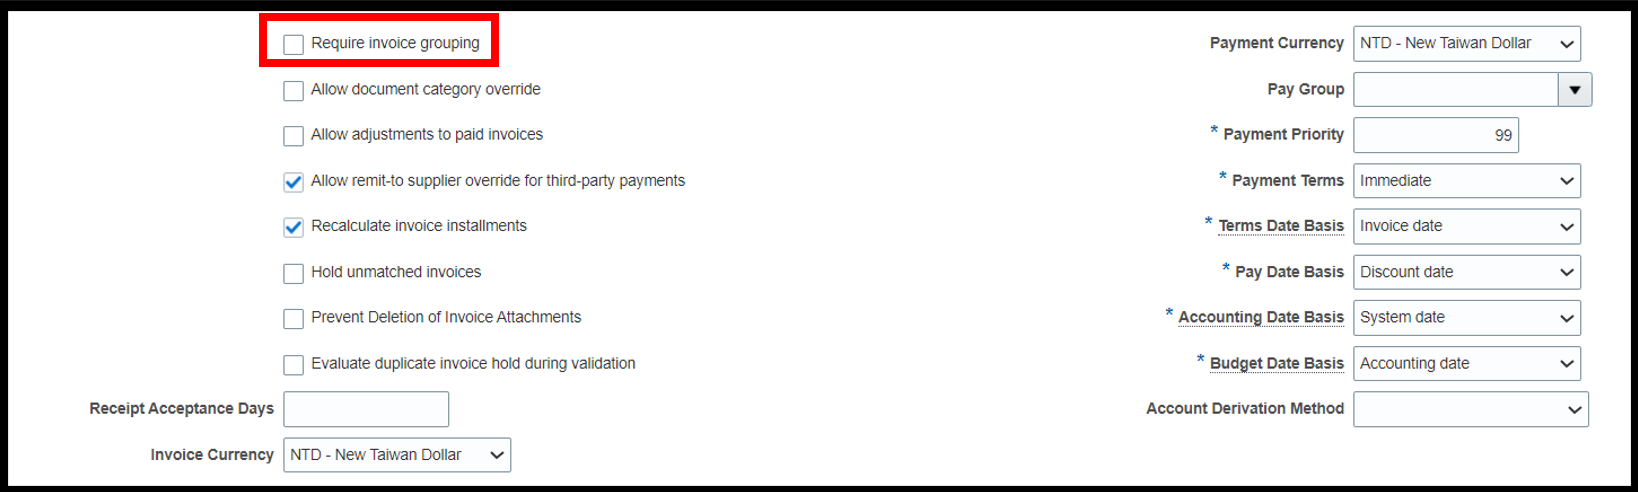
Understanding different Invoice Options:
- a)Require Invoice Grouping: If this checkbox is selected, the Invoice Group field at the Header level becomes mandatory when creating a new invoice.
The Invoice Group can serve as a useful selection criterion in processes such as Payment Process Requests or Invoice Import, allowing for more efficient sorting and processing of invoices.
- b)Allow Adjustments to Paid Invoices: When this option is enabled, users can make modifications to line-level information on an invoice, even if it is fully paid.
This feature is particularly useful in scenarios where the invoice was mistakenly matched to the wrong Purchase Order (PO) or PO line schedule, and the user needs to correct it. Such adjustments typically have no impact on the payment itself but ensure data accuracy for future reporting and processes.
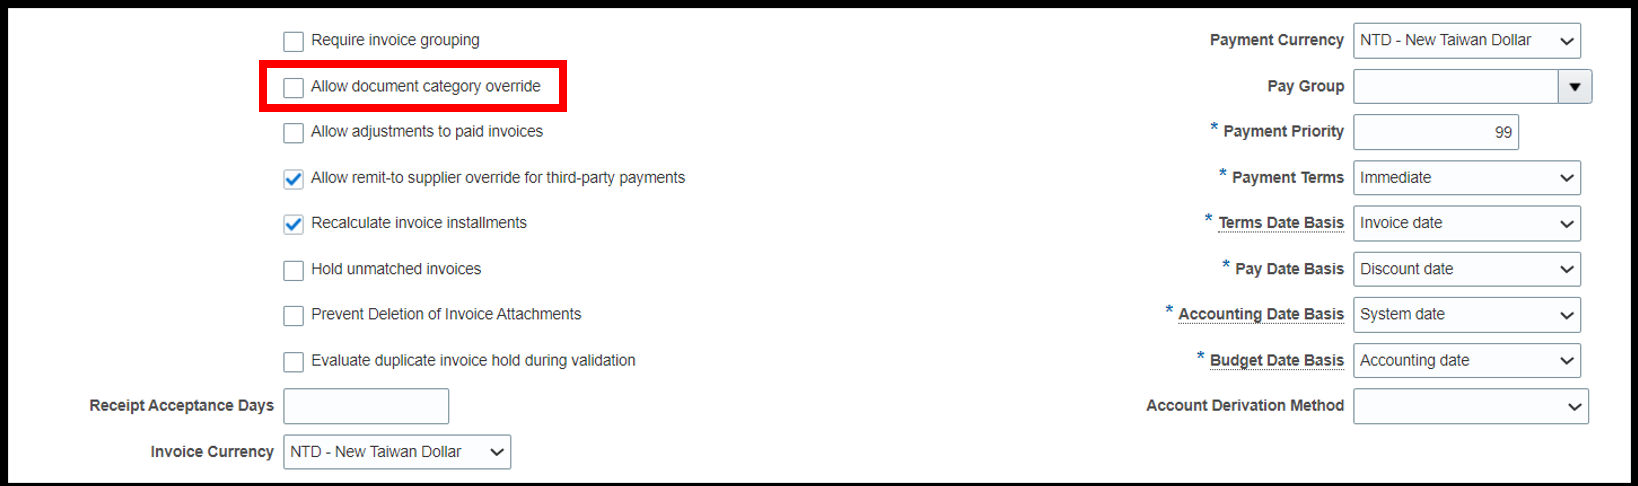
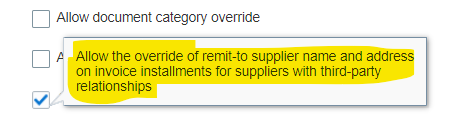
- c)Allow Remit-To Supplier Override for Third-Party Payments: This option establishes a relationship between two suppliers as defined in the Supplier Master.
Setup Process:
Step 1: Navigate to Setup and Maintenance → Supplier Master.
Step 2: Search for the supplier.
Step 3: Go to the Supplier Site → Additional Information → Invoicing → Third-Party Payment Relationship.
Let’s understand it through a business use case. If an organization has two suppliers, A and B, and supplier A specifies that payments for invoices raised by them should be made to supplier B, then supplier B becomes the ‘Remit-To Supplier’ for supplier A. This relationship is recorded in the Third-Party Relationship section under the Invoicing tab of supplier A’s relevant supplier site.
In the Manage Installments section of the Invoice form, users can modify the Remit-To Supplier details if the Allow Remit-To Supplier Override for Third-Party Payment option is enabled in the Manage Invoice Options setup.
If this option is disabled, the Remit-To Supplier details will not be visible to the user during invoice data entry. However, these details will still take effect if specified in the Supplier Master.
Impact: When a Remit-To Supplier is defined in the Manage Installments section of an invoice, the payment for that invoice will be issued to the specified Remit-To Supplier, rather than the original supplier.
- d)Recalculate Invoice Installment: This functionality pertains to the installments displayed on the Manage Installments screen of an invoice.
At the invoice header level, the Payment Terms default to the values specified in the Supplier Master. The system automatically calculates the payment terms and generates the installments, which can be viewed under Action → Manage Installments.
If changes are made to the payment terms at the invoice header level and the Recalculate Invoice Installment option is set to YES, the system will automatically recalculate and update the payment due dates based on the revised payment terms.
- e)Hold Unmatched Invoices: If set to YES in the Supplier Master, the system will hold all invoices for that supplier that are not matched to a Purchase Order (PO).
If enabled in Manage Invoice Options, the system will apply the hold to all unmatched invoices across the entire Business Unit.
- f)Enable Invoice Account Coding Workflow: This feature allows Invoice Data Entry users to complete invoices without entering account combinations at the line or distribution level. The invoice is then routed via automated workflow to designated users, who receive notifications to input the correct expense account details.
- g)Prevent Deletion of Invoice Attachments: If this option is enabled, once the invoice is approved, the system will not allow to delete any attachment for the invoice.
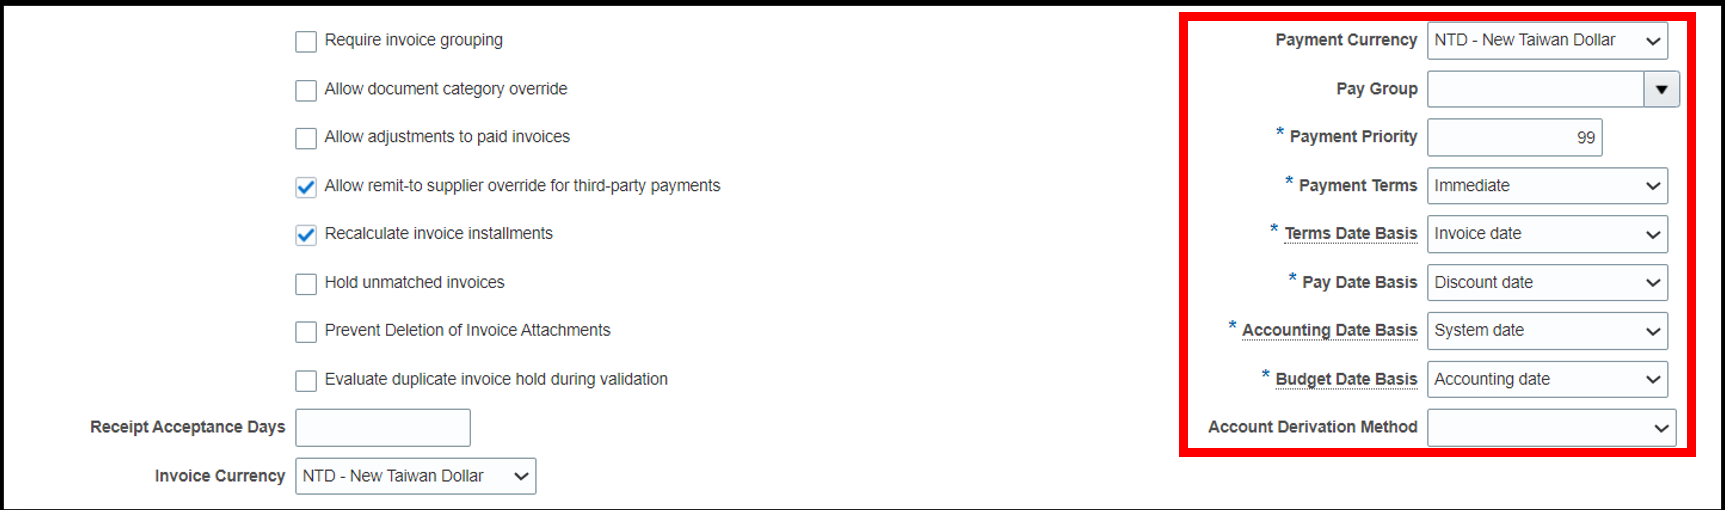
Most of the options on the right side on ‘Invoice Entry’ section of the Manage Invoice Options setup (such as Invoice Currency, Payment Currency, Pay Group, Payment Priority, Payment term etc.) are used to default the specified values on ‘Create Invoice’ screen as soon as the BU is selected.
- h)Invoice & Payment currency: It is the default currency visible on the invoice header level even before selecting the supplier for a specific BU.
- i)Pay Group: It gets reflected under the Actions -> Manage instalments which can be used as a criterion for creating PPR.
- j)Payment Terms: It is the payment tenure which is agreed between the company and the supplier. This information can be specified at the supplier master level or else if not specified.
- k)Term Date: The date from where the counting of the due date of payment will be selected.
If the Term Date Basis is set to Goods Received Date or Invoice Received Date in Manage Invoice Options, these dates must be explicitly entered on the invoice header. Without this, the system will not allow the invoice to be saved or validated. Note that for PO or GRN-matched invoices, the Goods Received Date must still be manually specified, as it is not defaulted by the system.
Next, let us understand different terms like Matching, Interest, Prepayment and Approval.
Matching

- 1.Allow Final Matching: When an invoice is received for only a partial quantity of a PO schedule, and no further quantities are expected, the user can select the option to mark the match as ‘Final Match’ during the invoice-to-PO matching process. As a result, the status of the corresponding PO schedule will change to ‘Closed’ or ‘Closed for Invoicing’.
The Allow Final Matching option in the Manage Invoice Options setup determines whether users can select ‘Final Match’ during the matching process.
- 2.Allow Matching Distribution Override: The Allow Matching Distribution Override setup option determines whether AP invoice data entry users can modify the invoice distribution account on PO-matched invoices. This option applies to invoices matched to PO schedules with the ‘Accrue at Period End’ accounting option.
For invoices matched to ‘Accrue at Receipt’, the accrual account cannot be changed, as it must match the account used during the GRN accounting. However, for invoices matched to ‘Accrue at Period End’, the Expense Account can be changed, subject to the setup option.
Quantity & Amount Tolerance: It is meant to place a hold on the invoice if it exceeds the specified quantity or amount.
Interest

- 1.Create Interest Invoice: In case we exceed the payment term with the supplier, then a new invoice covering the interest payment is being created.
Prepayment

- 1.Payment Terms: When the invoice type is changed to Prepayment during invoice entry, the payment term from the Prepayment section in Manage Invoice Options is automatically applied. For business purposes, it is recommended to set the payment term as ‘Immediate’ for prepayment invoices.
- 2.Settlement Days: The Settlement Days specified in the Manage Invoice Options setup are added to the invoice date to determine the ‘Apply After Date’ for prepayment invoices. The invoice will not be available for application on or before this date.
Approval

- 1.Enable Invoice Approval: This option will not enable the approval of the invoices. Rather there will be a need to have setup for the entire ‘Business process management engine’.
- 2.Allow Force Approval: When approval is enabled on Manage Invoice Option setup for a specific BU, all invoices entered in that BU will be subjected to workflow approval in system i.e. before getting approval as per the pre-defined approval hierarchy, invoices won’t be available for payment.
In that context, ‘Allow Force Approval’ option enables the users to bypass the regular approval workflow & manually approve the invoice so it becomes available for payment immediately.
Conclusion
In this blog, we explored and successfully completed the Manage Invoice Options setup while gaining insights into the various invoice configuration settings. In the next part of this series, we will delve into Manage Payment Options and other essential AP Invoice and Payment-related setups to enhance your Accounts Payable processes. If you have any questions, please feel free to reach out to us at [email protected].