Managing files within Oracle APEX applications often requires a reliable, scalable, and secure storage backend. Oracle Cloud Infrastructure (OCI) Object Storage is Oracle’s fully managed, enterprise-grade object store that integrates seamlessly with Oracle APEX without requiring any middleware layer.
This guide walks you through two of the most common file management operations in enterprise Oracle APEX applications:
- Uploading files from an APEX page directly to an OCI Object Storage bucket using Pre-Authenticated Request (PAR) URLs and PL/SQL page processes.
- Deleting files from OCI using IAM-signed API calls via APEX Web Credentials and OCI Native Authentication.
By the end of this guide, your Oracle APEX application will be able to accept file uploads from end users, store them securely in OCI Object Storage, track metadata in a relational table, and support deletion from PL/SQL, with no external middleware.
Prerequisites: An active OCI tenancy, an Oracle APEX workspace (version 22.x or higher), and DBA-level access to create database tables and page processes.
Architecture Overview
Before diving into configuration, it helps to understand how the components interact. This solution orchestrates two distinct flows for upload and deletes, entirely within the Oracle stack.
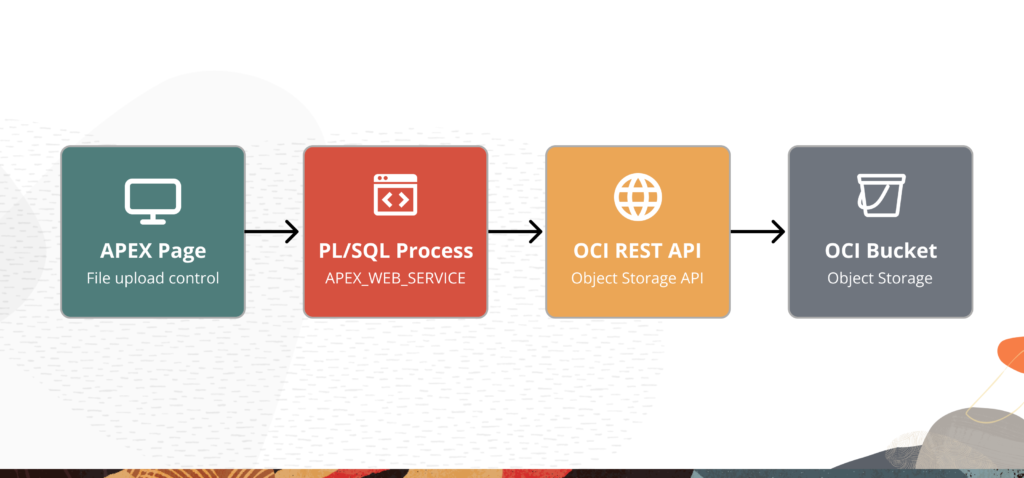
The upload flow uses a Pre-Authenticated Request (PAR) URL — a time-limited, unauthenticated endpoint making it ideal for APEX page processes where you want simplicity without managing IAM headers. The delete flow, by contrast, uses OCI Native Credential authentication, which signs each request with your RSA private key for secure, auditable deletion.
Part 1 — Setting Up the APEX Upload Page
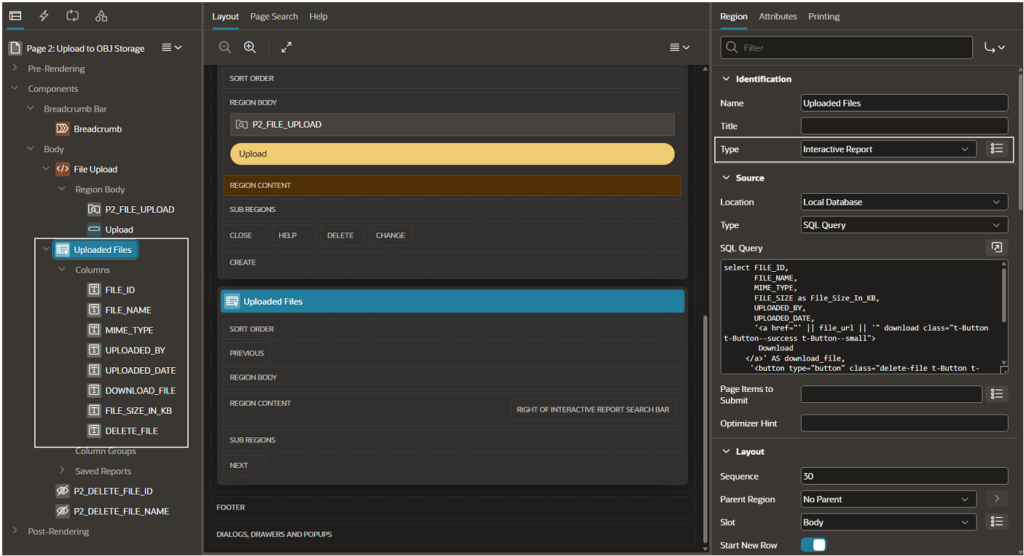
Begin by creating a dedicated APEX page that hosts the file upload control, a trigger button, and a report of previously uploaded files.
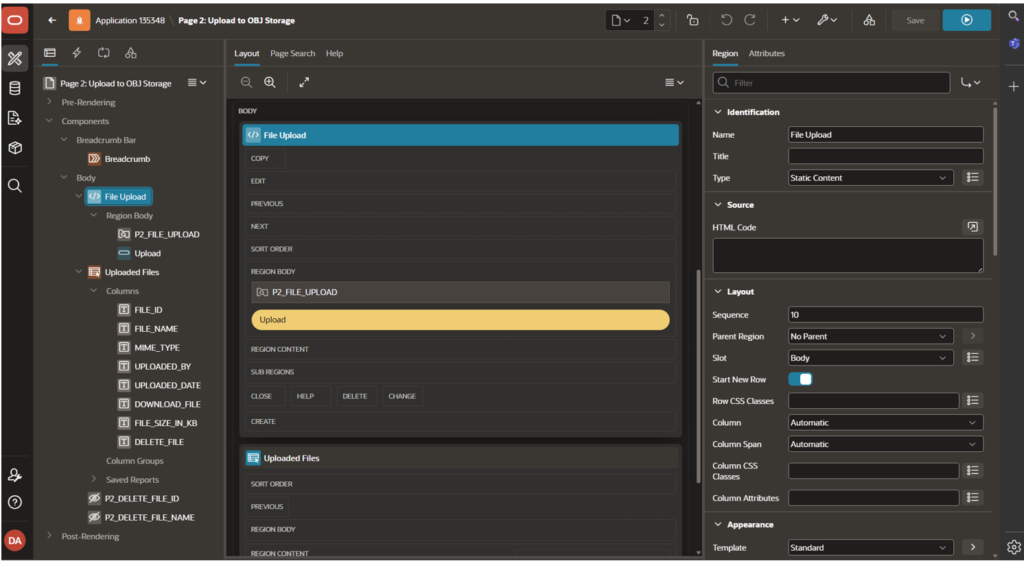
Step 1 — Create a new APEX Page
In Application Builder, create a new blank page. Add a File Browse item — for example, P2_FILE_UPLOAD and a Submit / Upload button. Set the button’s action to Submit Page so it triggers the server-side page process you will create in Section 3.
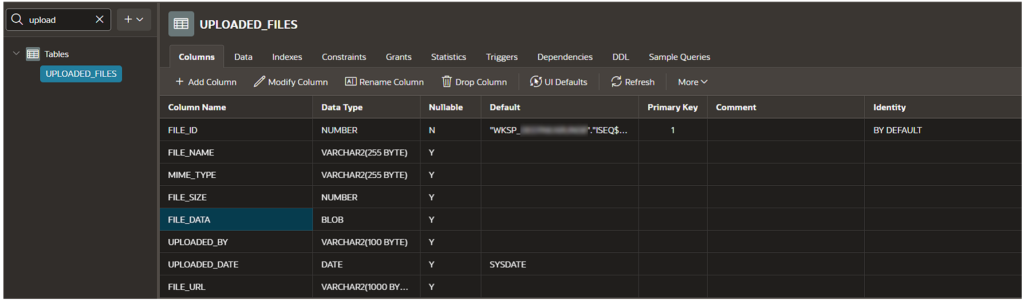
Step 2 — Create the UPLOADED_FILES tracking table
Use the SQL Workshop Object Browser to create a table that records file metadata after each successful upload. The table should include columns for the file name, OCI object URL, MIME type, the uploading user, and file size.
Using a relational tracking table decouples your APEX application from OCI. You can display, search, and delete files via SQL without making API calls for every read operation.
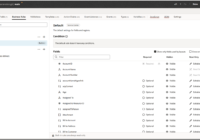
Step 3 — Add an Interactive Report
Use the SQL Workshop Object Browser to create a table that records file metadata after each successful upload. The table should include columns for the file name, OCI object URL, MIME type, the uploading user, and file size.
Part 2 — Configuring the OCI Object Storage Bucket
Before writing any PL/SQL, configure the OCI side: create a named bucket and generate a Pre-Authenticated Request (PAR) URL that APEX will use for PUT operations without IAM signature headers.
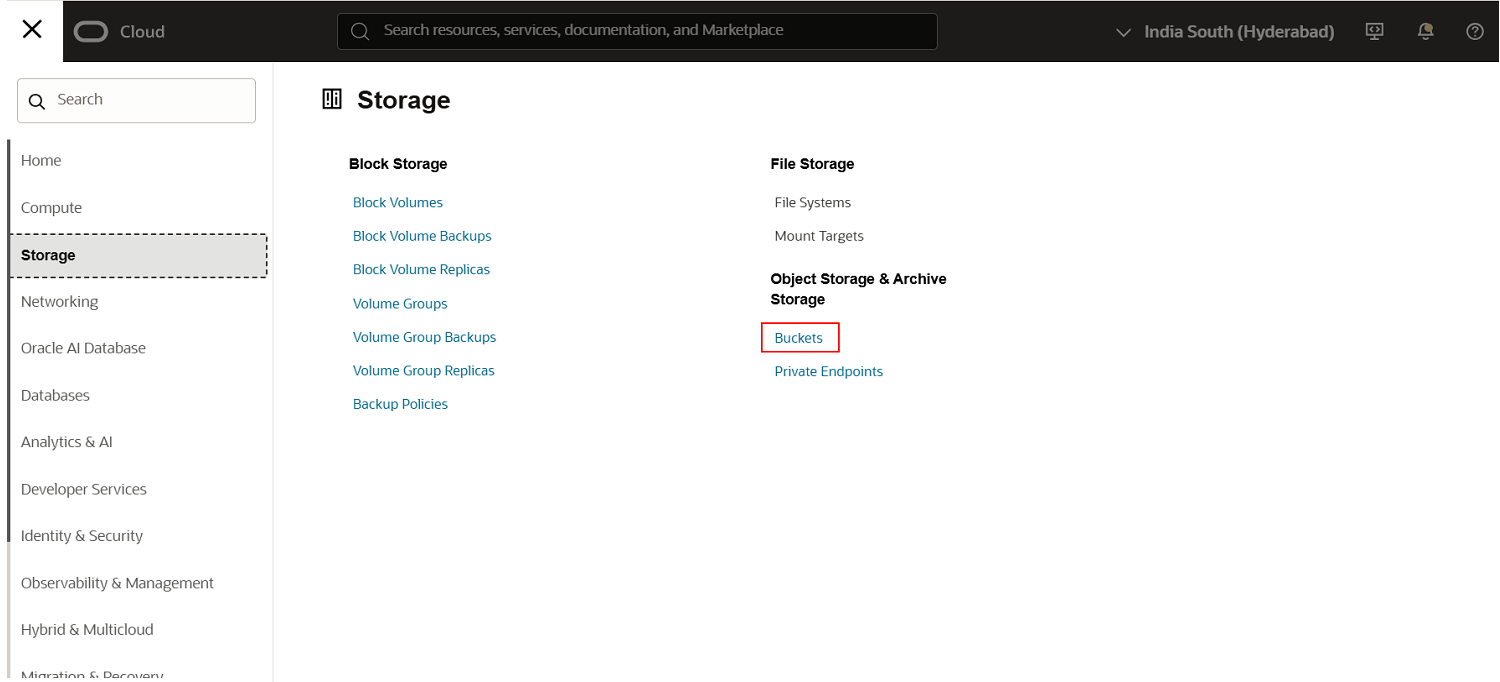
Step 1 — Log in to the OCI Console
Navigate to Storage → Object Storage → Buckets in the OCI Console sidebar.
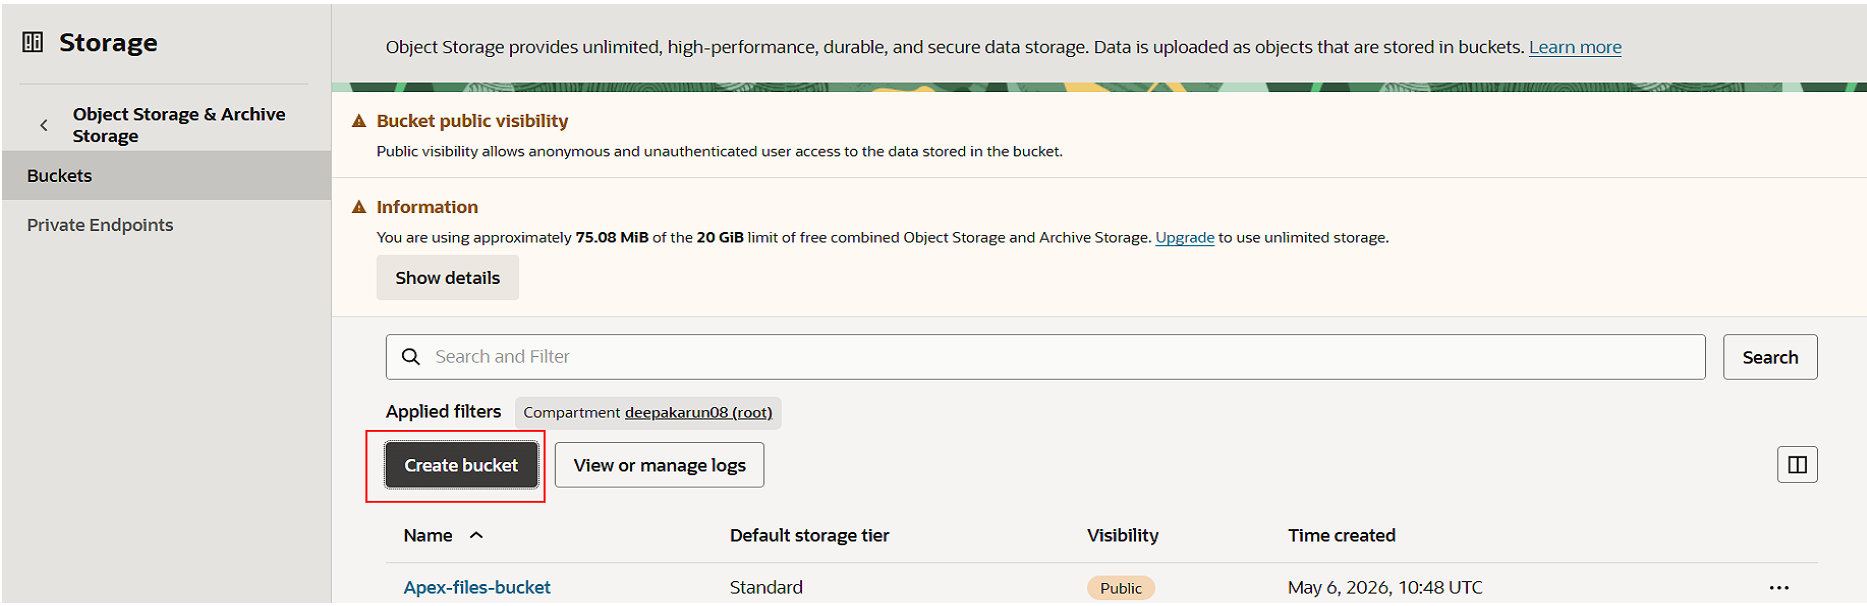
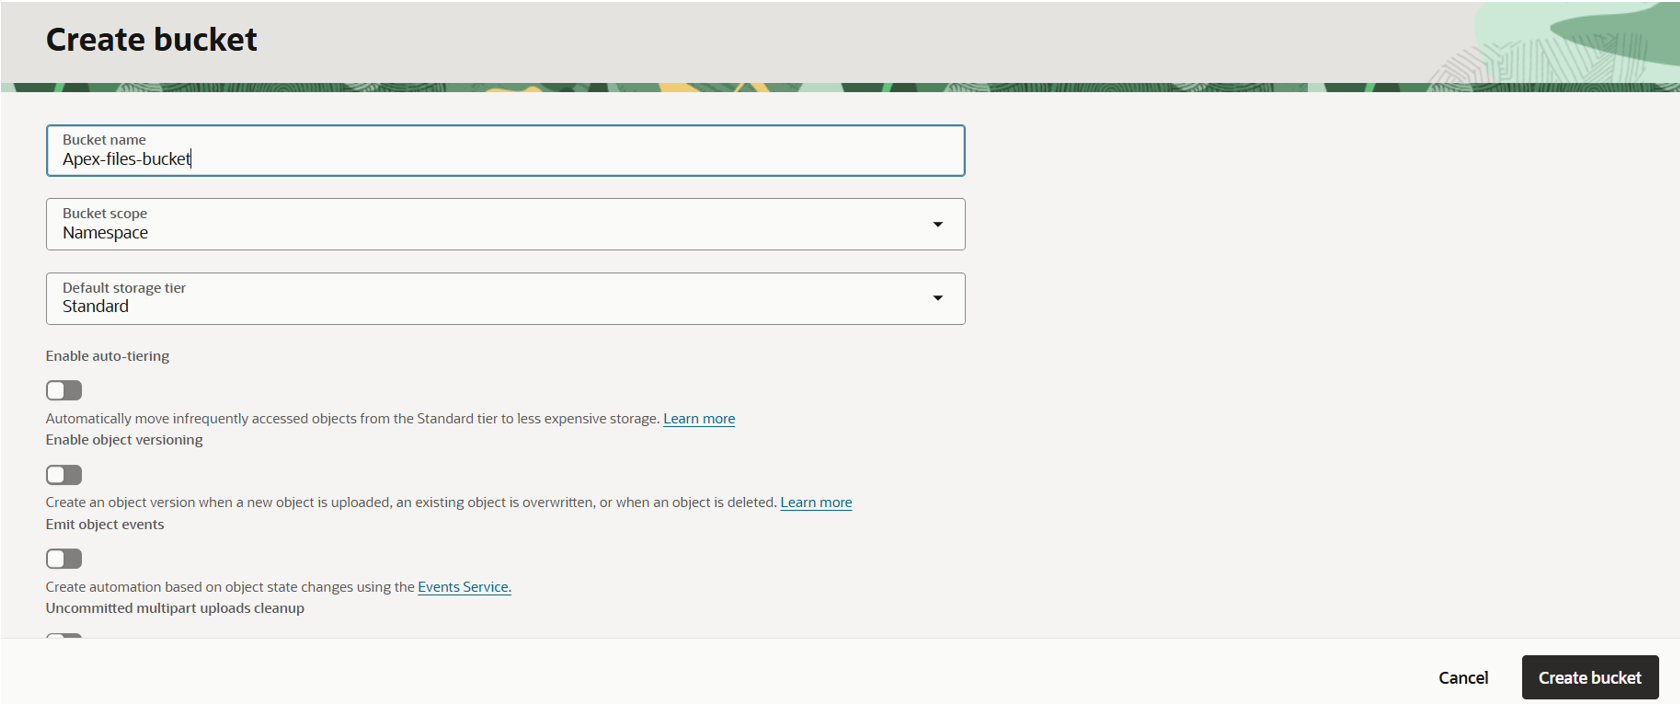
Step 2 — Create a Bucket
Click Create Bucket. Provide a descriptive name — for example, Apex-files-bucket — and confirm the default settings (Standard storage tier is sufficient for most APEX use cases).
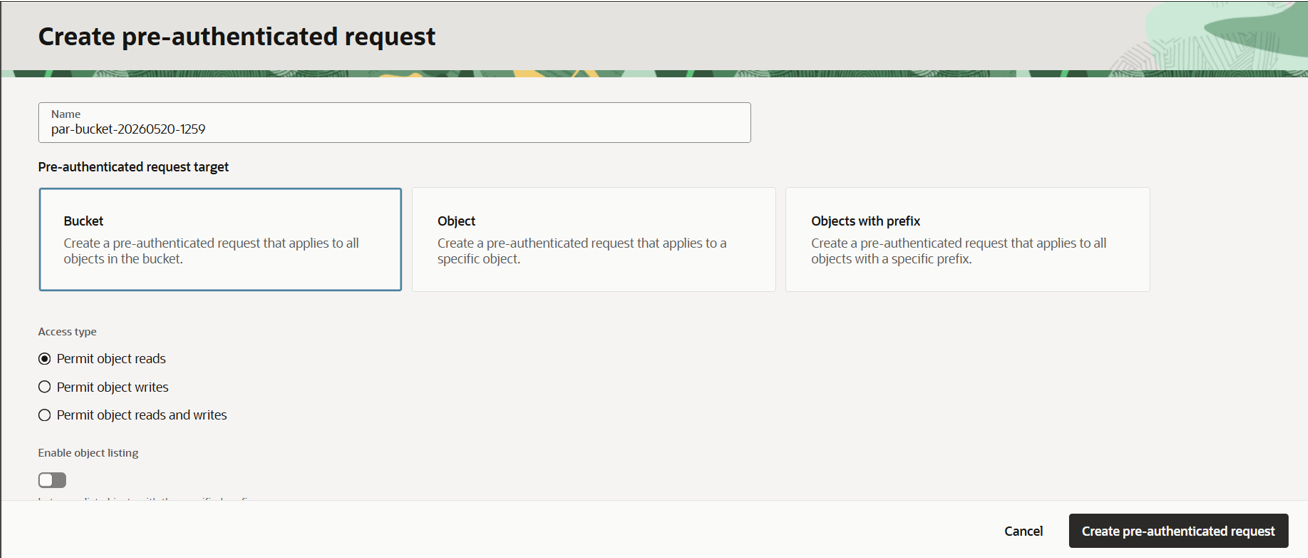
Step 3 — Generate a Pre-Authenticated Request (PAR) URL
Inside the bucket, open the Management tab. Navigate to Pre-Authenticated Requests → Create. Select Object-level access (allows PUT for a specific prefix or the entire bucket). Copy the generated URL immediately.
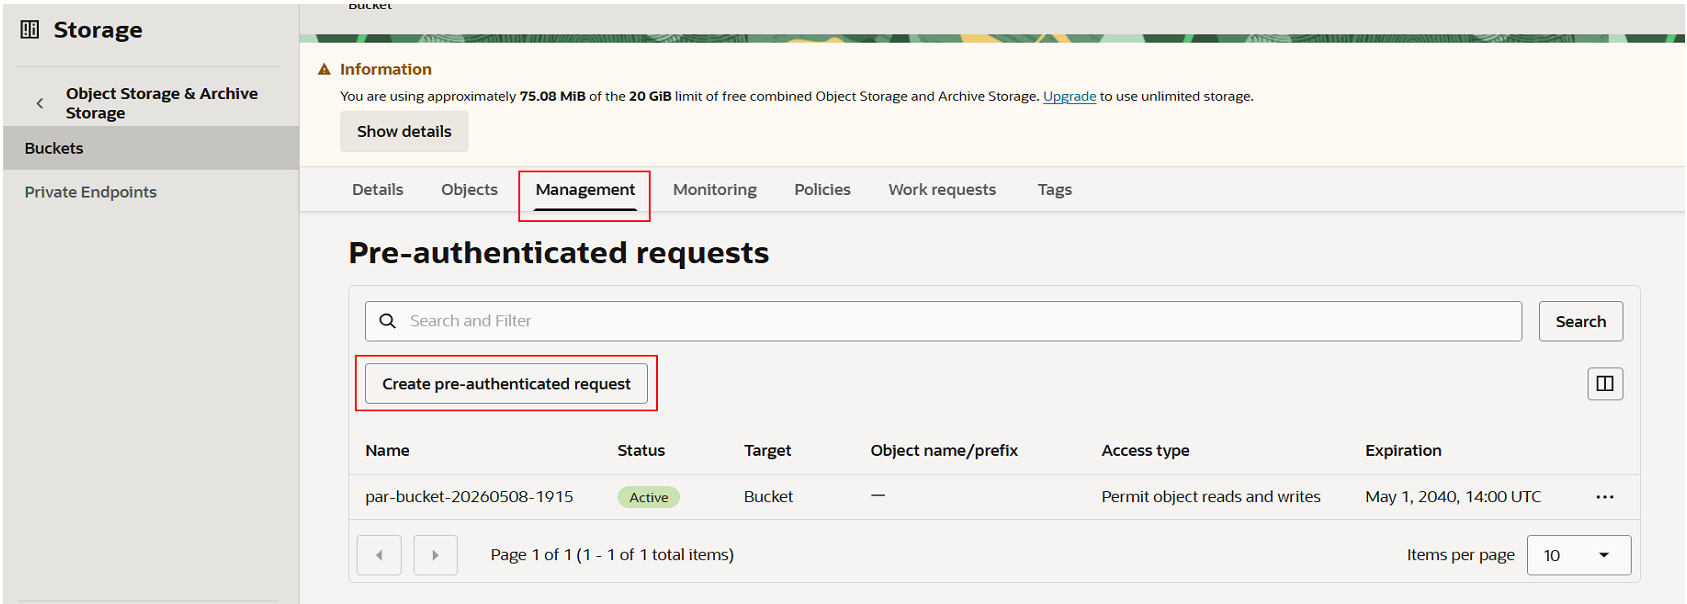
The PAR URL is displayed only once. Store it securely — this URL forms the base endpoint for all upload requests. Anyone with this URL can PUT objects into your bucket during its validity period, so treat it as a secret and set a sensible expiry.
Part 3 — Page Process: Uploading a File via PL/SQL
Create an After Submit page process on your APEX page, named for example upload, and wire it to the Upload button’s When Button Pressed condition. This process reads the file from APEX’s temporary file table, issues an HTTP PUT to OCI, then records the file metadata in your tracking table.
PL/SQL · Upload Page Process
l_url VARCHAR2(4000);
l_blob BLOB;
l_mine_type VARCHAR2(50);
l_file_size NUMBER;
l_filename VARCHAR2(255);
l_response CLOB;
BEGIN
— Read file from APEX temp table
SELECT blob_content, filename, mime_type,
DBMS_LOB.GETLENGTH(blob_content)
INTO l_blob, l_filename, l_mine_type, l_file_size
FROM apex_application_temp_files
WHERE name = :P2_FILE_UPLOAD; — Sanitise filename (replace spaces with underscores)
l_filename := REPLACE(l_filename, ‘ ‘, ‘_’); — Build OCI Pre-Authenticated Request URL
l_url := ‘https://objectstorage.ap-hyderabad-1.oraclecloud.com’
|| ‘/p/<your-PAR-token>’
|| ‘/n/ax7mnbdbrqku’
|| ‘/b/Apex-files-bucket/o/’
|| l_filename; — Set Content-Type header
apex_web_service.g_request_headers.delete;
apex_web_service.g_request_headers(1).name := ‘Content-Type’;
apex_web_service.g_request_headers(1).value := ‘application/octet-stream’; — PUT object to OCI Object Storage
l_response := apex_web_service.make_rest_request(
p_url => l_url,
p_http_method => ‘PUT’,
p_body_blob => l_blob); — Insert metadata into tracking table
INSERT INTO uploaded_files (file_name, file_url, mime_type, uploaded_by, file_size)
VALUES (l_filename, l_url, l_mine_type, :APP_USER, ROUND(l_file_size / 1024)); — Remove temp file
DELETE FROM apex_application_temp_files WHERE name = :P2_FILE_UPLOAD;
END;
How It Works?
The process follows four logical steps:
- Read binary content and metadata from apex_application_temp_files using the page item name as the lookup key.
- Sanitise the filename by replacing spaces with underscores — this prevents URL-encoding issues when the filename is appended to the PAR URL.
- Construct the full OCI endpoint URL by concatenating the namespace, bucket name, and sanitised filename to the PAR base URL, then issue an HTTP PUT via apex_web_service.make_rest_request.
- On success, insert a metadata record into UPLOADED_FILES and delete the temporary APEX file to keep the temp table clean.
Setting the Content-Type header to application/octet-stream ensures OCI accepts any file type without content negotiation errors.
Part 4 — Generating Auth Keys and Configuring Web Credentials
Unlike PAR-based uploads, OCI’s delete API requires proper IAM signature authentication. You need an RSA key pair and an APEX Web Credential that securely stores your OCI identity for server-to-server calls.
Generate an RSA Key Pair
Run the following commands on any machine with OpenSSL installed:
Generate RSA Key Pair
$ openssl genrsa -out oci_api_key_rsa.pem 2048# Verify: first line should read —–BEGIN RSA PRIVATE KEY—–
$ head -1 oci_api_key_rsa.pem# Derive the matching public key
$ openssl rsa -pubout -in oci_api_key_rsa.pem -out oci_api_key_public.pem# Output the public key (paste this into OCI Console)
$ cat oci_api_key_public.pem
The private key file (oci_api_key_rsa.pem) must remain on your server or be stored in a secure vault — it must never be shared or committed to source control. Only the public key is uploaded to OCI.
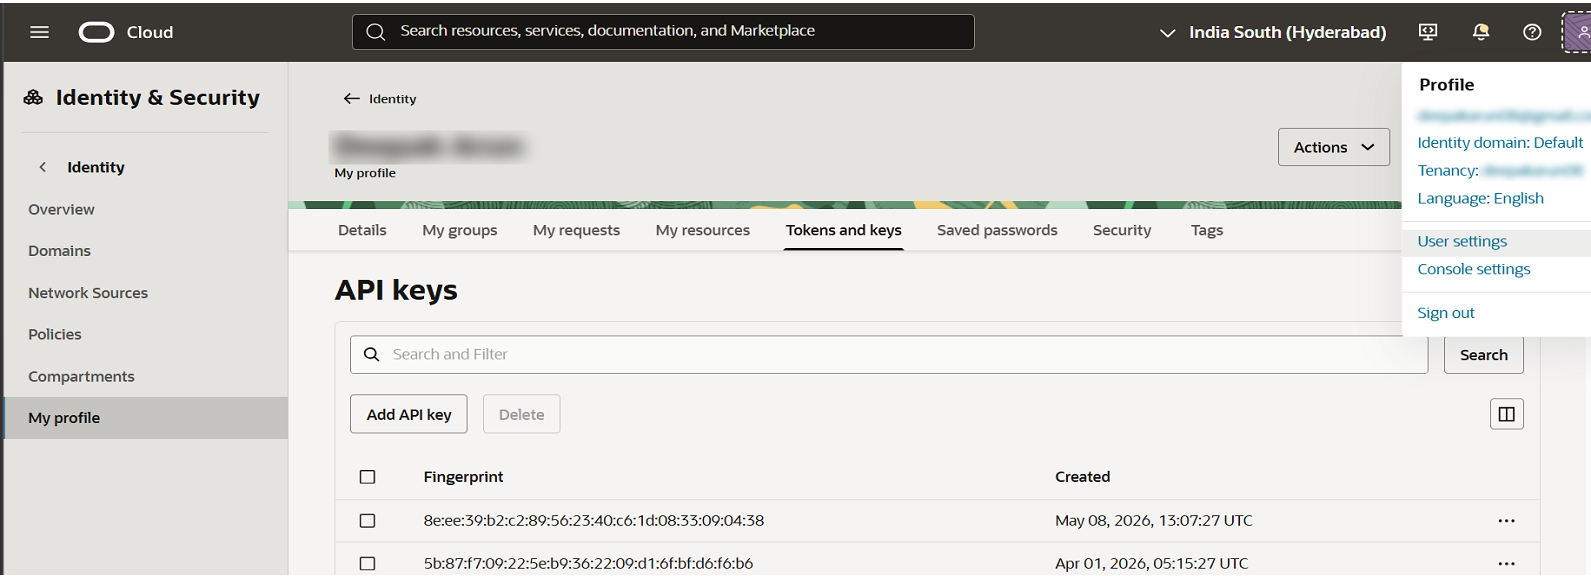
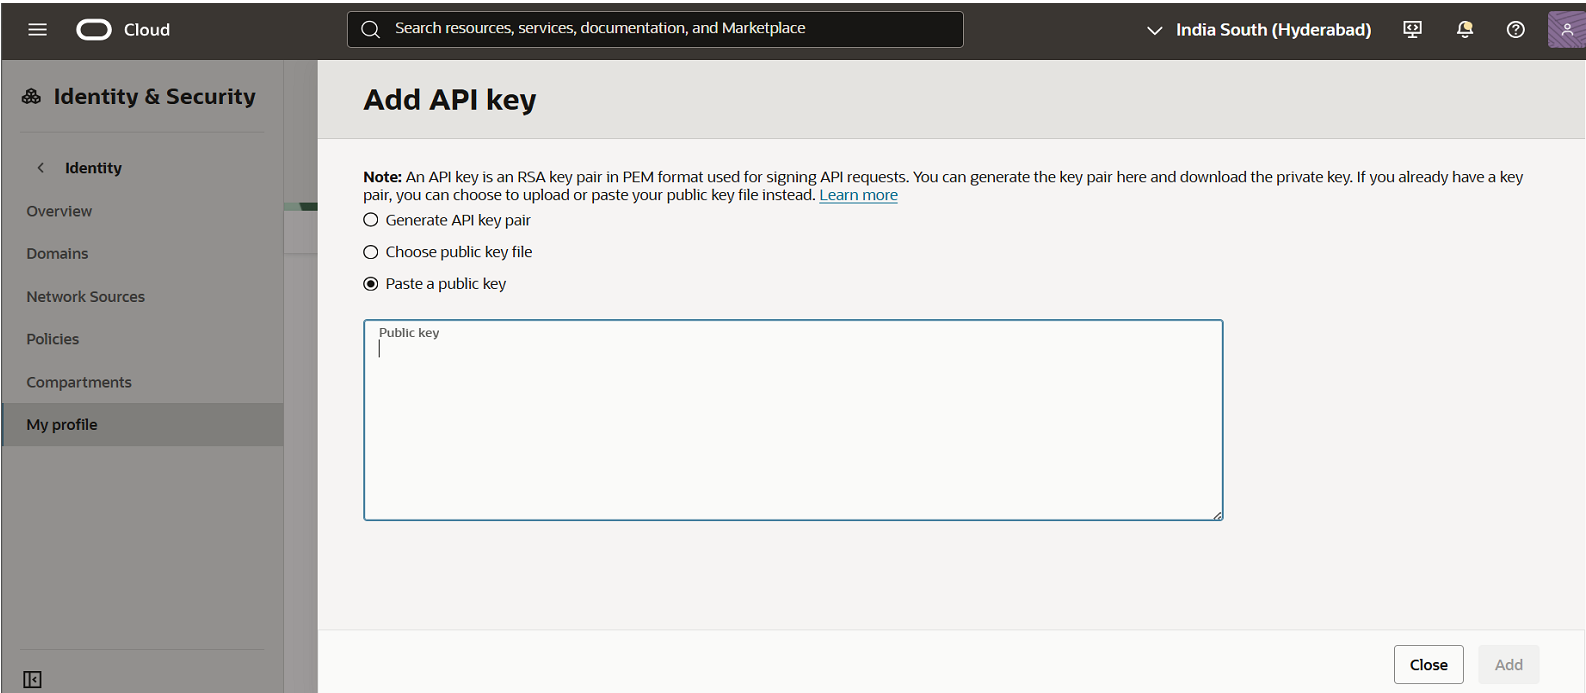
Add the Public Key to OCI
- Open User Settings in the OCI Console: navigate to your avatar menu → User Settings → Tokens & Keys → Add API Key.

- Paste the content of oci_api_key_public.pem into the dialog. OCI will generate a Fingerprint — keep this value, as you will need it when configuring the APEX Web Credential.

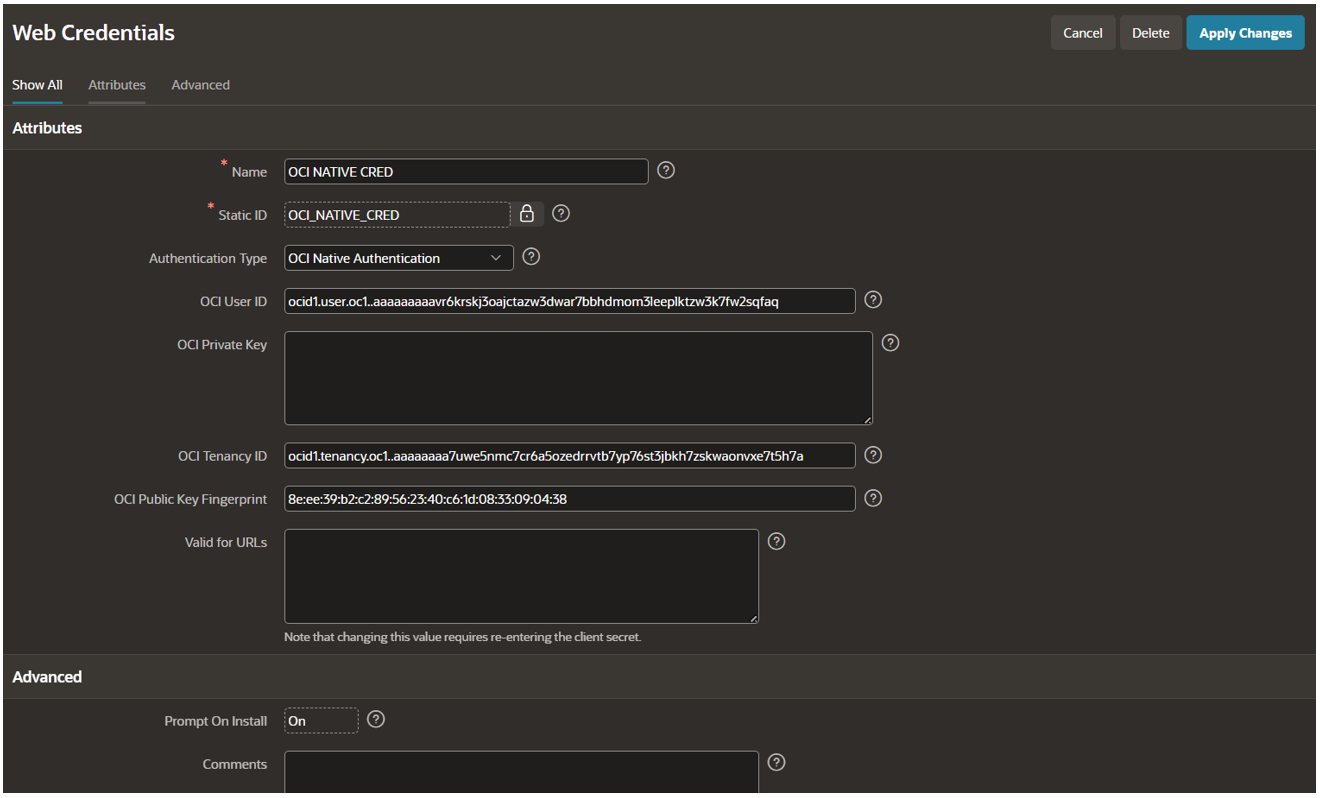
Create the APEX Web Credential
- In APEX, go to Workspace Utilities → Web Credentials → Create.
- Select credential type OCI Native Credential and enter your Tenancy OCID, User OCID, the private key content, and the fingerprint from the previous step.
- Name the credential OCI_NATIVE_CRED — this static ID is referenced directly in the delete PL/SQL code.
Security note: Keep oci_api_key_rsa.pem private — never commit it to source control. Store it in an OCI Vault or a secrets manager in production environments. Only the public key is uploaded to OCI.
Part 5 — Wiring the Delete Dynamic Action
With authentication configured, connect the Interactive Report’s delete link to a Dynamic Action that captures the file’s tracking ID and object name, then calls the server-side AJAX process.
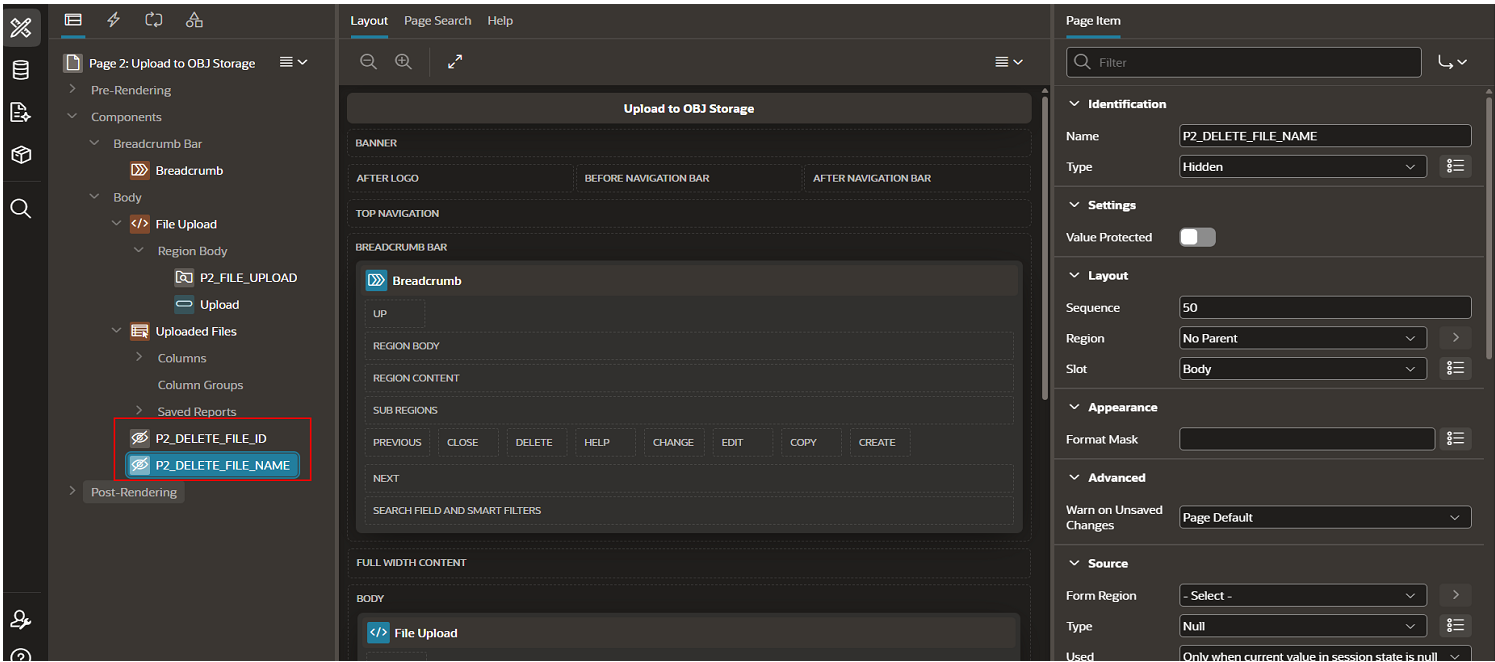
Step 1 — Add Hidden Page Items
Create two hidden items on your page: P2_DELETE_FILE_ID (to carry the tracking table primary key) and P2_DELETE_FILE_NAME (to carry the OCI object name for constructing the delete URL).
Step 2 — Create the Dynamic Action
Set the event to Click on the delete link column in the Interactive Report. In the True Action, choose Execute JavaScript Code. The JavaScript should populate the two hidden items from the report row’s data attributes, then invoke the AJAX callback:
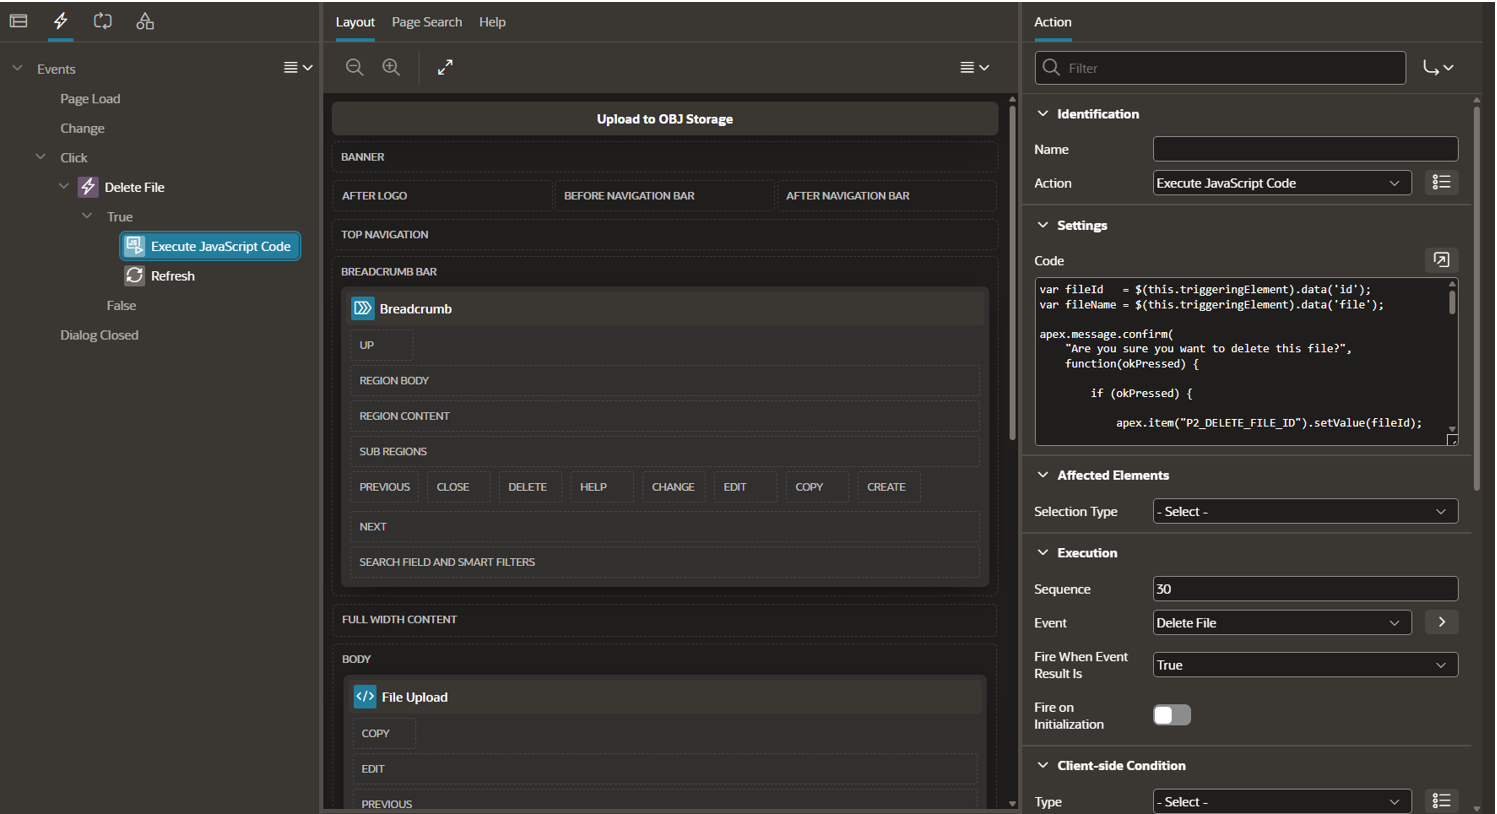
Delete File – APEX Server Process
‘DELETE_FILE’,
{ pageItems: ‘#P2_DELETE_FILE_ID,#P2_DELETE_FILE_NAME’ },
{
success: function(data) {
if (data.status === ‘success’) {
// Refresh the Interactive Report to reflect the deletion
apex.region(‘interactive-report-id’).refresh();
} else {
apex.message.showErrors([{ type: ‘error’, message: data.message }]);
}
}
}
);
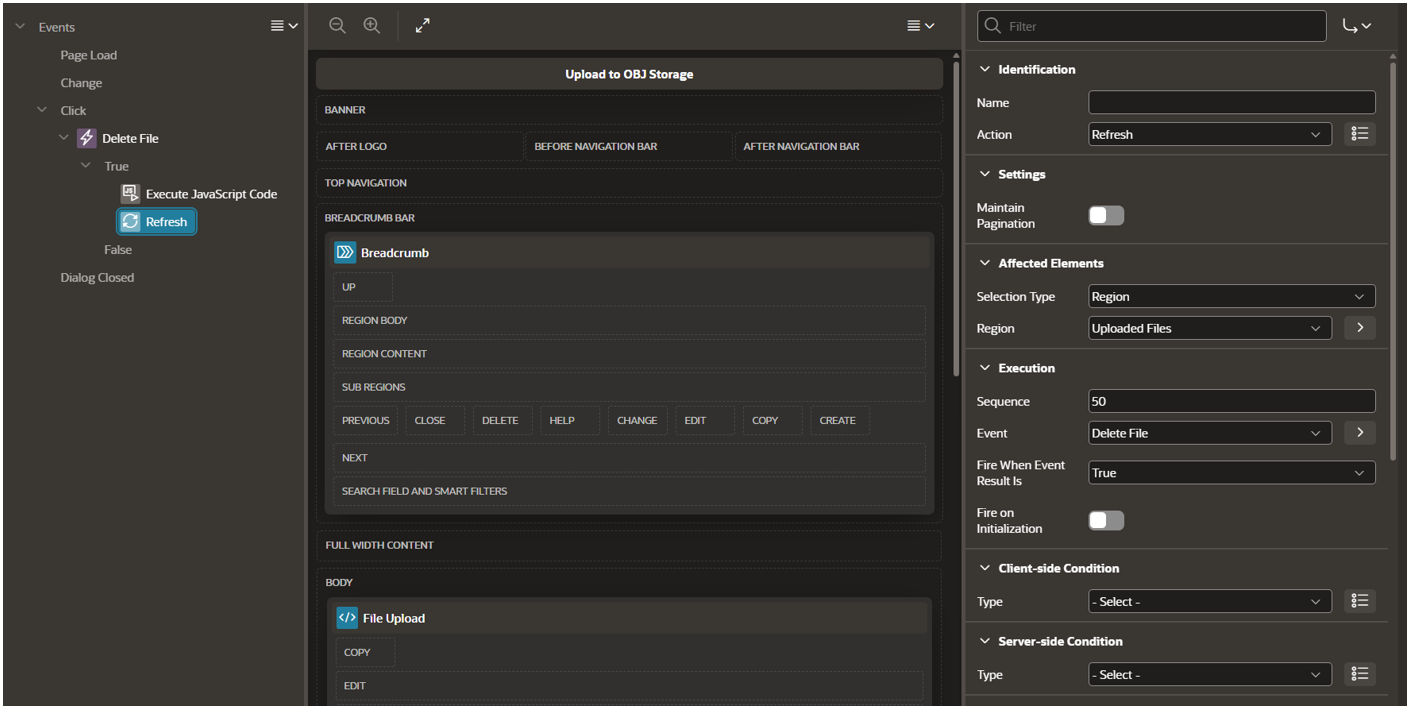
Step 3 — Refresh the Report on Success
In the JavaScript success callback, check data.status === ‘success’ and trigger an APEX region refresh on the Interactive Report. This keeps the displayed file list in sync with OCI without a full page reload.
Part 6 — AJAX Callback: Deleting a File from OCI
Create an AJAX Callback page process named DELETE_FILE. This process issues an authenticated HTTP DELETE to OCI Object Storage using the stored OCI Native Credential, removes the metadata record from the tracking table, and returns a JSON status to the calling Dynamic Action.
PL/SQL · AJAX Callback – Delete Process
l_base_url VARCHAR2(4000);
l_url VARCHAR2(4000);
l_response CLOB;
BEGIN
— OCI Object Storage endpoint
l_base_url := ‘https://objectstorage.ap-hyderabad-1.oraclecloud.com’
|| ‘/n/ax7mnbdbrqku’
|| ‘/b/Apex-files-bucket/o/’; — Append filename to form the full object URL
l_url := l_base_url || :P2_DELETE_FILE_NAME; — Issue HTTP DELETE using OCI Native Credential
l_response := apex_web_service.make_rest_request(
p_url => l_url,
p_http_method => ‘DELETE’,
p_credential_static_id => ‘OCI_NATIVE_CRED’); IF apex_web_service.g_status_code = 204 THEN
— Object deleted — remove tracking record
DELETE FROM uploaded_files WHERE file_id = :P2_DELETE_FILE_ID;
apex_json.open_object;
apex_json.write(‘status’, ‘success’);
apex_json.write(‘message’, ‘File deleted successfully.’);
apex_json.close_object;
ELSE
— Surface error details to the caller
apex_json.open_object;
apex_json.write(‘status’, ‘error’);
apex_json.write(‘message’, ‘STATUS=’ || apex_web_service.g_status_code
|| ‘ RESPONSE=’ || DBMS_LOB.SUBSTR(l_response, 4000, 1)
|| ‘ URL=’ || l_url);
apex_json.close_object;
END IF;
EXCEPTION
WHEN OTHERS THEN
apex_json.open_object;
apex_json.write(‘status’, ‘error’);
apex_json.write(‘message’, SQLERRM);
apex_json.close_object;
END;
Response Handling
| HTTP 204 No Content | OCI confirms the object was deleted. The process removes the corresponding row from UPLOADED_FILES and returns {“status”:”success”} to the Dynamic Action. |
| 4xx / 5xx Error | The OCI status code, raw response body, and target URL are packaged into a JSON error payload and returned to the caller for display — making it straightforward to diagnose authentication or URL issues. |
Conclusion
You have now built a fully functional file management integration between Oracle APEX and OCI Object Storage with no middleware, no external dependencies, and no third-party services. The entire solution runs within the Oracle Cloud ecosystem, making it ideal for organisations that operate within OCI tenancies and need to maintain data sovereignty.
This pattern is extensible as you can adapt the same approach to implement file downloads (via signed GET requests), bulk deletion, folder-style prefix filtering, or file version management. The combination of APEX_WEB_SERVICE, OCI Object Storage APIs, and OCI Native Credentials gives you the full surface area of OCI file operations from pure PL/SQL. If you have any questions or concern, kindly reach out to us on [email protected].