In this blog, we will discuss how to capture real-time business events using external web service in Oracle Transportation Management (OTM). So, let’s begin.
Step 1: Login to the OTM cloud with ‘ADMIN’ user role assignment.
Env Url: https://<host url>/GC3/
Credentials: username/password
User Role: ADMIN

Step 2: Navigate to Home screen and search for ‘Web Services’ as shown below:

Step 3: In the next page, click on “New” as shown in the image below:

Step 4: On the new page, click on the ‘+’ symbol and go to the next window.

Step 5: A new window will open, then click on “Document Detail” as shown below:

Step 6: On next page, enter below details:
a) ID: <enter the Document ID/name>
b) Domain Name: From the dropdown, select the domain
Also Read: Choosing Between Service Data Provider (SDP) and Array Data Provider (ADP) in Oracle VBCS
c) Storage: From the dropdown, select ‘Secure URL’
d) URL: Enter the wsdl URL of the external web service which will receive the request.

Once all the details are entered, click on ‘Finished’. It will close the current window and return back to the main window page.
Step 7: In the main page, click on “Service Details” as shown below:

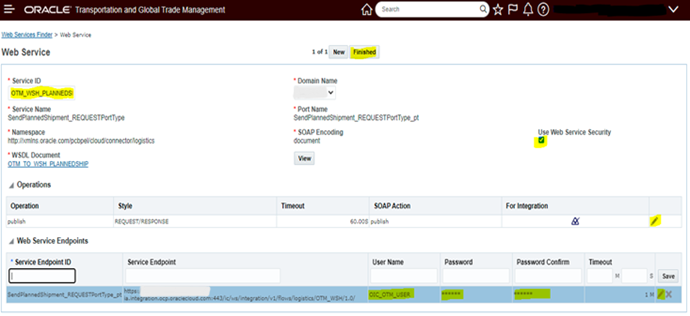
Step 8: On the next page, enter below details:
- a) Service ID: <Name of the webservice>
- b) Select the checkbox ‘Use Web Service Security’
- c) You can increase/decrease the timeout time for the web service by clicking on the ‘edit’ symbol in the ‘Operations’ section.
- d)Also as the web service is secured, you can enter the credentials for the same by clicking on the edit symbol in the ‘Web Service Endpoints’ section. After entering the credentials, click on ‘Save’. After saving the details, click on ‘Finished’.
Step 9: Once the Web service is created, go to ‘home’ and search for ‘External Systems’ and click on it:

Step 10: On the next page, click on ‘New’ as shown in the image below:

Step 11: On the next page, enter below details:
- a) External System Id: <Name of the external system>
- b) Description: <Description for the external system purpose>
- c)Target Namespace: From the dropdown select ‘Current’ or ‘Version prior to 6.4.2’ (if webservice wsdl is having schema to older version of OTM)
- d) Transport Through Data Stream: Select the checkbox
- e) Socket Timeout: Increase/Decrease as per the env
- f) Content Type: text/xml
- g) In ‘For HTTP/HTTPS’ section, select the checkbox ‘Read Response Code’ and select ‘POST’ from the dropdown of ‘HTTP Method’.
- h) In ‘Web Service’ section, select the web service created earlier and then select the ‘Service Operation’ and ‘Service Endpoint’.


i) In ‘Out XML Profiles’ section,
- Select the ‘Out XML Profile ID’ by clicking on Search.
- In the next window, click on ‘Search’.
- Select the ‘Out XML Profiles’ and click on ‘Finish’.


- Select the ‘XML Element ID’ from the dropdown based on the callback process. Then, click on ‘Save’.


- Click on ‘Finished’.

Step 12: Now we have to automate the process so that whenever a particular event is completed, it should trigger the external web service.
For this automation, you can follow the below steps:
a) Go to Home and search ‘Automation Agent’.

b) On the next page, click on ‘New’.

c) Next, in the ‘Agent Header’ tab, enter the below details:
- Agent ID: <Provide Agent Name for Identification e.g. HZN_ORDER_RELEASE_RESPONSE>
- Agent Type: From dropdown select the Agent Type e.g. ‘ORDER RELEASE’

- In the ‘Agent Events’ section, search for ‘Event’ by clicking on the search icon. On the new window, click on ‘Search’.

- On the next window, select the correct Agent Event e.g. for Order Release Async Response select ‘Order-Created’. In case you are not able to see all the events, then on the top right corner click on ‘All’ which will show all the Agent Events listed. After selecting the event click on ‘Finish’.

- Select the ‘Restrictions’ for this particular event (In our case it will be ‘INTEGRATION’) by clicking on the highlighted symbol:

- Click on ‘Save’.

d) Now click on the ‘View/Enter Actions’ as shown below:

- On the next page, click on ‘Add Action’.

- Next, select ‘Data Type Association’.

- Select ‘Action’ from the dropdown:
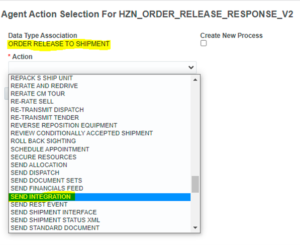
- Select ‘Notify Method’ as ‘Service’ and then select ‘External System’.

- Once you click on ‘Save’, it will show you the below window.

e) Next, configure ‘Error Handler’ by clicking on the highlighted tab.

- Then, click on ‘Add Action’ in the next window.

- On the next page, select ‘Data Type Association’ from the dropdown. Then select the ‘Action’ from the dropdown.

- Choose the ‘Contact’ who should receive a notification, in case of failure and select the ‘Communication Method’ as Email. Next, set the ‘Subject’ for Email.

- Click on ‘Save’ to get the below:

f) Click on ‘Finished’.


g) Now go back to the ‘Automation Agent’ page and see if the ‘Agent’ created above is activated or not.

- h) If the agent is ‘Active’ then no further action is required. But if it is not activated as shown above, then we need to select the ‘Agent’ and then Activate it by clicking on ‘Actions’ shown in above screenshot.

i) Next, you can refresh the page and check if ‘Agent’ is activated or not.

- j) Now, whenever an event with a particular status is completed, it will trigger the web service configured in the External System automatically.
If you have any questions or concerns, please let us know in the comments section or reach out to us on [email protected].


