In this blog, we will discuss how to apply Hold on Duplicate invoices with the help of REST API in Oracle Integration Cloud. But first, let us check the prerequisites needed to perform the hold on duplicate invoices.
Prerequisites:
- ERP Cloud instance access and BI developer role (BI Author role) to create BIP report.
- OIC instance access with User having Service Developer role, Service Monitor, Service invoker role.
- Accounts payable manager role in ERP cloud instance for invoice creation.
Note* Before creating integration, HOLD NAME needs to be created in Fusion ERP (ex: Duplicate invoices)
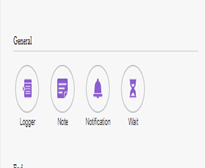
Solution: It’s divided into 4 Parts
- Create BIP report for fetching invoice data from fusion.
- Create tables and PLSQL Procedure
- Create REST, SOAP and DB Adapter connections to be used in OIC integration
- Create an OIC integration for applying hold on duplicate invoices.
Step1: Login to ERP cloud instance and navigate to report and analytics through tool.
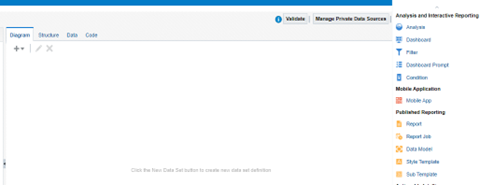
Tool -> report and analytics -> catalog -> create ->Data model.
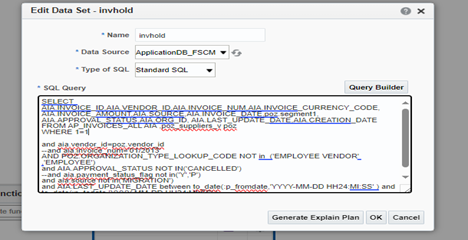
SAMPLE QUERY
SELECT AIA.INVOICE_ID,AIA.VENDOR_ID,AIA.INVOICE_NUM,AIA.INVOICE_CURRENCY_CODE,
AIA.INVOICE_AMOUNT,AIA.SOURCE,AIA.INVOICE_DATE,poz.segment1,
AIA.APPROVAL_STATUS,AIA.ORG_ID, AIA.LAST_UPDATE_DATE,AIA.CREATION_DATE
FROM AP_INVOICES_ALL AIA ,poz_suppliers_v poz
WHERE 1=1
and aia.vendor_id=poz.vendor_id
–and aia.invoice_num=’01/2013′
AND POZ.ORGANIZATION_TYPE_LOOKUP_CODE NOT in (‘EMPLOYEE VENDOR’ ,’EMPLOYEE’)
and AIA.APPROVAL_STATUS NOT IN(‘CANCELLED’)
–and aia.payment_status_flag not in(‘Y’,’P’)
and aia.source not in(‘MIGRATION’)
and AIA.LAST_UPDATE_DATE between to_date(:p_fromdate,’YYYY-MM-DD HH24:MI:SS’ ) and to_date(:p_todate,’YYYY-MM-DD HH24:MI:SS’ )
Also Read: Invoice Creation and Payment Processing
STEP 2: Save the data model and create a report in csv format.
Before report creation, save the output of data model in ‘save as sample data’, then click on create report.
Create report->browse data model->next->select layout->Next
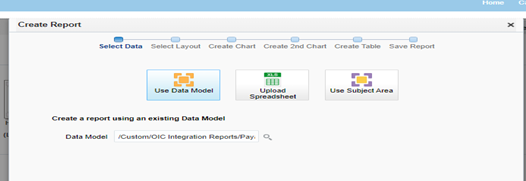
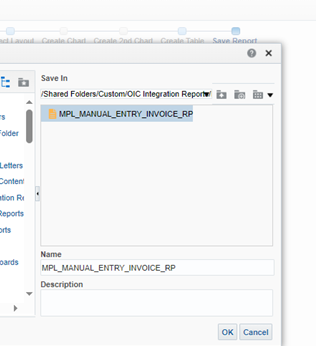
Provide the report name and save it in Custom folder inside shared folder.
STEP3: Report has been created, now click on view a list.
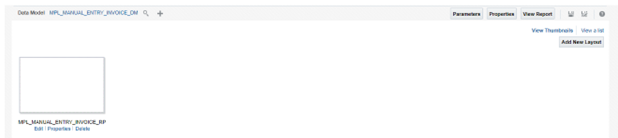
Select Output Formats and Default format as DATA CSV and save the report.
Download the Report in csv format, which will be required as sample report while creating OIC integration.

PART2: Create tables and PLSQL Procedure
We will create a table in database for inserting data from BIP report and then will create a PLSQL asynchronous procedure for checking if the data is duplicate after comparing from other tables where invoice has been already created.
Sample table:
CREATE TABLE MPL_MANUAL_ENTRY_INVOICE_TL
( “INVOICE_ID” NUMBER,
“VENDOR_ID” NUMBER,
“INVOICE_NUM” VARCHAR2(500 BYTE),
“INVOICE_CURRENCY_CODE” VARCHAR2(50 BYTE),
“SOURCE” VARCHAR2(100 BYTE),
“INVOICE_AMOUNT” NUMBER(5,2),
“INVOICE_DATE” DATE,
“APPROVAL_STATUS” VARCHAR2(200 BYTE),
“ORG_ID” NUMBER,
“LAST_UPDATE_DATE” DATE,
“CREATION_DATE” DATE,
“IS_DUPLICATE” VARCHAR2(200 BYTE),
“INTEGRATION_RUN_ID” VARCHAR2(200 BYTE),
“ERROR_MSG” VARCHAR2(500 BYTE)
);

PART 3: Create REST, SOAP and DB adapter connections to be used in OIC integration.
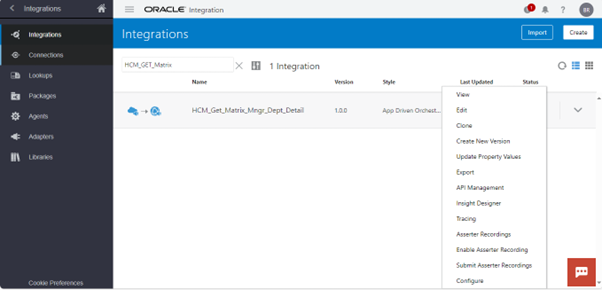
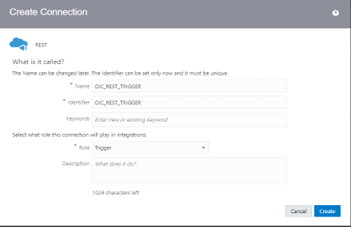
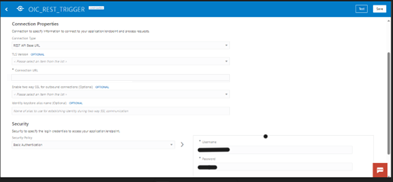
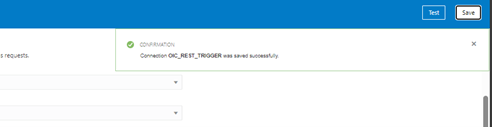
STEP1: Create REST connection as Trigger which we will be going to use for creation of triggered orchestration.
NAVIGATOR->INTEGRATIONS->CONNECTIONS->CREATE->REST->SELECT
Provide the required details such Name, role and click on create tab, in connection properties page add connection type, connection URL and provide Authentication with username and password.
Then test and save the connection.
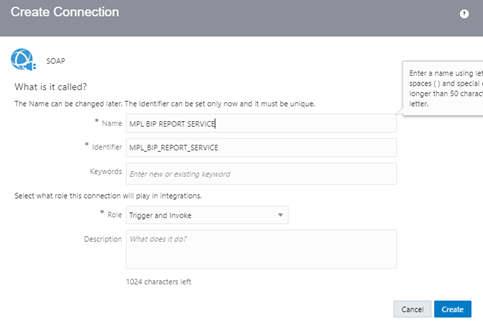
Step 2: Create a SOAP based adapter which will work as an invoke for invoking the data from BIP report. Follow the same navigation as above and create a SOAP connection.
Provide the required details such Name, role and click on create tab, in connection properties page add WSDL URL and provide Authentication with username and password.
(WSDL URL ex: https://hostname /xmlpserver/services/ExternalReportWSSService?WSDL)
Then test and save the connection.

Test the connection and save.
STEP3: Likewise create another connection using DB adapter for inserting data into database.
Follow the same navigation path as above and create connection.
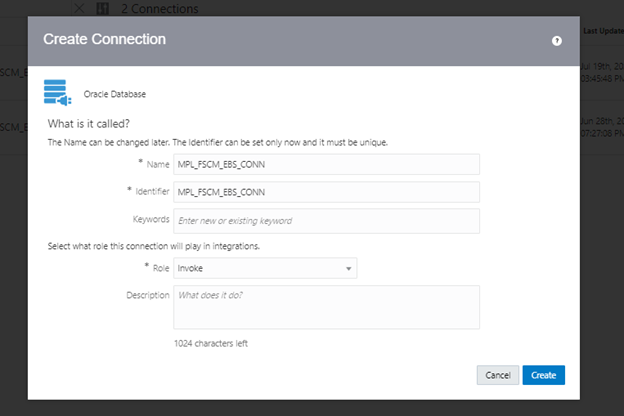
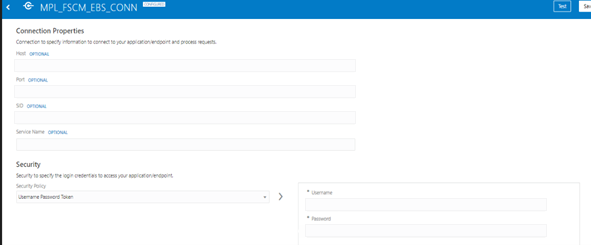
Provide all the required details of database and test and save the connection.
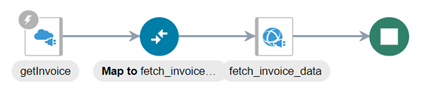
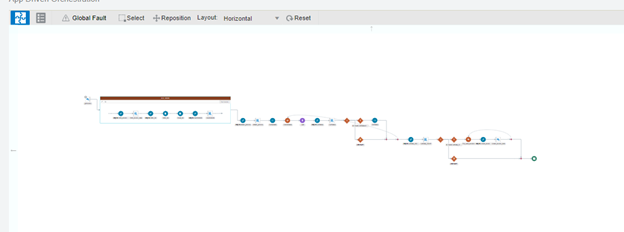
PART 4: Create an OIC integration for applying hold on duplicate invoices.
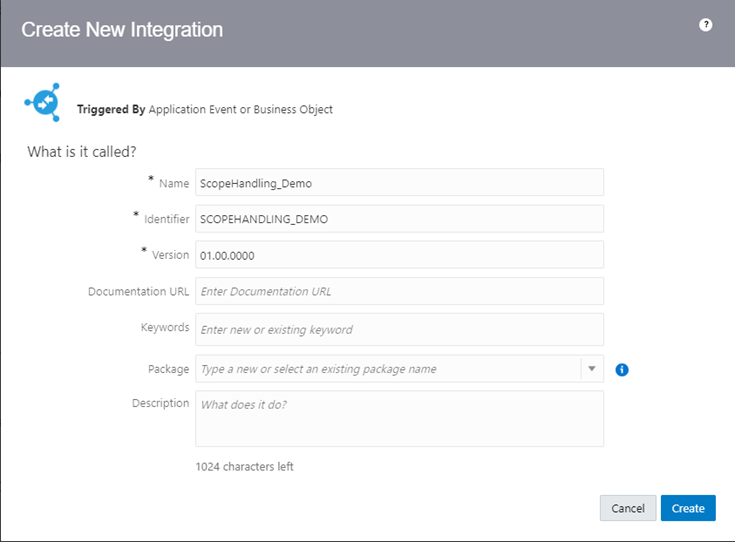
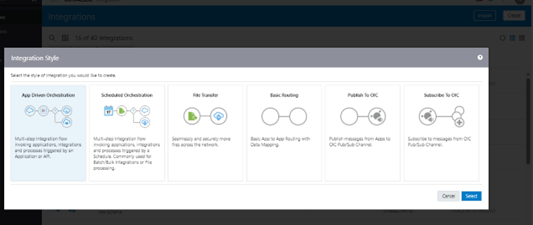
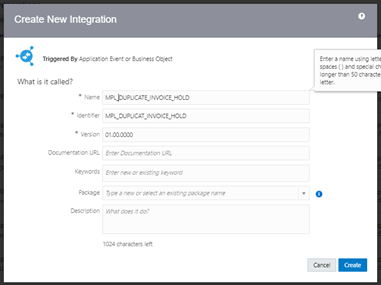
STEP 1: Create an App driven Orchestration, by following below navigations.
Navigator->integrations->create->Select->Provide Integration name->create
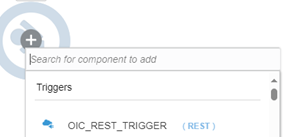
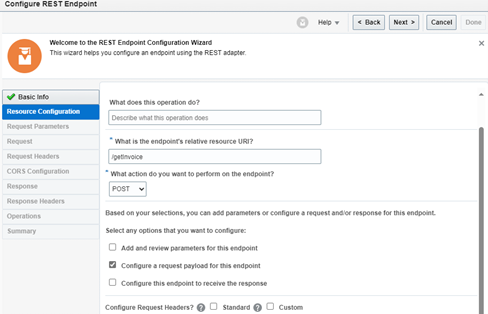
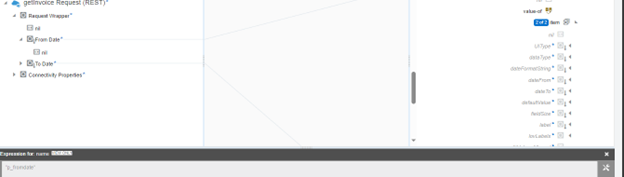
STEP2 : Take REST connection as trigger, fill all the required details , as mentioned below
Provide the endpoint name and click on NEXT.
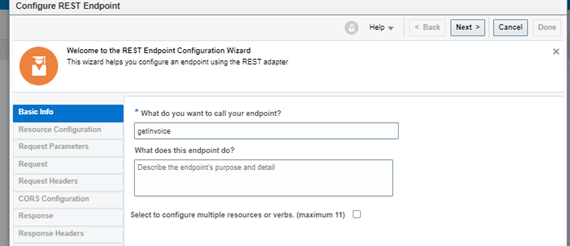
Provide any name for the Endpoint URI and take the Operation as POST which will be configured using request Payload, click on NEXT.
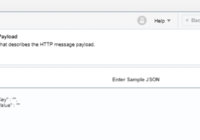
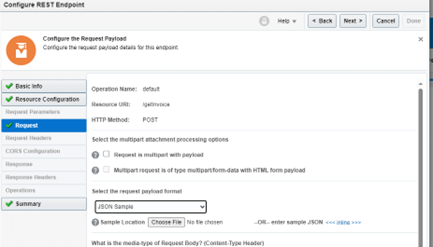
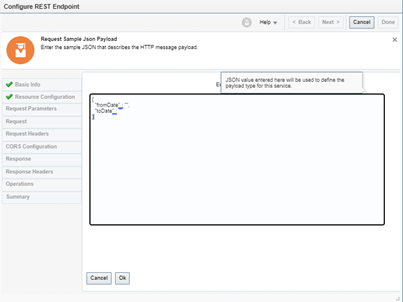
Select the payload format as JSON Sample and enter sample JSON by clicking on <<<inline>>> and then click on ok and then NEXT then FINISH.
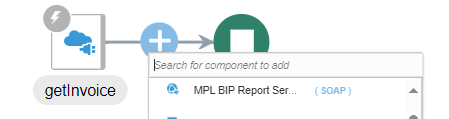
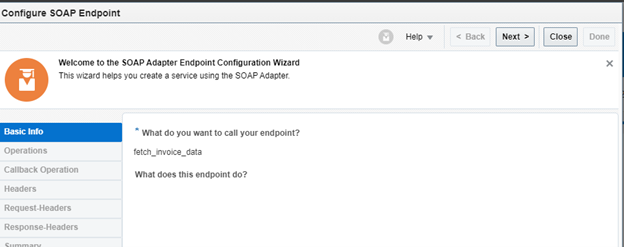
STEP3: Select SOAP connection for invoking the BIP report which has been created in PART:1.
Provide the Name of your end point as shown below and click on NEXT.
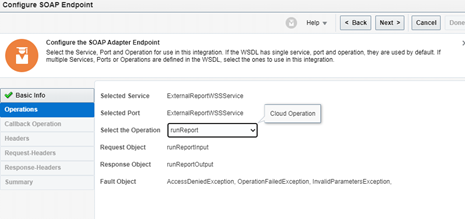
Select the Operation as RunReport->NEXT->NEXT->DONE.
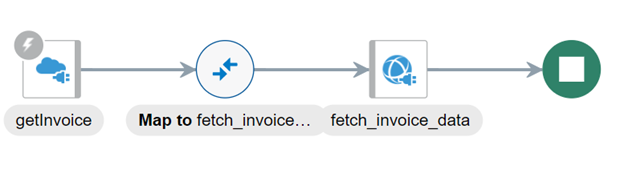
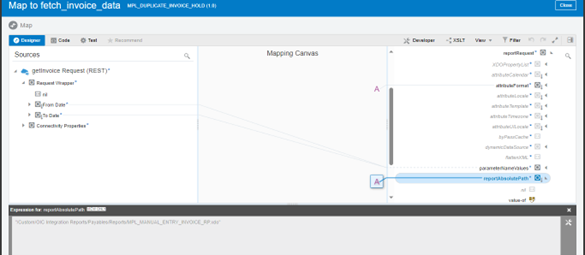
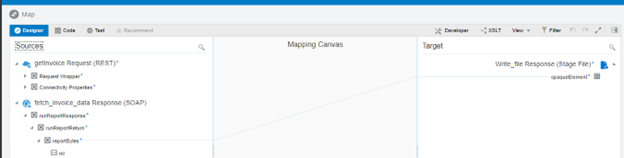
STEP 4: In the Mapper, create two items and provide values for the parameters in “parametervaluesname” field of SOAP request and provide values of items as p_from_date and p_to_date and then Map the request of REST to the request of SOAP.
Similarly add reportabsolutepath, sizeofChunkData as “-1” and attributeformat “csv”.
Validate and close.
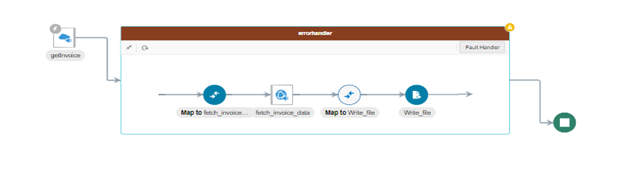
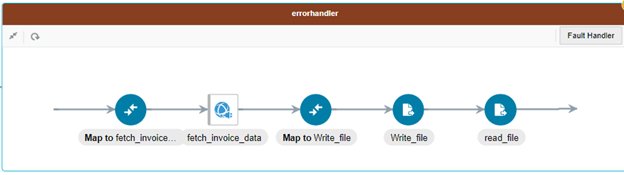
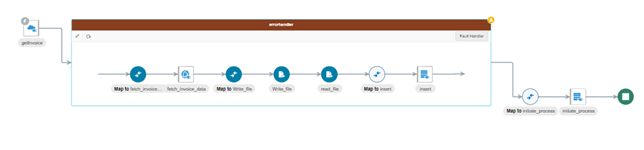
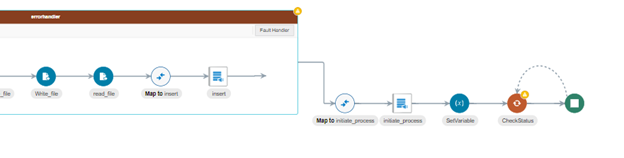
STEP 5: Before moving forward, create error handler to handle any fault.
Select Scope from Collection

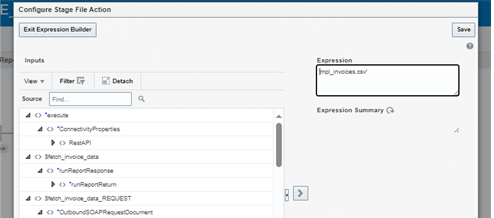
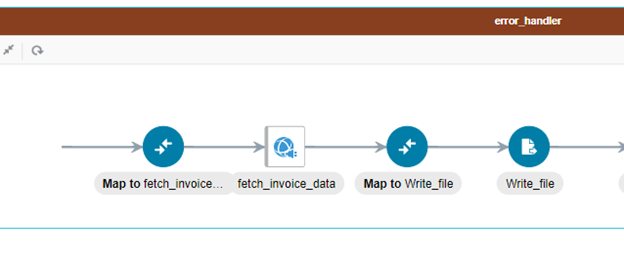
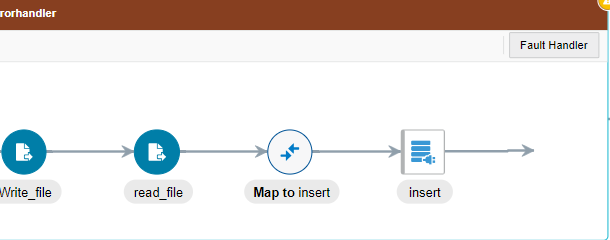
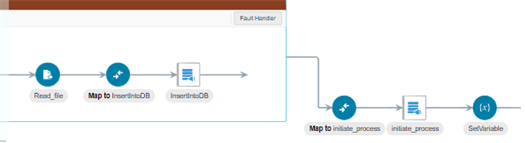
By Using Reposition Drag and drop Connection and mapper inside error handler and write the data from BIP in temporary directory i.e. ‘Oic’ by using Stage file Action.
Write the data from BIP in temporary directory i.e. ‘Oic’ by using Stage file Action.
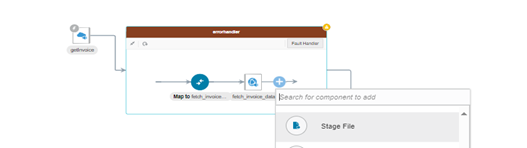
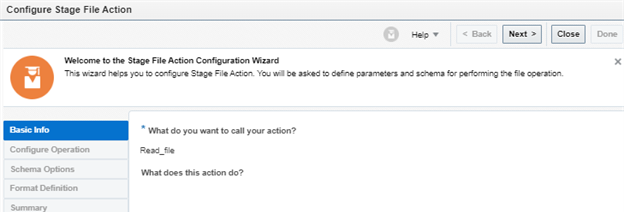
Provide the name of call action, then click on NEXT and from expression builder provide the valid name of the file.
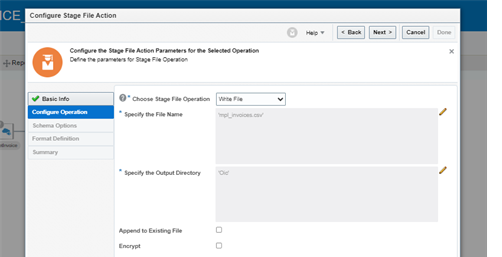
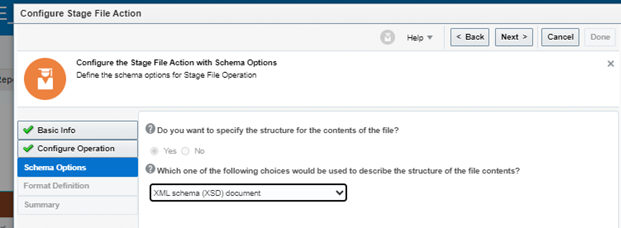
Provide the format of file contents and click on NEXT.
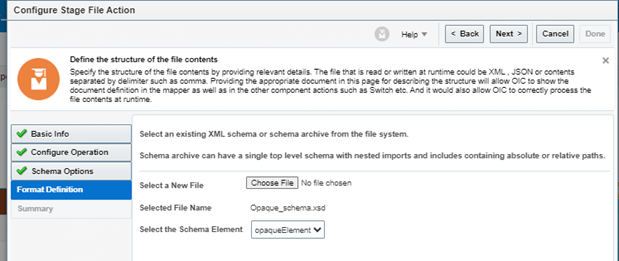
Select OPAQUE SCHEMA FILE, click on NEXT and then DONE.
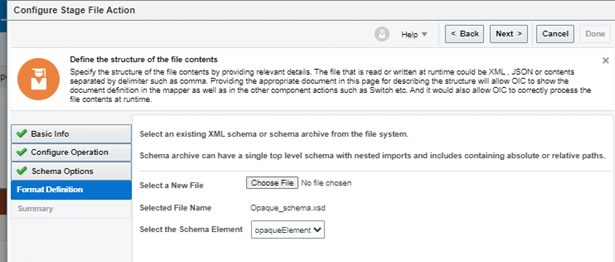
In the mapper, provide required mapping.
STEP 6: After writing the file, Read the file by selecting the file in csv format and then insert the data into data base with the help of DB adapter.
Provide the name for call Action and click on NEXT.
Select Stage file Operation as Read entire file->configure file reference as Yes->provide the reference of writefile response from expression builder.
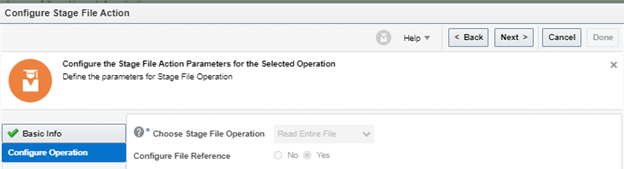
->save->NEXT.

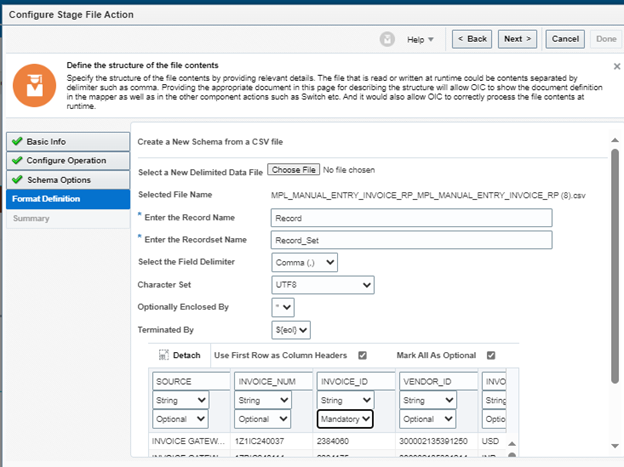
Select file format sample file format i.e. “csv”->NEXT

Select the sample csv file(which has been downloaded from BI Publisher in Part1), provide the name of record and recordset keep, one field as mandatory and others as optional then click on NEXT->DONE
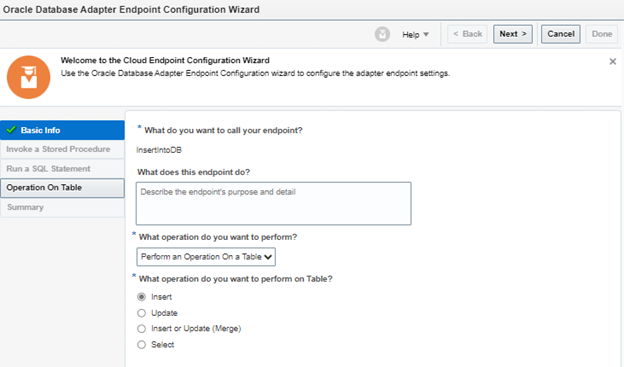
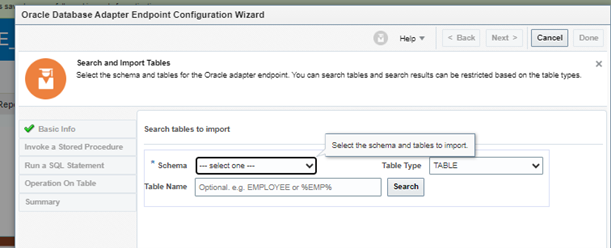
Select Database adapter for inserting the data into database. Select Operation as Insert into DB->NEXT->select schema and table name->ok->NEXT->DONE

Provide the mapping as below
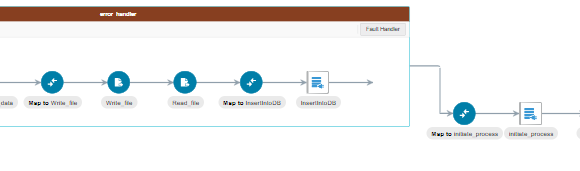
STEP 7: Outside error handler again take DB Adapter connection to call the procedure which has been created in PART-2.
Select the operation as invoke a Stored Procedure.
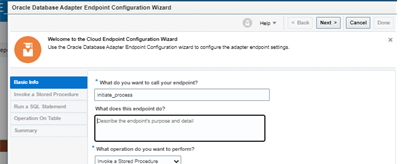
Select Schema name, Package Name and Procedure Name then click on NEXT->NEXT->DONE.

In the mapper provide mapping as below.
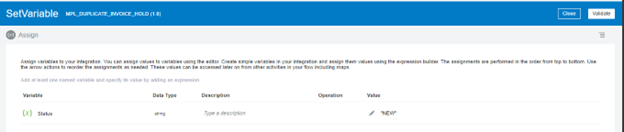
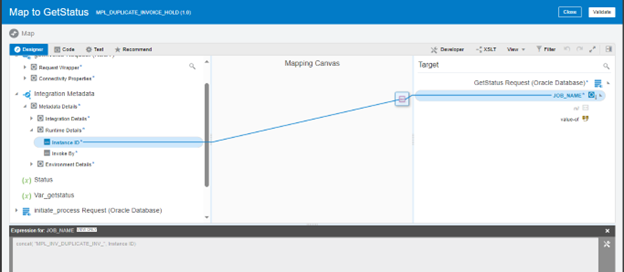
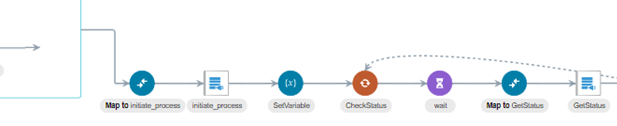
STEP:8 Now we will check the status of Schedular job run for our Async procedure by creating a variable. From Actions select assign.
Create an assign variable provide the name and keep value as “NEW”->Validate->close.
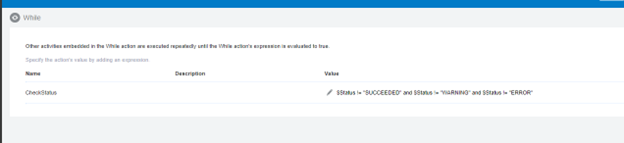
Take a while loop from actions’ Collection to check the status of Job as if succeed or errored or warning, then VALIDATE->CLOSE.
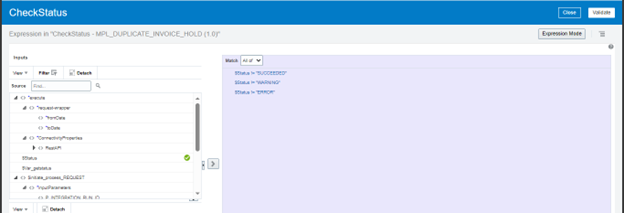
Select database adapter and run the SQL statement.
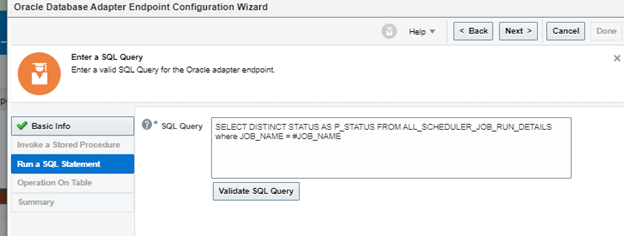
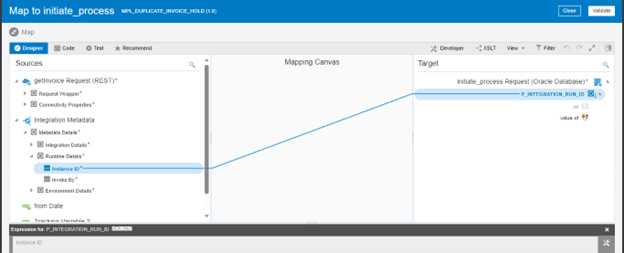
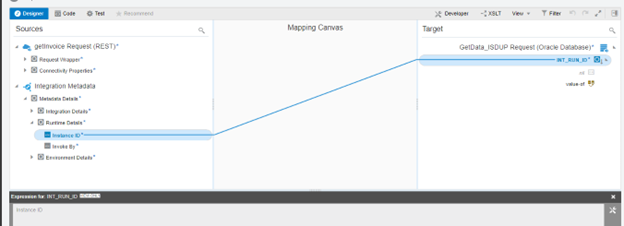
In the mapper, map the job name of Procedure with integration run id as shown below.
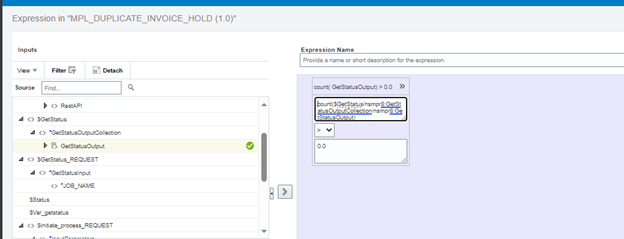
STEP 9: Check the count of Status by using if condition, if count is greater than 0, then set status.
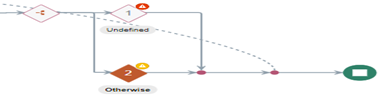
After adding condition VALIDATE the expression and then close.
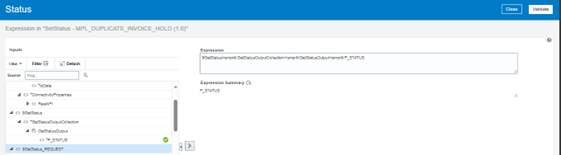
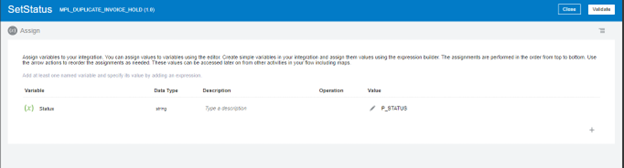
Take Assign variable, provide the valid name (SetStatus) , VALIDATE the expression and CLOSE.
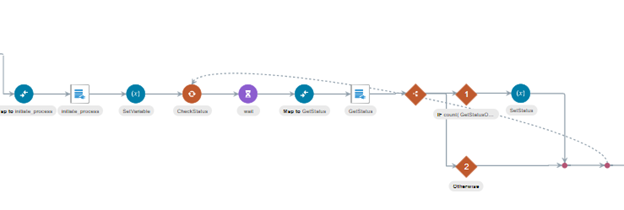
STEP 10: Now take database adapter to get all the invoices which are found duplicate and to which HOLD needs to be applied.
We can provide the name as GetData_ISDUP, then select run as SQL statement and provide required expression.
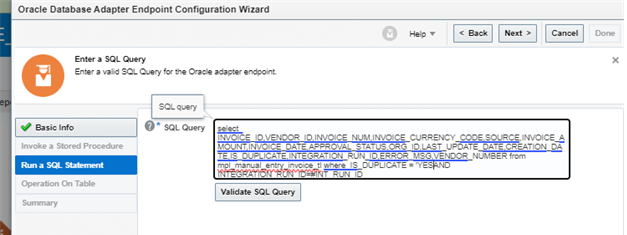
In the Mapper, provide required Mapping.
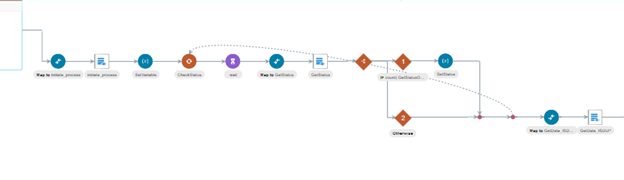
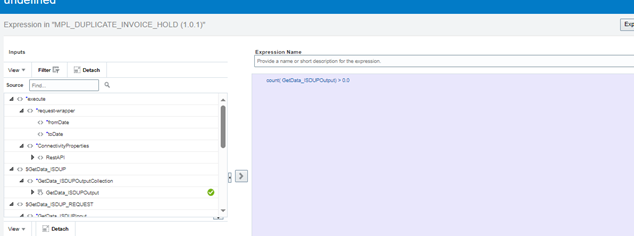
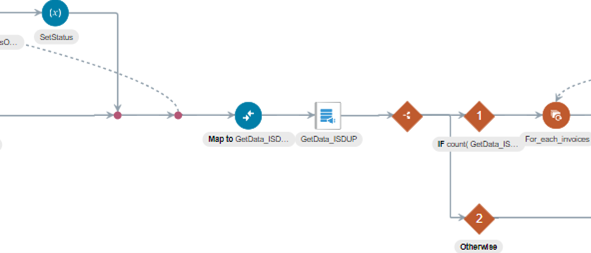
STEP 11: Check the count of duplicate Invoices, if found any, by using if condition and then apply hold on Duplicate invoices.
Apply condition validate and close.
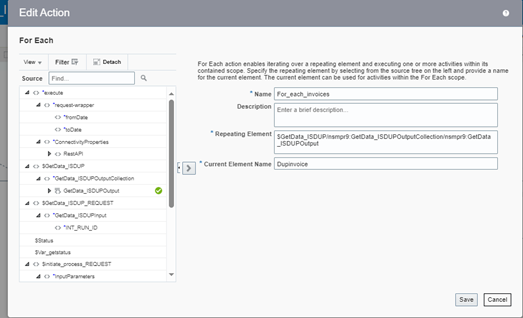
If count of duplicate invoice is greater than 0, take for each loop for performing the iteration on each invoice.
STEP 12: Take invoke REST connection and provide required mapping in the mapper.
As we are applying the hold we will take POST METHOD.
(URI :-/fscmRestApi/resources/11.13.18.05/invoiceHolds)
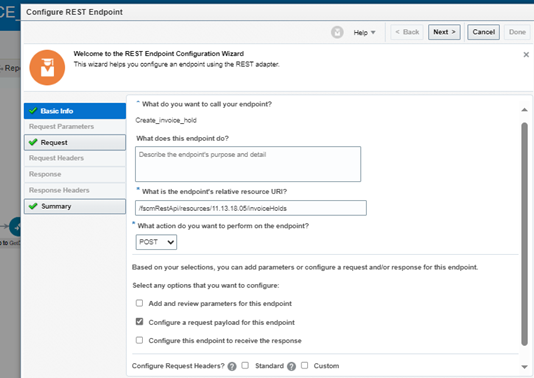
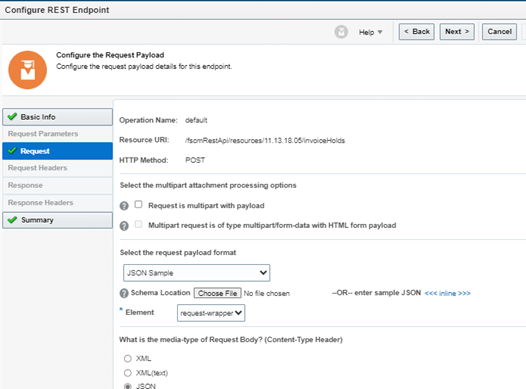
Enter sample JSON request payload->ok->NEXT
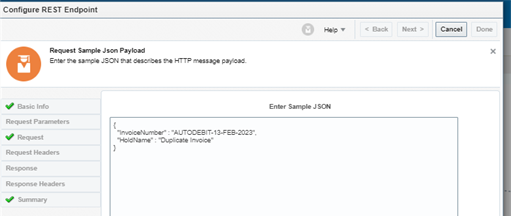
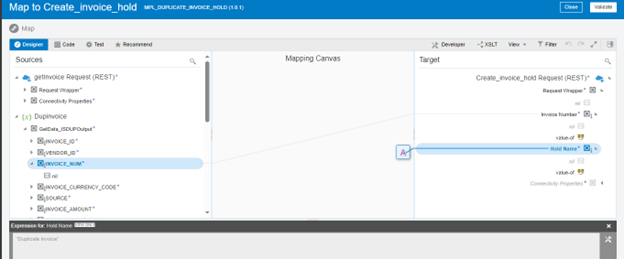
In MAPPER, map invoice number and provide the value of hold name which should be created first in Oracle Fusion ERP.
VALIDATE->CLOSE->SAVE.
SAVE the Integration and Activate.

Integration has been completed.
For testing , Create a Duplicate invoice in fusion and run integration by providing parameters values as below.
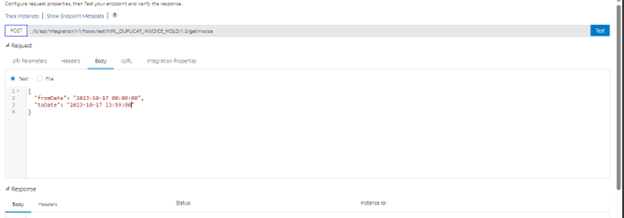
After successful run Hold will be applied on Invoice.
If you have any questions or concern, kindly leave a comment below or contact us on [email protected].