In this blog post, we will be going through a step-by-step guide on how to integrate Oracle Digital Assistant (ODA) with Microsoft Teams. Through this process, you can easily access the ODA bots within Teams. It covers the entire process, starting with creating an application in Teams, setting up a dedicated Teams channel in ODA, configuring this channel through the Teams Developer Portal, and enabling external apps in Office 365 to facilitate seamless bot interactions. The blog will also be a guide to enable Single Sign-On (SSO) for enhanced security.
PART 1: Creating an application on Microsoft Teams
The first step to access your ODA Digital Assistant (or Skill) in MS Teams, you need to create a Microsoft Teams app which acts as a container for a bot. Once the app is created, you need to add a Bot to it which communicates with the Oracle Digital Assistant.
Follow the below steps for the setup:
Step 1: Go to Teams Developer Portal and login with your Microsoft credentials. Follow this link – https://dev.teams.microsoft.com/home

Step 2: Click on the menu icon in the top left corner, and from the navigation list click on Apps.
Step 3: Click on + New app.

Step 4: A pop-up screen will appear, in the Name field assign a name to your Bot. This name will appear in Microsoft Teams, and then click on Add button.

Step 5: Select Basic information, located in the page’s left navigation, under the Configure section.

Step 6: On the Basic information page, fill all the required fields except for Application (client) ID and Save. This client ID is only required if you require SSO for your MS Teams Channel. We will cover this section in detail, in our upcoming blog.

Step 7: In the left navigation of the page, under the Configure section, select App features. Then, click on BOT.

Step 8: On the Bot page, under the Identify your bot section, you will find a Create a new bot link, click on it. This will redirect you to Bot management page.
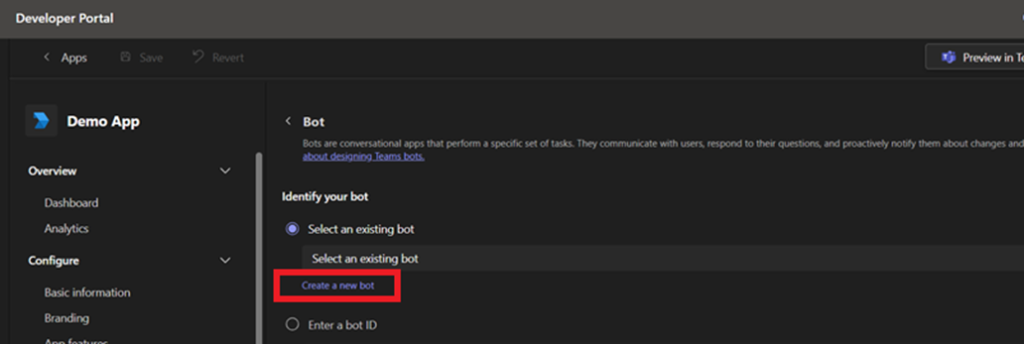
Step 9: In the Bot management page, click on + New bot.

Step 10: In the Add bot dialogue box, assign the Bot name and click on Add.

Step 11: In the left pane of the page, go to Channels, select the Microsoft Teams checkbox and Save.

Step 12: Now in the left pane of the page, go to Client secrets.
Suggested for you – How to Develop Chatbots using Oracle Digital Assistant?
Step 13: On the Client secrets page, click on Add a client secret for your bot, make sure to copy the value of the generated client secret and save it in a safe place for later use, it will not be displayed again.

Step 14: On the Client secrets page, open the Azure link in a new window to get to the App Registrations page of Azure Active Directory.

Step 15: On the Manage -> App Registrations page, click All applications, select the bot that you have created.
Step 16: Under the left pane of this screen, go to Manage -> Authentication.
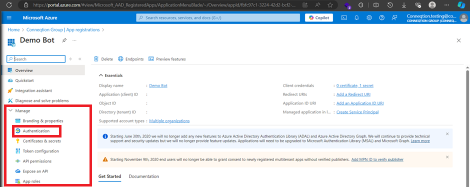
Step 17: Under the Supported account types, select Accounts in any organizational directory (Any Microsoft Entra ID tenant – Multitenant).

Step 18: Under the left pane of this screen go to Manage -> API permissions.
Step 19: Click on + Add a permission, select Microsoft Graph -> Application permissions.

Step 20: In the given search bar, type Directory.Read.All, under the Directory drop down, check the box and click on Add permissions.

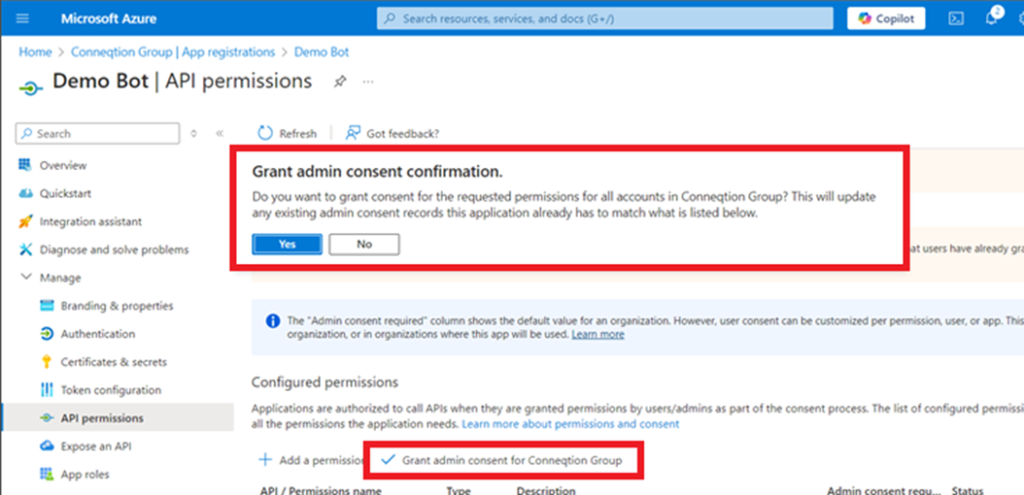
Step 21: In Microsoft Azure, login using the admin credentials, and navigate to the same page as below and Grant admin consent.
Step 22: Go back to the Teams Developer Portal and perform step 7-8. Next, Select an existing bot dropdown, select the bot you just created. Check the upload and download files if you want to receive or send attachments.
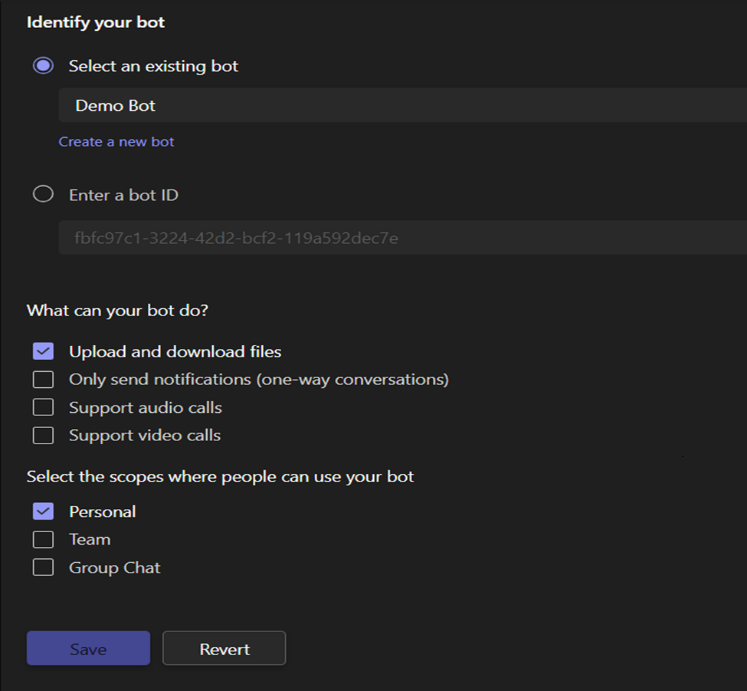
Step 23: Under the Enter a bot ID section, you might find a Bot ID already given, copy the Bot ID and save it in a safe place. Cross-check it with the ID next to the bot’s name you just selected.

Step 24: Alternately, go to Configure -> Domains, add domains of the users.
Step 25: In the same page, under the scopes section, check Personal, and click Save.
This is the end of Part 1; you’ll return to this portal again in the later parts. Now, let’s move on to the next part where we will set up a Teams channel in ODA.
PART 2: Creating a Teams Channel in Oracle Digital Assistant (ODA)
Before you start the setup, make sure you have your Digital Assistant (or Skill) ready and working flawlessly in ODA.
If everything is good to go, then follow the steps given below:
Step 1: Go to Oracle Digital Assistant, and login with right credentials in your respective tenancy.
Step 2: Click on the menu icon in the top left corner, under the Development dropdown, click on Channels.

Step 3: On the Channels page, select + Add Channel.

Step 4: In the pop-up screen, fill the Name and Description, under the Channel Type dropdown and make sure to select Microsoft Teams.
Step 5: Here the Microsoft Bot Id is the Bot ID you copied in step 24 of the previous part and the Microsoft Bot Password is the client secret value you copied in step 14.
Step 6: Click on Create.

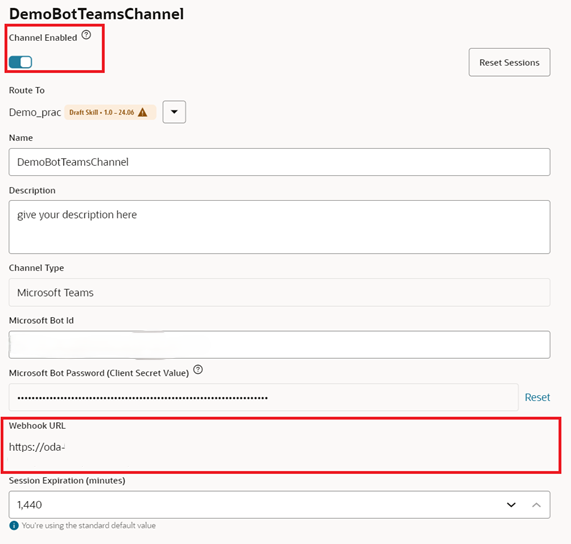
Step 7: Once the channel is created, go to the created channel, at the section you will find a toggle button for Channel Enabled, enable it.
Step 8: Under the Route To section, select the digital assistant or skill that you want to create a channel for.
Step 9: At the bottom of the page, you will find a section Webhook URL this will be your bot endpoint, copy the link and save it in a safe place.
PART 3: Configure the Teams channel created in ODA in Teams Developer Portal
Now that we have finished setting up ODA Teams channel and an app in Teams Developer Portal, all that’s left is to configure them together.
Follow the below steps for configuration:
Step 1: Open your Teams Developer Portal.
Step 2: Click on the menu icon in the top left corner and select Tools -> Bot management.
Step 3: From the list displayed, select the bot that you have created.

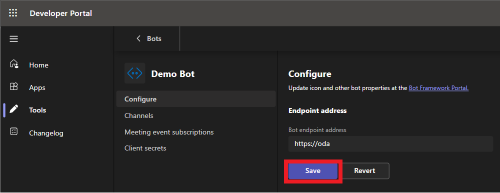
Step 4: Now, on the selected bots page, click Configure.
Step 5: On the Configure page, under the Endpoint address, paste the Webhook URL that you have copied from Step 9 of Part 2. And then click on Save.
PART 4: Enabling External Apps from your Office 365 Tenant
To be able to access external applications in Microsoft Teams, your Office 365 tenant must be configured by your administrator as below:
Step 1: Sign in to Microsoft Teams admin center with admin credentials.
Step 2: From the left pane of the page, go to Teams apps -> Setup Policies -> Global.

Step 3: After clicking on Global, enable the Upload custom apps toggle button and Save.

Step 4: From the left pane again, go to Teams apps –> Manage apps -> Org-wide app settings.

Step 5: On the Org-wide app settings, enable toggle buttons under Custom apps.

PART 5: Testing on MS Teams
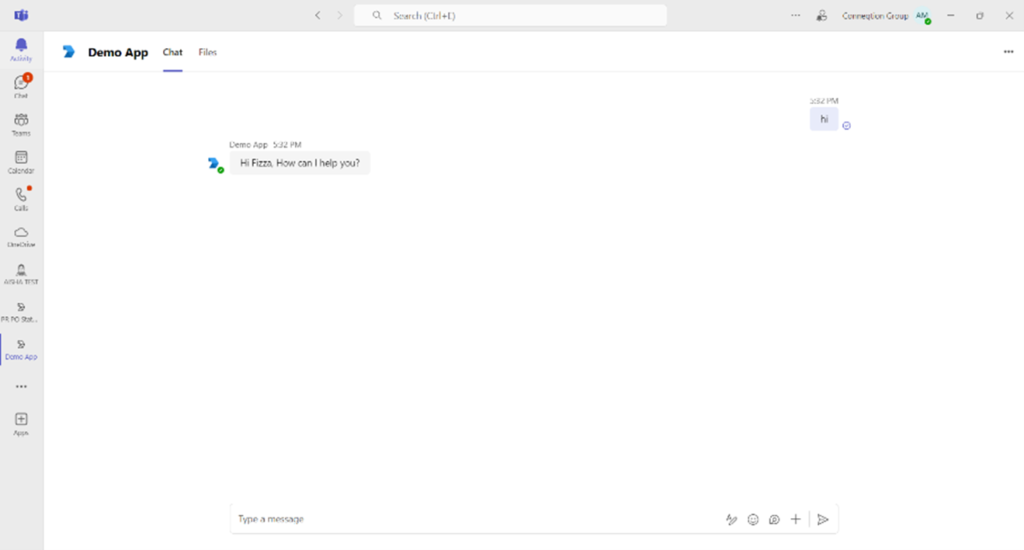
After configuring everything from Part 1 to Part 4, now let us test the bot in MS Teams. Follow the steps given below to do so:
Step 1: Open your Teams Developer Portal, navigate to the left pane Apps -> Select your created app.
Step 2: On the app page, from the menu under Publish, select Publish to org. Click on Publish button. You will find your publish logs.


Step 3: Sign in to Microsoft Teams admin center with admin credentials, navigate to the app that you have created.

Step 4: Click on Publish button and confirm the publication.


Step 5: Alternately, you can also publish your chatbot using app package.
Step 6: Open your app to publish and click on Publish button in the top right corner.

Step 7: From the pop- up, click Download the app package.

Step 8: Open your app in MS Teams admin centre, click on Upload file, now from the pop-up, click on Select a file and upload your app package, and your app will be published.

Hurray! You have successfully integrated your ODA chatbot in Teams.
So, with that, we come to the end of this blog. Let us know what you think about this blog, in the comments or write to us at [email protected] if you would like to know more or have any suggestions or feedback for us.


Atman
This is the only detailed explanation for this integration available in the internet. Good Job!
Vignesh Ramachandran
Hello,
Thanks for sharing this.
Has this been tested from MS teams end to end successfully? Have you created SSO configuration as described in the documentation.
Please share any testing screenshots.
Regards,
Vignesh.
Dhruvil Pandya
Hi Vignesh,
Yes this has been tested from MS Teams successfully along with SSO Configuration.