In modern enterprise applications, approval delays often become a bottleneck especially when approvers are required to log into systems just to approve or reject a simple request.
Using the powerful workflow capabilities of Oracle APEX, organizations can now enable In-Email Approvals, allowing approvers to take action directly from their inbox without opening the application.
This blog walks through the overall architecture, implementation approach, and benefits of enabling in-email approvals in Oracle APEX applications. We take an approach to fit enterprise workflow requirements and approval automation scenarios.
Why In-Email Approvals?
Traditional approval systems usually follow this flow:
- User submits request
- Approver receives notification
- Approver logs into application
- Approver navigates to pending approvals
- Action is taken
While effective, this method introduces friction for quick approval.
With In-Email Approvals:
- Approvers can approve/reject directly from email
- Decision-making becomes significantly faster
- User adoption improves
- Mobile approvals become seamless
- Approval turnaround time reduces drastically
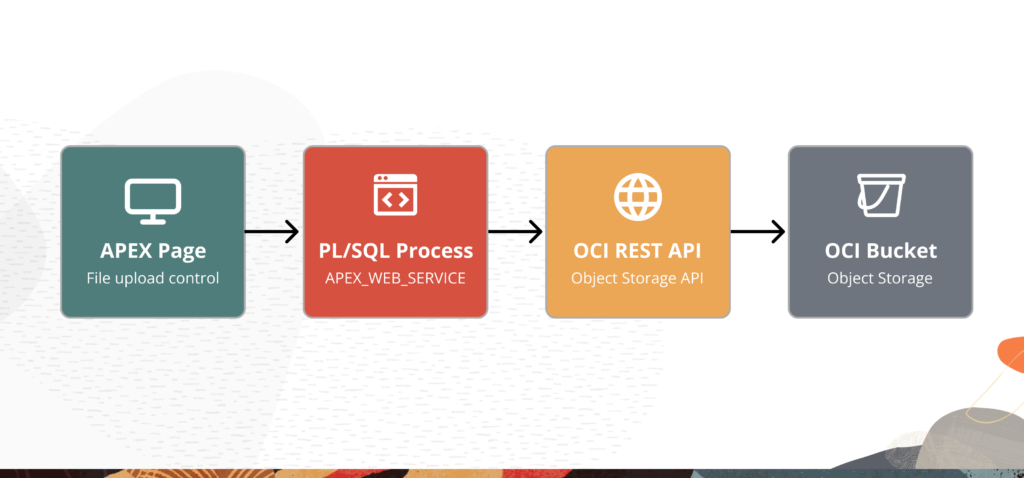
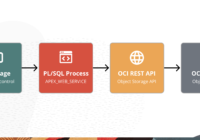
Solution Architecture
The implementation leverages multiple Oracle APEX capabilities along with Microsoft Graph APIs.
Core Components
- Oracle APEX Approvals Component
- Email Templates
- Microsoft Graph API
- Oracle APEX Automations
Steps to integrate In-Email approval system with APEX app
Step 1: Creating an Email Template in Oracle APEX
To enable in-email approvals, we first need an email template that will be sent to approvers when a request is raised. DEMO Template is shown at the very end of this blog.
The email features two action buttons: Approve and Reject. Clicking either button opens a pre-filled email in the approver’s default email client. The pre-filled email contains details which will be leveraged later while reading the emails and when approving/rejecting tasks.
Step 2: Send approval email through configured template
If you are using the APEX Workflow component, then you must add an action by choosing Send Email as the Action Type to send an email to the Approver when a task is created.
If you are doing custom approval system, you must run the APEX send mail API along with replacing your placeholders to send email to your approver.
BEGIN
apex_mail.send (
p_to => ‘[email protected]’,
p_template_static_id => ‘ORDER_CONFIRMATION’,
p_placeholders => q’~
{
“CUSTOMER_NAME”: “Steven King”,
“ORDER_NUMBER”: 1234,
“ORDER_DATE”: “02-Feb-2018”
}~’ );
apex_mail.push_queue;
END;
Step 3: Integrating Emails through to read and update approval status through APIs
There are 2 main steps to integrate emails:
- Register application in Microsoft Azure with necessary privileges.
- Create Web Credentials in Oracle APEX, then create a Rest Data Source with these Web Credentials.
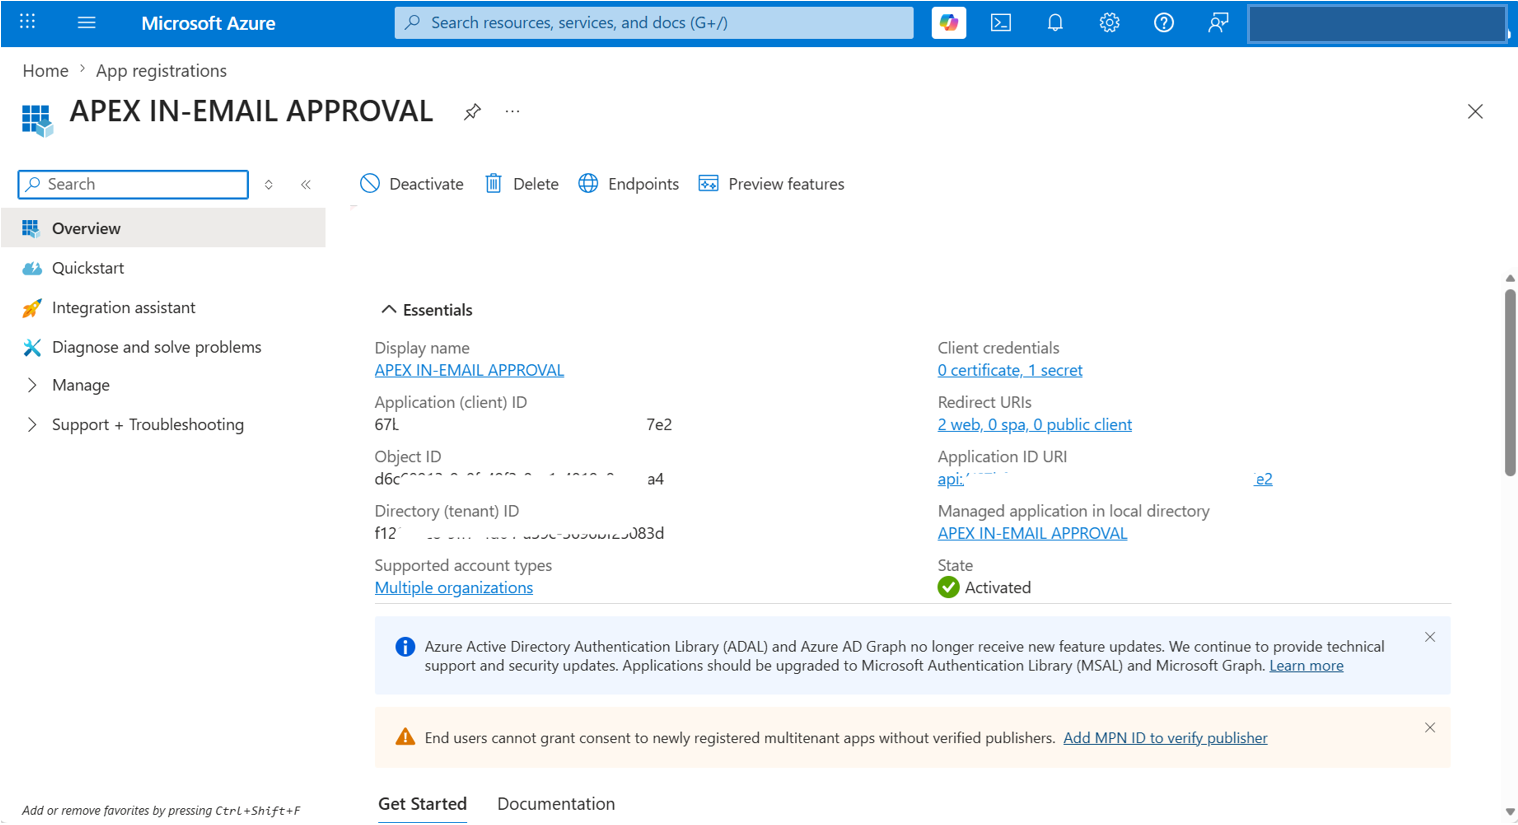
3.a Register application in Microsoft Azure with necessary privileges
To register your application in azure:
Log in to Microsoft Azure –> Migrate to App registration and register your app by adding the callback URL of the oracle APEX instance you want to configure the API in.

After registration, follow these steps to create client secret, configure token claims and API permissions.
To create Client Secret,
- In the left sidebar, click Certificates & secrets
- Click + New client secret
- Add a description: APEX Integration
- Set expiration: 24 months (recommended)
- Click Add
- IMPORTANT: Copy the Secret Value (not the Secret ID) immediately and keep it handy in a notepad/clipboard — as you will be unable to view it again
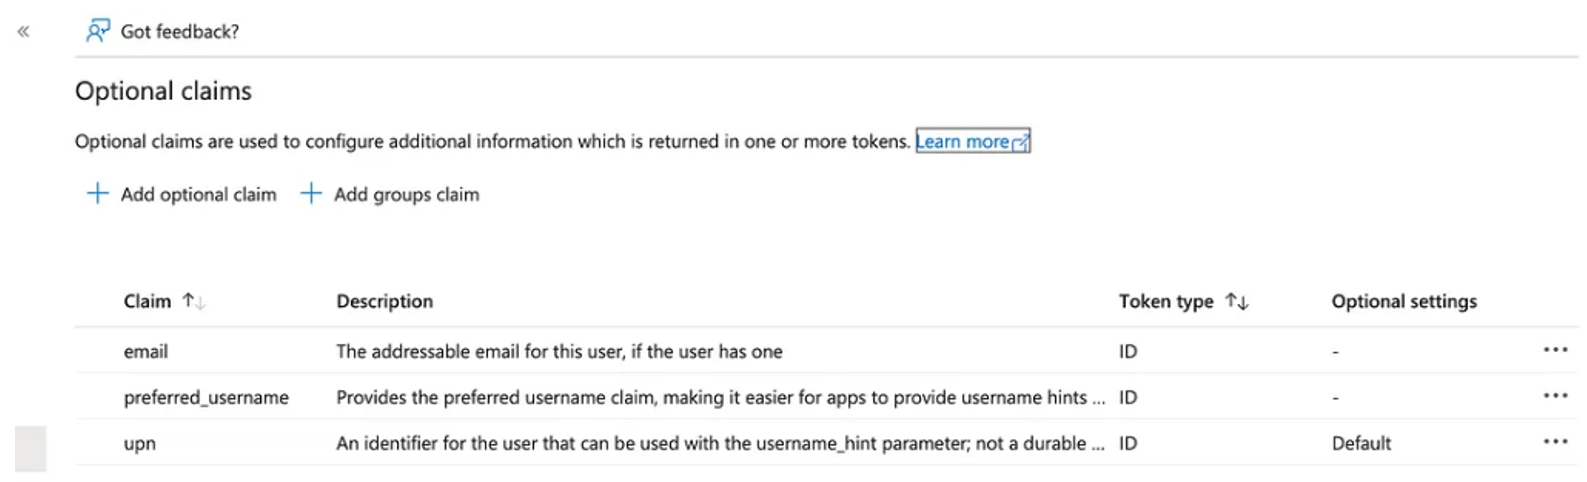
For Token Claims,
- In your app registration, click Token configuration in the left sidebar
- Click + Add optional claim
- Select ID token type
- Check these claims:
✅ preferred_username
✅ upn (User Principal Name)
- Click ADD
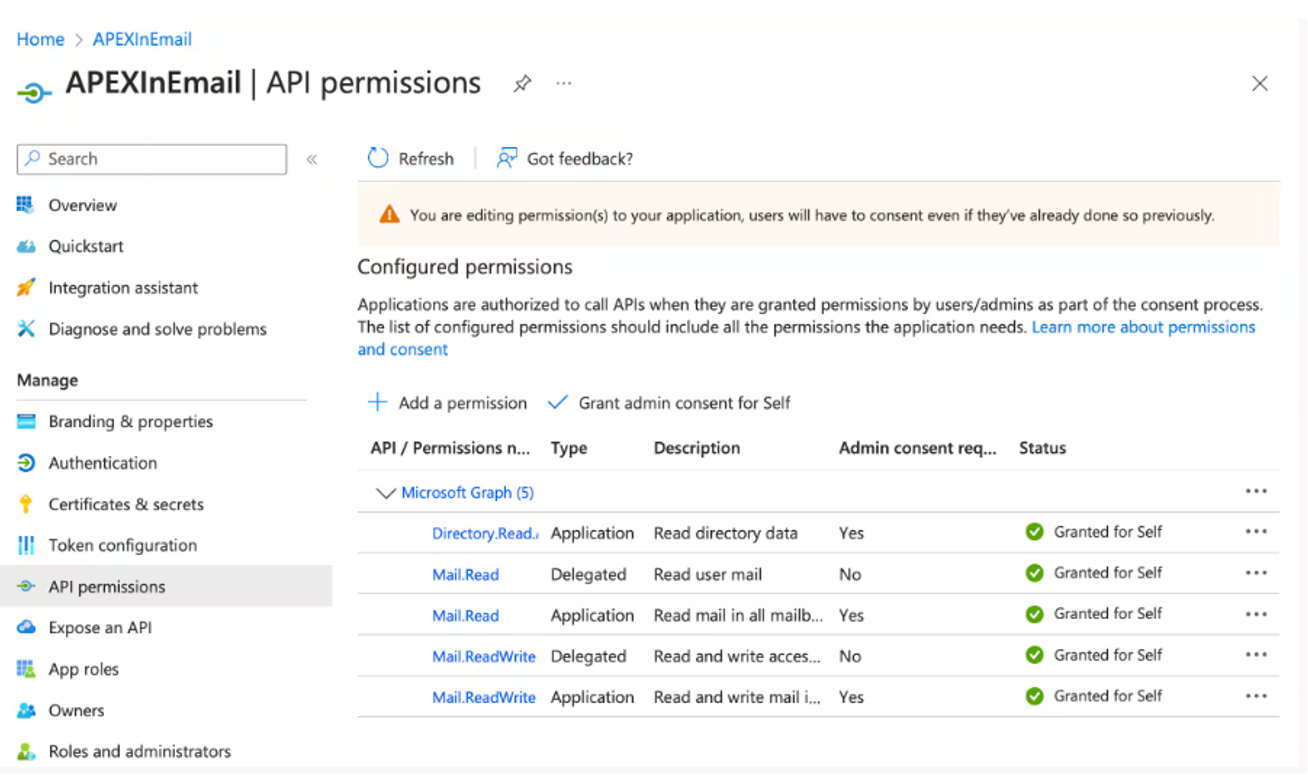
To Configure API Permissions,
- Click API permissions in the left sidebar
- Verify these permissions are granted:
- Delegated (User Context):
- Read
- ReadWrite
- Application (App-only)
- Read
- ReadWrite
Once your app is registered, copy the Client ID and Tenant ID and store it in Notepad.
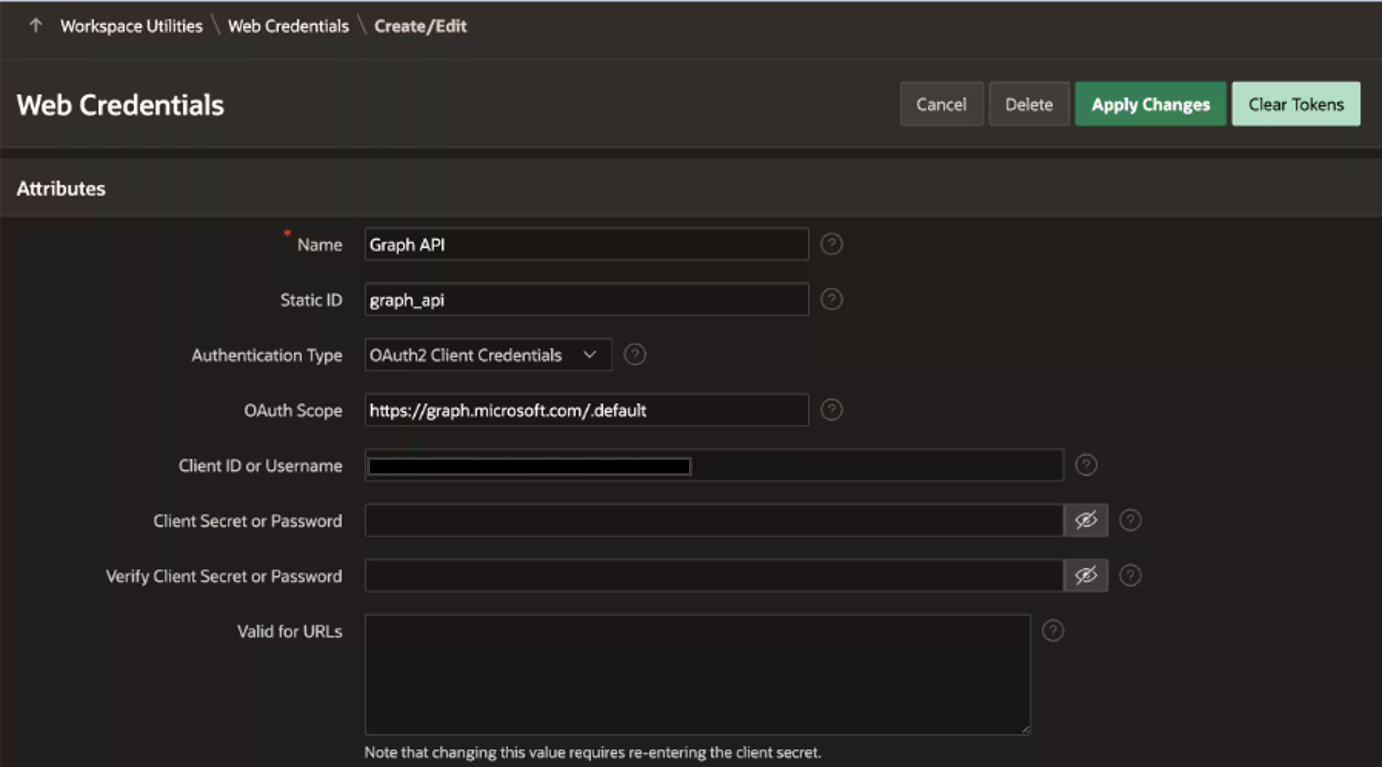
3.b Create Web Credentials in Oracle APEX, then create a Rest Data Source with these Web Credentials.
Web Credentials in Oracle APEX allow you to securely store and encrypt authentication details for external REST services or REST-enabled SQL services. We will create Web Credentials using the Application/Client ID and Client Secret Value we copied in the previous Step.
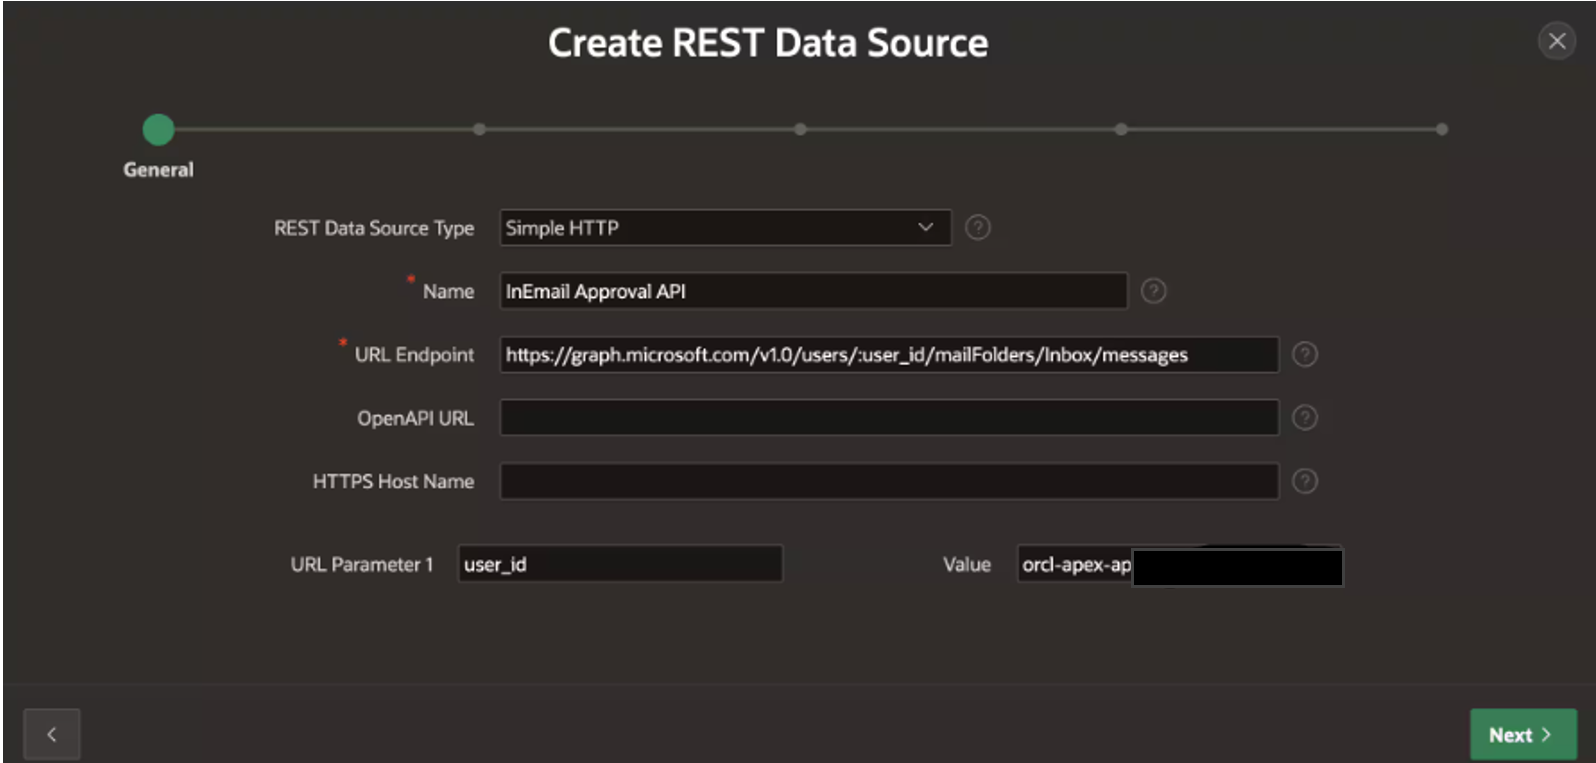
1. To create Rest Data Source, Navigate to Shared Components > REST Data Sources, and click Create. For the endpoint URL, use https://graph.microsoft.com/v1.0/users/:user_id/mailFolders/Inbox/messages
Here, replace :user_id with the email address that is configured with the Read/Write permissions
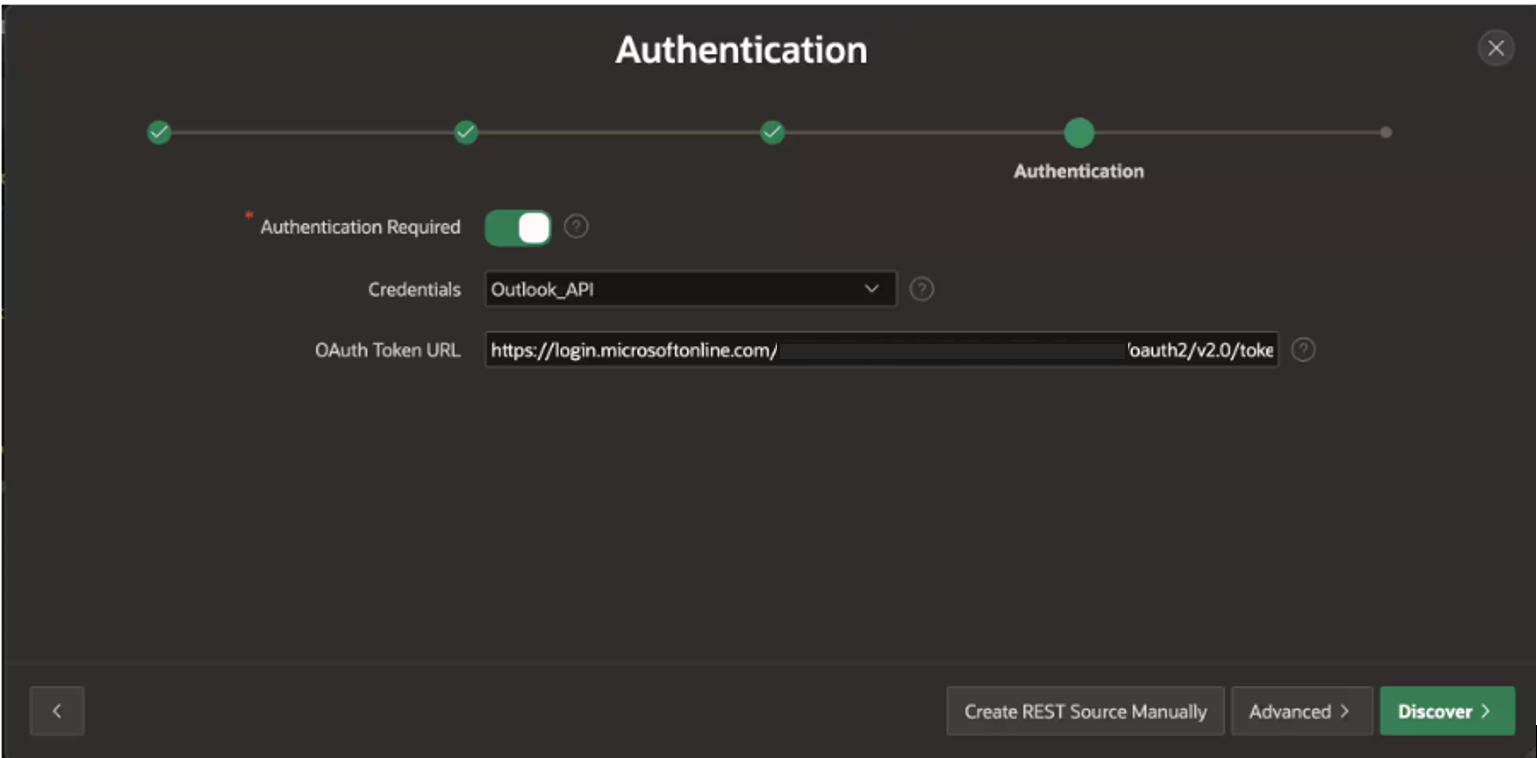
2. We will use the OAuth2-based web credentials that we have previously configured for this integration. For the Token URL, enter the OAuth2 token endpoint for your Azure Active Directory tenant, replacing <TENANT_ID> with your directory’s actual Tenant ID.
https://login.microsoftonline.com/<TENANT_ID>/oauth2/v2.0/token
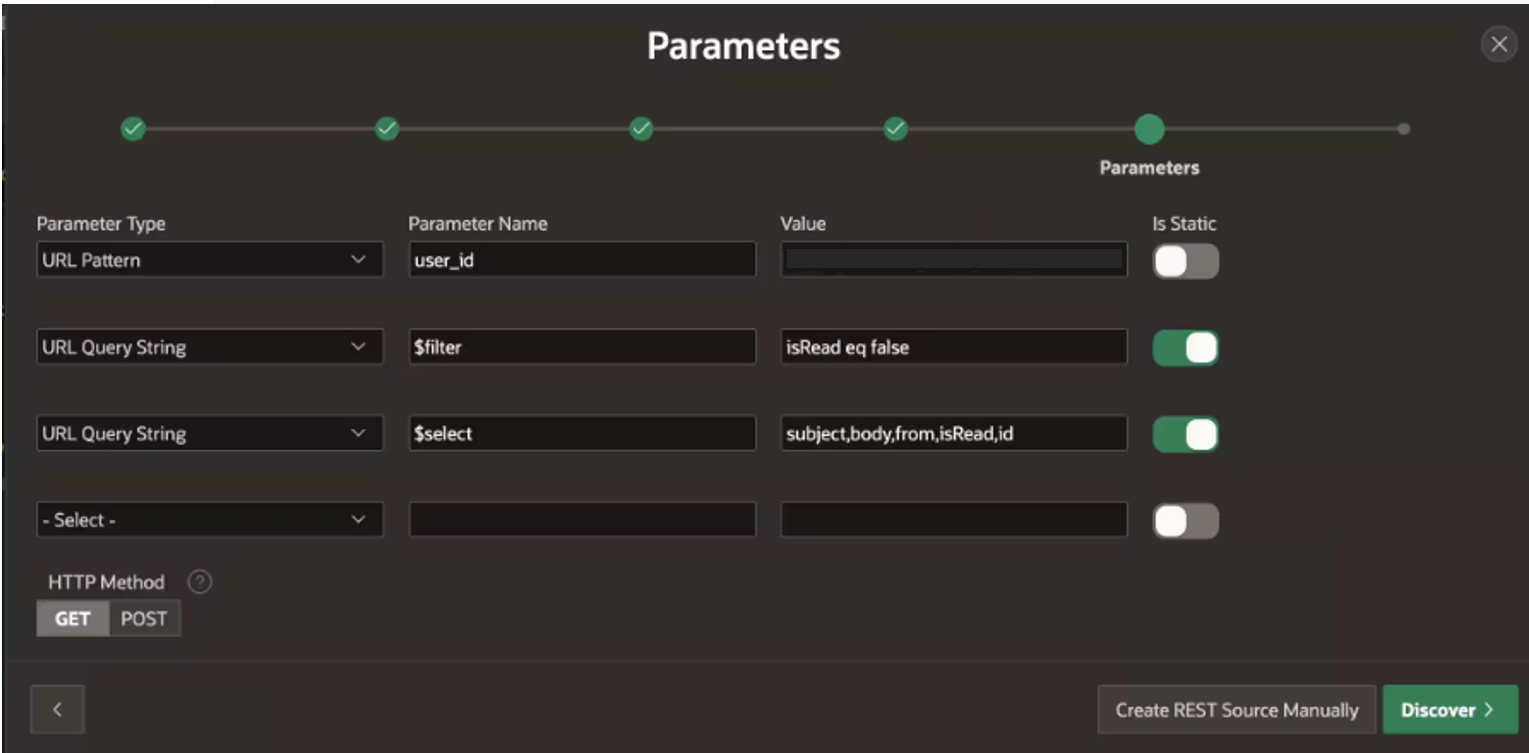
3. To refine the API response and limit the data payload to what you need, add query string parameters in the Advanced Parameters section:
- $filter → isRead eq false
- $select → subject,body,from,isRead,id
- Click the button Create REST Source manually.
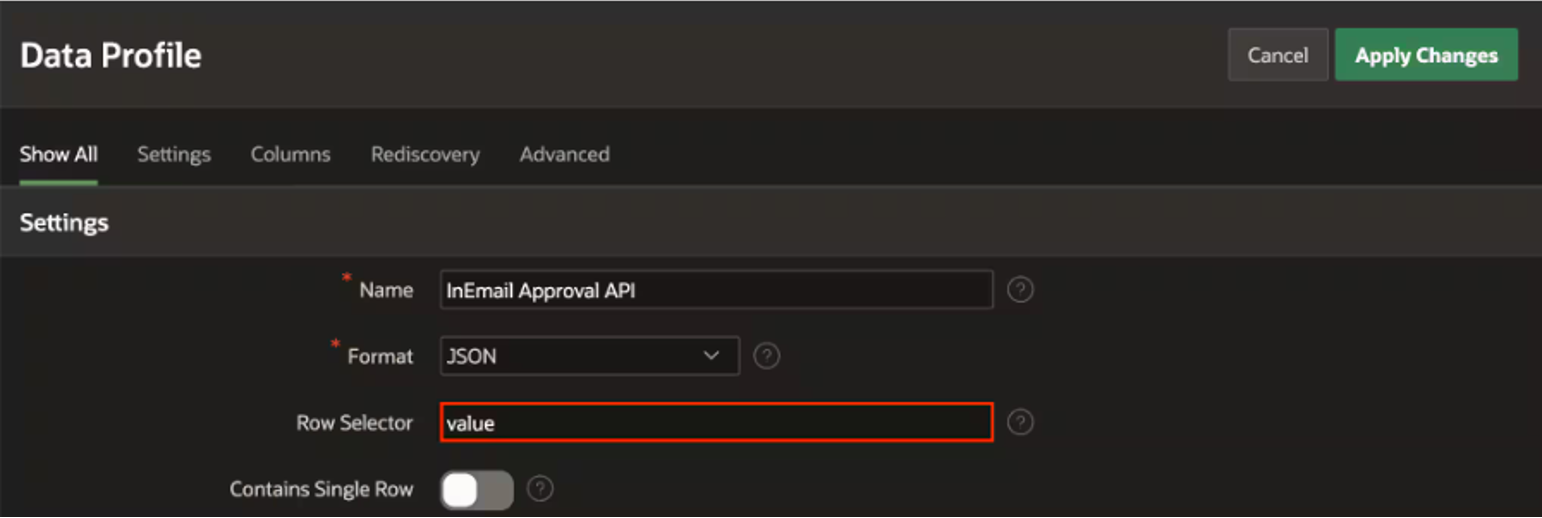
4. After creating the REST Data Source, Open the Data Profile and Set the Row Selector to value. This is essential because the Microsoft Graph API wraps response data within a value array, and APEX needs to be directed to look there for individual records.
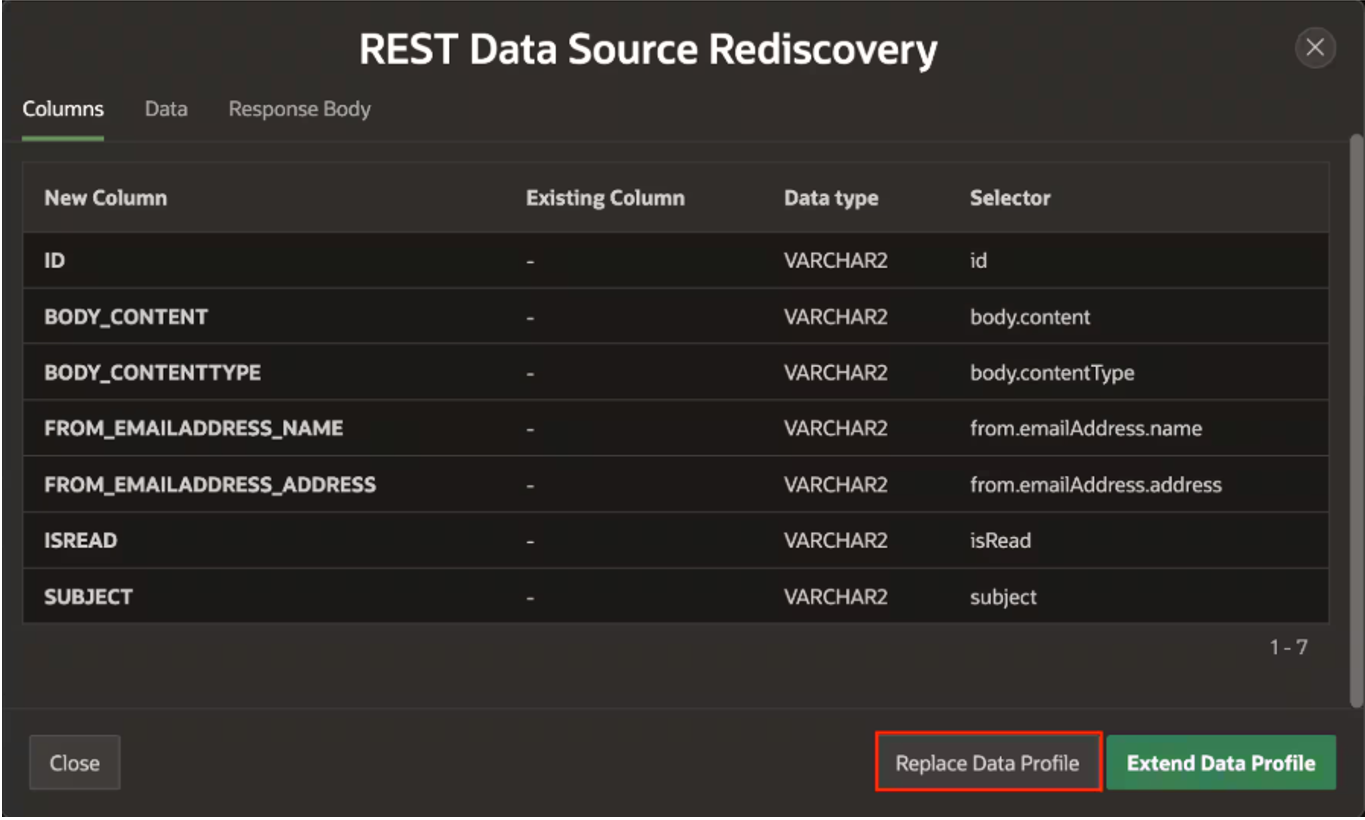
5. Then, click Rediscover Data Profile, choose Replace existing, and confirm. This updates your field mappings based on the latest API response structure, ensuring your data source stays in sync with the response.

Step 4: Create PL/SQL package to process Emails
We need to create a PL/SQL Package that will Read Emails from a Shared Email Exchange, process them, and Mark them as Read.
The process starts by connecting to a shared Microsoft Exchange inbox using a REST Data Source in Oracle APEX. It fetches all unread emails, pulling details like the Subject, Body, Sender’s Email, and Message ID. The email content is cleaned by stripping out unnecessary characters and formatting, then scanned for key details and the sender’s email, which is used to look up the approver’s name from an employee table. Based on whether the email body contains the word “APPROVE” or “REJECT,” the corresponding task is processed through APEX Human Task APIs if you’re using the APEX workflow component or call your respective approve/reject procedures if custom workflow has been setup. Once handled, the email is marked as read via a REST PATCH call to Microsoft Graph, ensuring it isn’t processed again.
You can create your email processing procedures as per your requirements. Below I’ll attach the main code snippets where we process the email through API, fetch the key details and mark them as read.
Note:
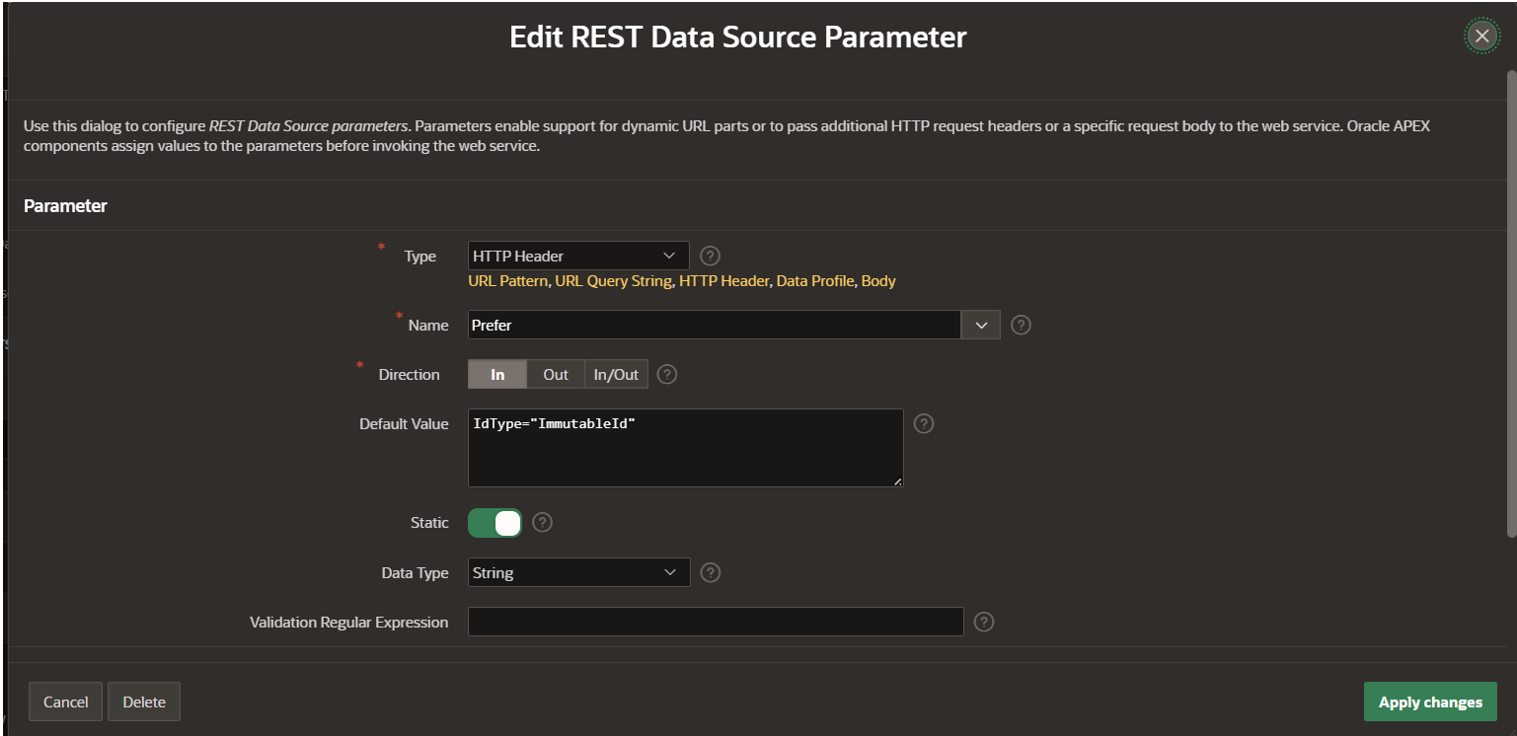
Due to security restrictions, you might not always have permission to mark emails as read. In such cases, while configuring the REST Data Source, add a header in the GET request to fetch immutable IDs instead of regular IDs.
Immutable IDs remain unchanged within a mailbox, even if emails are moved across folders (e.g., Archive), whereas regular IDs change. By storing and comparing immutable IDs locally, you can identify new emails and avoid duplicate processing—even when emails aren’t marked as read.
Use this header to enable it:
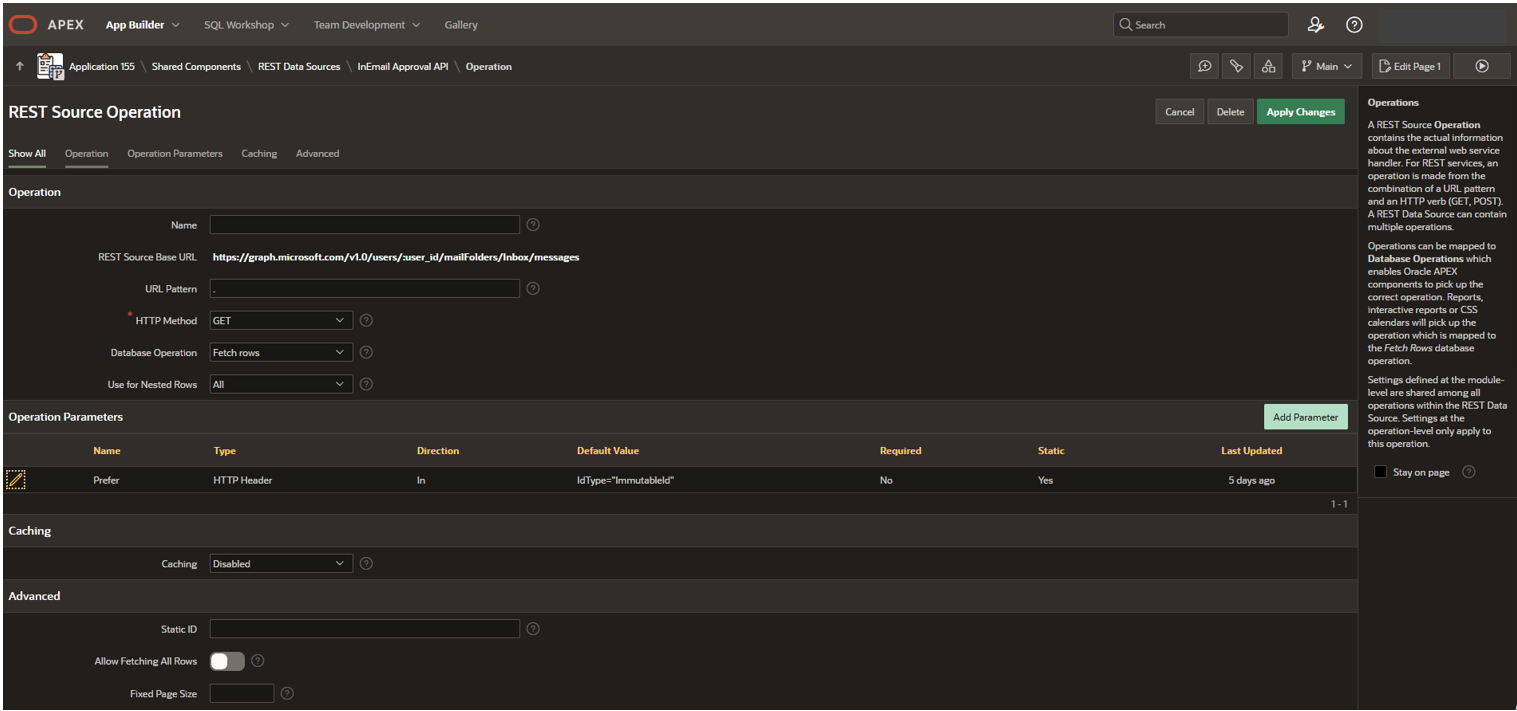
Prefer: IdType=”ImmutableId”
Immutable IDs are to be added as shown in the below screenshot
CREATE OR REPLACE PACKAGE BODY EMAIL_TASK_PROCESSOR
ASPROCEDURE FETCH_UNREAD_EMAILS IS
L_CONTEXT APEX_EXEC.T_CONTEXT;
L_BODY VARCHAR2(4000);
L_STATUS VARCHAR2(100);
L_ID VARCHAR2(4000);
L_FROM_EMAIL VARCHAR2(4000);
L_SUBJECT VARCHAR2(1000);
L_TASK_ID VARCHAR2(100);
L_APPROVER VARCHAR2(200);
L_APPROVER_NAME VARCHAR2(200);
L_IDX_BODY PLS_INTEGER;
L_IDX_ID PLS_INTEGER;
L_IDX_FROM PLS_INTEGER;
L_IDX_SUBJECT PLS_INTEGER;BEGIN
L_CONTEXT := APEX_EXEC.OPEN_REST_SOURCE_QUERY(
P_STATIC_ID => ‘inemail_approval_api’,
P_MAX_ROWS => 1000
);L_IDX_BODY := APEX_EXEC.GET_COLUMN_POSITION(L_CONTEXT, ‘BODY_CONTENT’);
L_IDX_ID := APEX_EXEC.GET_COLUMN_POSITION(L_CONTEXT, ‘ID’);
L_IDX_FROM := APEX_EXEC.GET_COLUMN_POSITION(L_CONTEXT, ‘FROM_EMAILADDRESS_ADDRESS’);
L_IDX_SUBJECT := APEX_EXEC.GET_COLUMN_POSITION(L_CONTEXT, ‘SUBJECT’);WHILE APEX_EXEC.NEXT_ROW(L_CONTEXT) LOOP
L_BODY := APEX_EXEC.GET_VARCHAR2(L_CONTEXT, L_IDX_BODY);
L_ID := APEX_EXEC.GET_VARCHAR2(L_CONTEXT, L_IDX_ID);
L_FROM_EMAIL := APEX_EXEC.GET_VARCHAR2(L_CONTEXT, L_IDX_FROM);
L_SUBJECT := APEX_EXEC.GET_VARCHAR2(L_CONTEXT, L_IDX_SUBJECT); L_BODY := LOWER(L_BODY);
L_BODY := REPLACE(L_BODY, CHR(10), ‘ ‘);
L_BODY := REPLACE(L_BODY, CHR(13), ‘ ‘);
L_BODY := REPLACE(L_BODY, UNISTR(‘\FEFF’), ”);
L_BODY := REGEXP_REPLACE(L_BODY, ‘<[^>]+>’, ‘ ‘);
L_BODY := REGEXP_REPLACE(L_BODY, ‘[^[:print:]]’, ”); L_STATUS := TRIM(L_BODY);
L_TASK_ID := REGEXP_SUBSTR(L_SUBJECT, ‘\d{10,}’);
L_APPROVER := L_FROM_EMAIL;
END LOOP;
APEX_EXEC.CLOSE(L_CONTEXT);
EXCEPTION
WHEN OTHERS THEN
APEX_EXEC.CLOSE(L_CONTEXT);
RAISE;
END FETCH_UNREAD_EMAILS;
END EMAIL_TASK_PROCESSOR;
EMAIL_TASK_PROCESSOR.FETCH_UNREAD_EMAILS; apex_json.open_object;
apex_json.write(‘status’, ‘success’);
apex_json.write(‘message’, ‘Emails processed successfully.’);
apex_json.close_object;EXCEPTION WHEN OTHERS THEN apex_json.open_object;
apex_json.write(‘status’, ‘error’);
apex_json.write(‘message’, SQLERRM);
apex_json.close_object;END;
You can create automation in your APEX application (Shared Components) to call your email process package at a regular interval.
EMAIL_TASK_PROCESSOR.FETCH_UNREAD_EMAILS;
END;
<head>
<title>Leave Request Approval for Task #TASK_ID#</title>
</head>
<body>
<p>Dear #APPROVER_NAME#,</p>
<p>Please review the following Leave Request and approve or reject as necessary:</p>
<h3>Approval Details</h3>
<ul>
<li>
<strong>Leave Type:</strong> #LEAVE_TYPE#
</li>
<li>
<strong>Number of Days:</strong> #NO_OF_DAYS#
</li>
</ul>
<h3>Task Details</h3>
<ul>
<li>
<strong>Task ID:</strong> #TASK_ID#
</li>
<li>
<strong>Task Description:</strong> #TASK_DESC#
</li>
</ul>
<p>
<strong>Click below to approve or reject:</strong>
</p>
<a href=”mailto:#APPROVER_EMAIL#?subject=Leave%20Request%20Approval%20-%20Task%20#TASK_ID#&body=Approved”
style=”background-color: green; color: white; padding: 10px 20px; text-decoration: none; border-radius: 5px; display: inline-block; margin-right: 10px;”>
Approve
</a>
<a href=”mailto:#APPROVER_EMAIL#?subject=Leave%20Request%20Rejection%20-%20Task%20#TASK_ID#&body=Rejected”
style=”background-color: red; color: white; padding: 10px 20px; text-decoration: none; border-radius: 5px; display: inline-block;”>
Reject
</a>
<br>
<br>
<p>Best regards,</p>
<p>#EMP_NAME#.</p>
</body>
</html>
Conclusion
In-email approvals significantly streamline business processes by allowing approvers to take action directly from their inbox, eliminating the need to log into the application for routine approvals. By combining Oracle APEX Workflows, Automations, REST Data Sources, and Microsoft Graph API, organizations can build a secure, scalable, and user-friendly approval mechanism that improves efficiency and reduces turnaround times. This approach not only enhances the user experience but also accelerates decision-making across the enterprise. As organizations continue to focus on automation and productivity, in-email approvals offer a practical and impactful way to modernize approval workflows within Oracle APEX applications.