In Oracle Cloud Accounts Payable (AP), every payment must be supported by a corresponding invoice. Generating invoices is a fundamental part of maintaining smooth financial operations, ensuring payments are accurate and traceable. There are various methods for generating invoices in the AP module, including manual entry, importing spreadsheets, and using recurring invoice spreadsheets for payments that happen on a regular basis.
In this blog, we’ll explore the process of creating recurring invoices, a useful feature for automating and simplifying repetitive payments like rent, utilities, or subscription services. Let’s dive into how recurring invoices can streamline your AP workflow in Oracle Cloud.
Difference between a Spreadsheet Invoice and Recurring Invoice:
- •In case of ADFDi invoice creation, you need to enter as many rows in the spreadsheet as the number of invoices. Alternatively, in case of recurring invoice, simply enter only one row, and multiple invoices gets auto generated.
- •In case of ADFDi invoices system does not allow you to create invoice in the future enterable period or never opened period. However, in case of recurring invoice, you can enter the invoice in the never opened period but for the purpose of internal control, the validation and accounting of the same is not possible.
Recurring invoices are the invoices that are exactly same except for the invoice date and invoice number. Hence for data entry, the option of recurring invoice is available in Oracle.
For instance, in case of rental, the service provider may create invoice on monthly basis, hence recurring invoice can be used. Alternatively, in case of insurance premium the insurance company may issue only one invoice. However, the user may be making the payment on monthly basis, hence the concept of recurring invoice will not be applicable here.
Business Case:
For example: The rent for Rs 10,000 for the building is to be paid by the company each month. (It is a fixed period payment which can be Monthly/weekly/quarterly etc.)
STEP-1 Create AP Calendar : This is a mandatory step before creating the recurring invoice. Firstly, you need to define the payable calendar to define the ‘From period’ and ‘To Period’. The business logic behind making a separate AP Calendar is that the recurring invoice can be created at any other frequency other than the one specified in your accounting calendar.
Navigation> Setup and maintenance> Offerings as financials> payables> All task> manage payable calendar
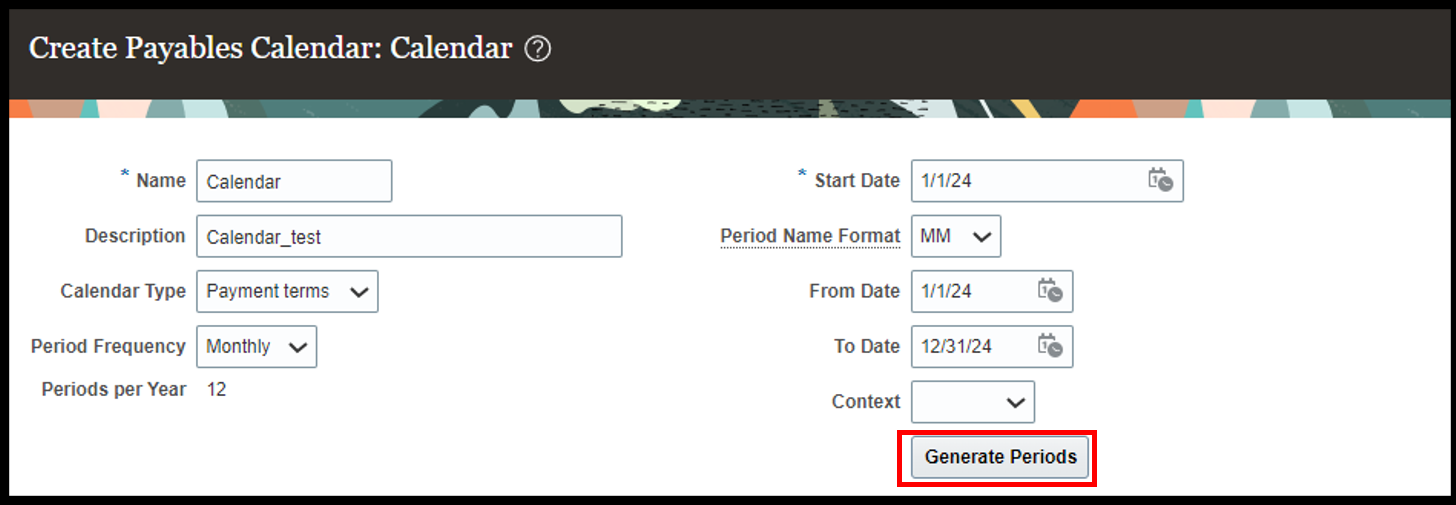
Name: Name of the AP calendar.
Description: Details about the calendar (you can specify the details about the calendar in this section).
Calendar type: Payment term/ General purpose: The calendar can be general purpose calendar, or it can be based on the payment terms as decided by the supplier.
Period frequency: 4-4-5, 4-5-4, 5-4-4, others, quarterly, monthly, weekly: These are the options available for the period frequency. You can choose it as per the business requirement.
Period per year: This is auto created by the system based on the period frequency selected. For example, in the above scenario the frequency selected is monthly hence the period per year came to be 12.
Recommended for you: Invoice Creation and Payment Processing
From and to date: It represents the period from where the AP calendar period will start and will go to which period.
STEP-2: Generate Period: After filling all the details, when you click on Generate Period, the system will automatically create the periods.
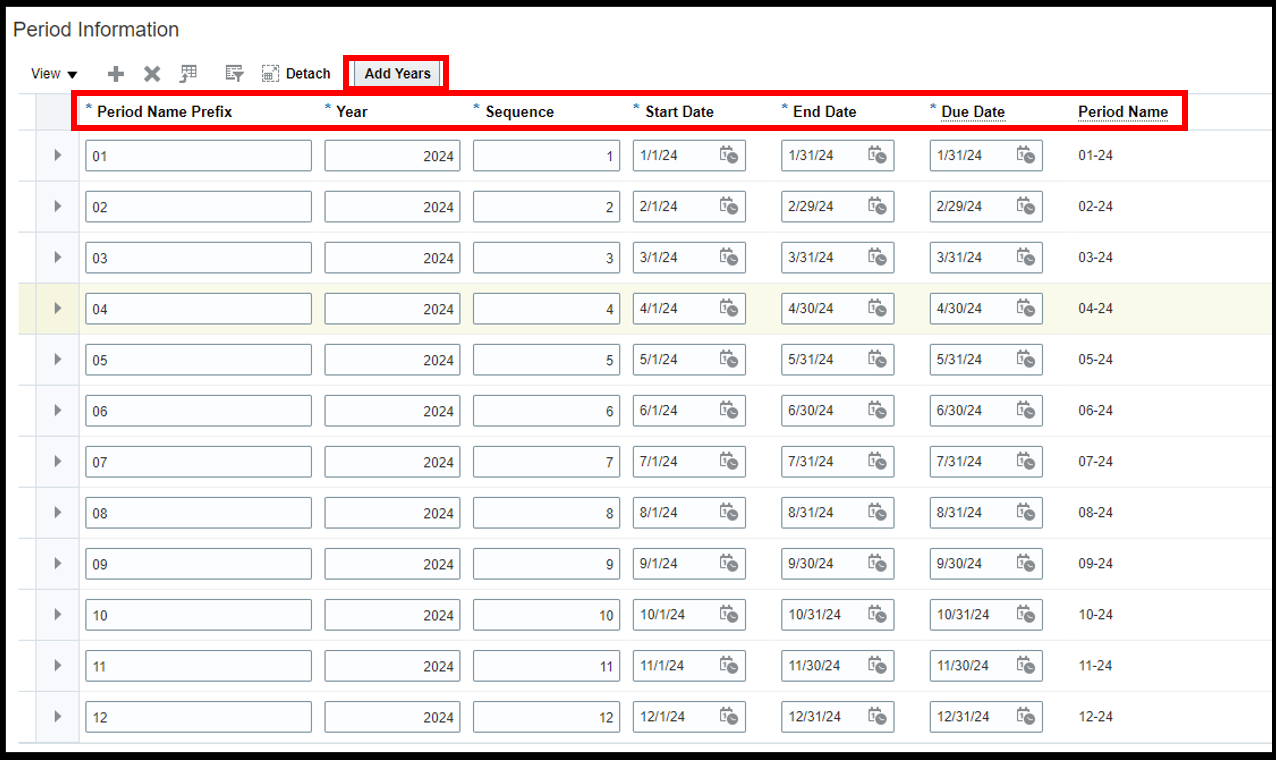
Period Name Prefix: If you want to add any specific prefix for the period, it can be done here.
Sequence: The sequence of the period can also be defined here.
Start date: The starting date of the period.
End date: The ending date of the period.
Due date: The actual date during the period when the transaction needs to be shown in the records.
Add Years: You can further add years to the same calendar if it is a business requirement.
STEP-3 Download the Recurring invoice spreadsheet
Navigation – Home> Payables> Invoices> task list> Create recurring Invoices> open excel sheet> fill the Oracle credentials

STEP-4: Fill the Recurring invoice spreadsheet

Business unit: The business unit from which the invoice belongs to.
Invoice Number: The specific number mentioned on the invoice given by the supplier
Invoice Amount: The amount for which the invoices need to be created.
Supplier: It represents the name of the supplier for whom the invoices need to be created.
Supplier Number: A unique number that is allotted to each supplier by the system
Supplier Site: The location of the supplier.
Invoice currency: The currency in which the invoice is originally been created.
Payment currency: Sometimes the invoice has been created in some other currency while the payment must be done in some other currency. Payment currency represents the currency in which the payment must be made to the supplier. This is not a mandatory requirement for creating a recurring invoice as it can be specified at the time of making the payment.
Description: Here you can provide a brief about the invoice.

Calendar name: Here we have selected name as ‘Manage AP Calendar’.
From Period: The time from when the invoice needs to be created.
To period: The period till when the calendar needs to be created.
Type: It represents the line type, whether it is for item or for tax.
Amount: It represents the amount to be specified at the line level.
Invoiced quantity: The number of units being purchased from the supplier; it is applicable in case of goods purchased.
Unit Price: It represents the per unit price of the goods to be purchased.
STEP-5 View Status: Once all the details are filled, the next step is to view the status. If there is no error in the status, you can proceed to the next step. Status viewer icon is located at the top right of the excel sheet.

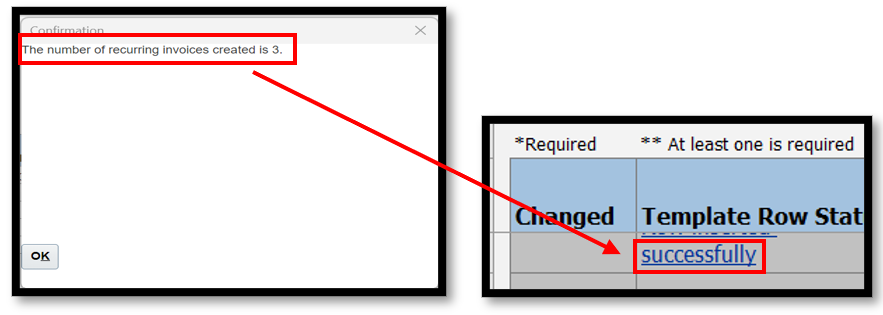
STEP-6 Generate: It will generate invoices which will be in ‘Not Validated’ status. Moreover, on the excel sheet you can see ‘Successfully’ on the ‘Template Row Status’.
STEP-7 Check the invoices in Fusion : Here, you can check the invoices in Fusion.
Navigation>home>payables>Invoices>Recent infotile> incomplete

Another way to locate the created invoices is through Manage Invoices page.
Navigation – Home> Payables> Invoices> Task List> Manage Invoices> search by Invoice number

STEP- 8 Open and check the invoice: It is easier to check the details filled in this spreadsheet on the invoice created. Once the details are verified, the invoice can now be validated.
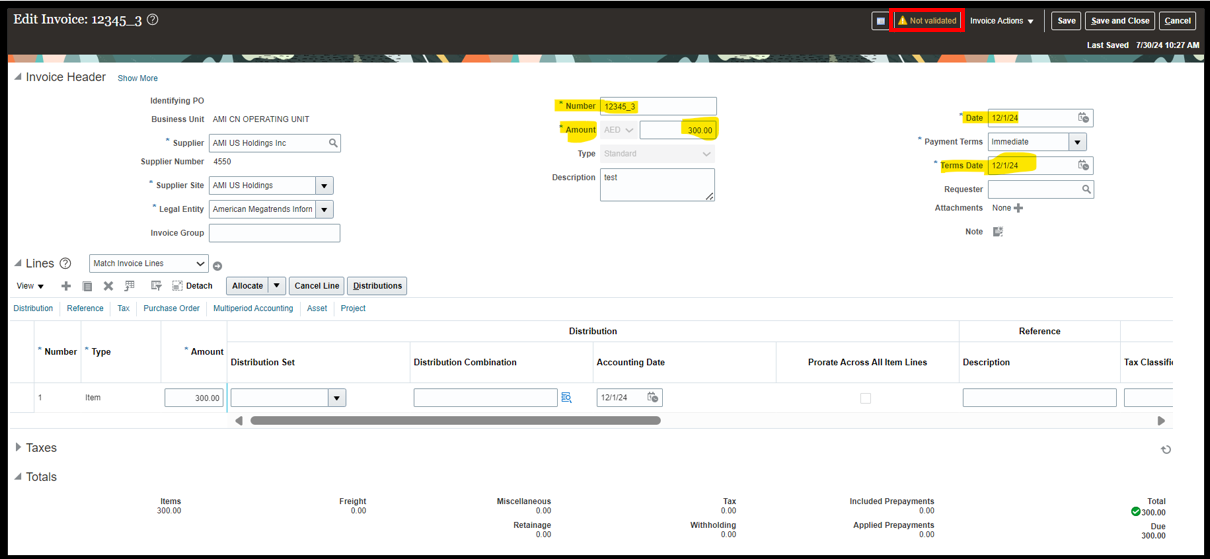
**Note: Posting and Accounting will be possible only in case the accounting period is an open period.
Conclusion
In conclusion, leveraging the recurring invoices feature in Oracle Cloud Accounts Payable can significantly streamline your financial operations by automating recurring payments. By setting up recurring invoices for regular expenses such as rent, utilities, or subscriptions, you not only save time but also reduce the risk of errors and ensure consistency in your AP workflow. Automating these processes helps maintain accurate financial records and improves overall efficiency, enabling your team to focus on more strategic financial tasks. Start utilizing recurring invoices today to optimize your accounts payable process and enhance your organization’s financial management.


