In this blog, we will walk you through the steps necessary to customize receivables transactions invoice templates and make them BU-specific. Let’s get started.
Step 1: To find the Default Receivables Invoice Templates and Data model, navigate to: /Shared/Financials/Receivables/Bill Presentment.
Step 2: To get a copy of the template and data model automatically into custom folder, open in a new tab by adding the extension at the end of the URL with xmlpserver to get the customized option as shown below:
Ex: https://XX-XXXX-XXX-saasfaprod.fa.ocs.oraclecloud.com/xmlpserver/servlet/catalog

By using the below navigation, we can find the custom Invoice template and Data model: /Shared/Custom/Financials/Receivables/Bill Presentment.

Step 3: We can create a Custom template from scratch, or we can use the existing one for minor changes. After preparing the custom template using BI Plug-in as shown below, we need to save the file with .rtf extension.

Step 4: To upload the custom template, double click on the invoice template which we placed in the custom folder as shown:


Step 5: To upload the custom template, click on View a List > + > Upload.


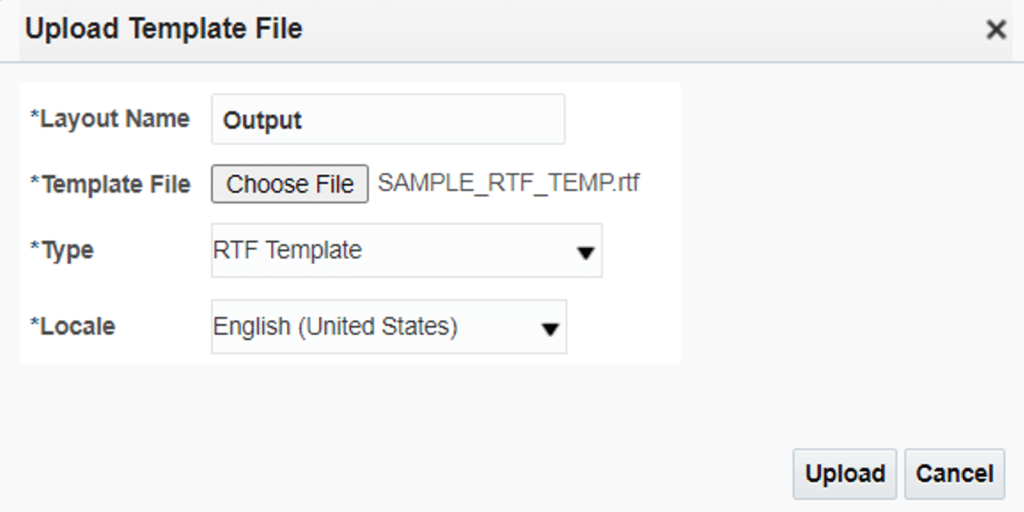
Step 6: Then provide the information and upload the template from our local storage by selecting the type as .rtf as shown below:
Also Read: Creating Recurring Invoices in Oracle Cloud Accounts Payable

Step 7: We can see the screen as shown in the screenshot below.

In View a List:

Step 8: Save the changes and close it.
Step 9: Now, we need to do the setup to make the custom template available for Business Unit Specific by following as shown below:
Navigation: Setup and Maintenance > Search > Manage Standard Lookup


Step 10: To create the Lookup, click on “+ “icon and enter the below values to create the custom lookup:
Lookup Type: ARBPA_SELECT_INV_TEMPLATE
Meaning: ARBPA_SELECT_INV_TEMPLATE
Description: ARBPA_SELECT_INV_TEMPLATE
Module: Receivables
For Debit Memo, Credit Memo, and chargeback create lookup type as following:
- ARBPA_SELECT_CM_TEMPLATE
- ARBPA_SELECT_DM_TEMPLATE
- ARBPA_SELECT_CB_TEMPLATE

Step 11: Save it and create the lookup codes for the type by providing below details under Lookup Codes section as shown:
Lookup Code: < Business Unit > [Note that there is a 30-character limit for the BU Name]
Meaning: <Custom Template name>
Description: <Default Output format>

Step 12: Save and close it. Finally, the setup is done.
Step 13: To Schedule the ESS Process back to Home in the Fusion Instance and follow the below path:
Navigation: Tools > Schedule Processes > Schedule New Process > Print Receivables Transactions


Step 14: Select the Business Unit and automatically it will pick the custom Template which we have given in the setup.

Step 15: Submit the request and find the output template after the ESS job gets successful as shown below:

If you have any questions or concern, please get in touch with us on [email protected].


Shaik Rizwan
Dear Pathan Jahir,
Your step by step guide for changing invoice template was very very helpful.
Thanks a lot for helping through your detail guide.
Very Thankful,
Shaik Rizwan Ahmed