Interactive Grids in Oracle APEX offer powerful capabilities for managing and manipulating data within applications. However, to truly unlock their potential, developers often need to go beyond the default configurations and implement customizations that enhance user experience and streamline operations.
In this edition of our Oracle APEX Tips & Tricks series, we focus on advanced techniques for customizing Interactive Grids. We will explore how client-side JavaScript can be leveraged for real-time calculations, how to store Interactive Grid rows in a Page Item for further processing, and how to modify DML buttons to support custom operations. These practical tips will help you take full control of Interactive Grids and optimize them for your specific business needs.
Part 1 – Implementing Client-Side Calculations and Dynamic Summaries in Oracle APEX Interactive Grid Using Dynamic Actions
Step 1: Create an Interactive Grid. This grid will allow users to add or modify transaction records, and the changes will trigger recalculations of category-based totals.
Step 2: To ensure that the summary calculations are updated automatically when the grid data is modified, we will use Dynamic Actions to handle the recalculation.
Here’s how to set it up:
1. Create a Dynamic Action:
- Event: Choose “Change” as the event type for the Dynamic Action.
- Selection Type: Select Interactive Grid.
- Region: Choose the region ID of the Interactive Grid (e.g., TRANSACTION_GRID).

2. Configure the Action – In the Action section, select “Execute JavaScript Code”.
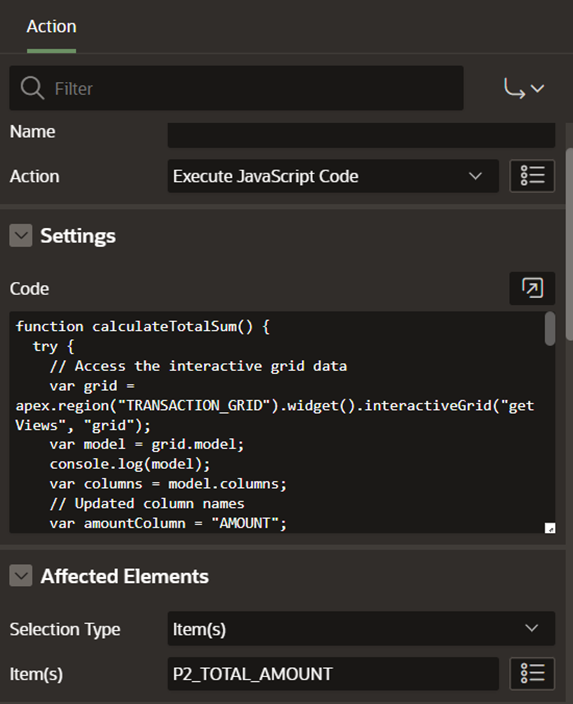
Next, add the following JavaScript code to calculate the totals when any data in the grid is modified:
function calculateTotalSum() {try {
// Access the interactive grid data
var grid = apex.region(“TRANSACTION_GRID”).widget().interactiveGrid(“getViews”, “grid”);
var model = grid.model;
var amountColumn = “AMOUNT”;
var categoryColumn = “CATEGORY_ID”; // Foreign key to AF_CATEGORY_TBL
var currencyColumn = “CURRENCY_CODE”;
var totalAmount = 0;
var categoryTotals = {};
var categoryCurrency = {};
// Iterate over the records in the grid
model.forEach(function(record) {
var amount = parseFloat(record[model.getFieldKey(amountColumn)]);
var categoryIdObj = record[model.getFieldKey(categoryColumn)];
var currencyCode = record[model.getFieldKey(currencyColumn)];
var categoryId = categoryIdObj && categoryIdObj.v ? categoryIdObj.v : null;
var categoryName = categoryIdObj && categoryIdObj.d ? categoryIdObj.d : null;
if (!isNaN(amount)) {
totalAmount += amount;
if (!categoryTotals[categoryId]) {
categoryTotals[categoryId] = 0;
categoryCurrency[categoryId] = currencyCode;
}
categoryTotals[categoryId] += amount;
}
});
// Update total amount on page item (e.g., P2_TOTAL_AMOUNT)
$s(“P2_TOTAL_AMOUNT”, totalAmount);
// Generate the summary HTML
var summaryHtml = ‘<div style=”font-size:0.75rem;font-weight:600;font-family: sans-serif, Helvetica,Arial; margin: 20px;”><h5>Summary</h5>’;
for (var categoryId in categoryTotals) {
if (categoryTotals.hasOwnProperty(categoryId)) {
summaryHtml += ‘<p style=”font-weight:500;”>Category ‘ + categoryId + ‘: ‘ + Number(categoryTotals[categoryId].toFixed(2)).toLocaleString(‘en-US’) + ‘ (‘ + categoryCurrency[categoryId] + ‘)</p>’;
}
}
summaryHtml += ‘<p style=”font-size:0.75rem; font-weight:500; margin-top: 20px;”>Total: ‘ + Number(totalAmount.toFixed(2)).toLocaleString(‘en-US’) + ‘</p>’;
// Inject the generated HTML into the page
$(“#CATEGORY_DETAILS”).html(summaryHtml);
} catch (e) {
console.error(“Error calculating total sum: “, e);
}
}
// Execute the calculation
calculateTotalSum();
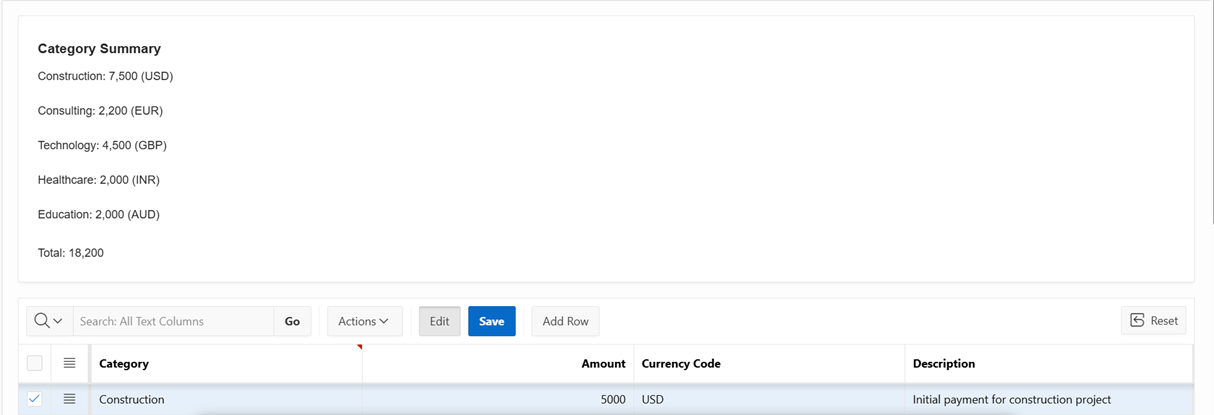
Step 3: Display the Summary in Static Content.
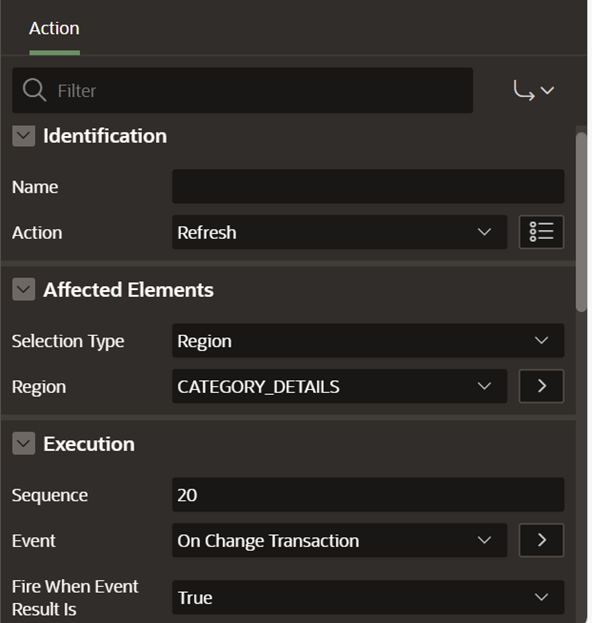
To present the category-based summary to the user, create a Static Content region on your page. This region will display the dynamically updated summary (CATEGORY_DETAILS). The region will be populated automatically with the updated summary each time the data in the grid is updated.
Also Read: Oracle APEX Tips & Tricks Series Part 4
Step 4: Testing the Implementation.
- Populate the Grid: Make sure your Interactive Grid is populated with sample data that includes amounts and categories.
- Modify Data: Edit any value in the grid (e.g. amount) and observe that the client-side calculation dynamically updates the summary displayed in the specified region (CATEGORY_DETAILS).
- Verify Accuracy: Ensure that the summary reflects accurate totals by category and overall.
By leveraging Dynamic Actions and client-side calculations, this implementation allows you to create a real-time summary display for data entered on Oracle APEX Interactive Grid. The approach focuses on minimizing server-side calls, ensuring a seamless and responsive user experience.
Part 2 – How to Store Selected Rows from an Interactive Grid into a Page Item in Oracle APEX
Imagine you have an Interactive Grid displaying data. When the user selects multiple rows, you want to capture specific data from those rows and store it in a page item. This can be useful for performing operations like calculating sums, applying filters, or submitting data for further processing.
Step 1: Set Up the Interactive Grid Region. It should display the data relevant to your use case. It’s essential to enable multi-row selection so that users can select multiple rows simultaneously.
- Ensure the grid contains the necessary columns for data selection.
- You can enable the checkbox for row selection by adjusting the grid’s selection type settings.
Users will select one or more rows, and we will capture these selected rows for further processing.
Step 2: Create a Page Item to Store Selected Rows. This could be a hidden text field to store the values in a comma-separated format, for instance.
- Page Item Type: Text Field (Hidden or Visible depending on your design).
Item Name: This item will store the values of the selected rows, so you might name it something descriptive (e.g., P3_SELECTED_ROWS).
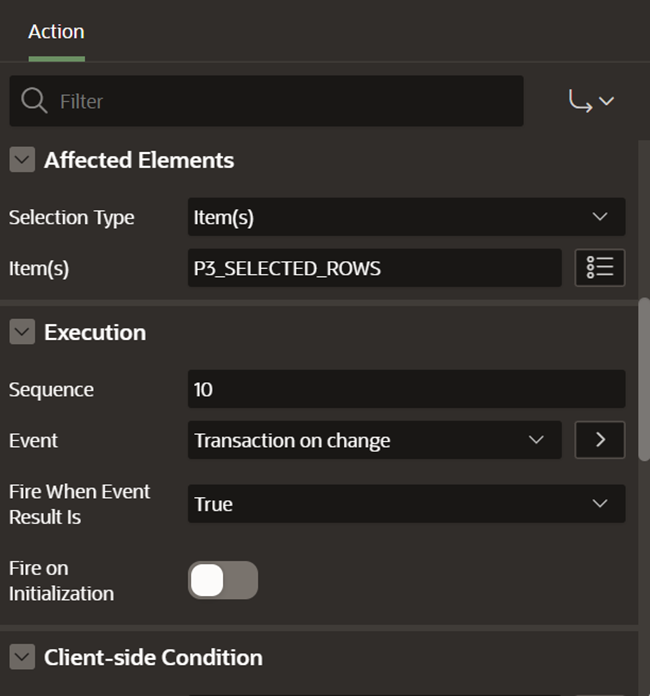
Step 3: Create the Dynamic Action. It will be triggered every time the user changes the selection in the Interactive Grid. This action will collect the selected row values and populate the page item. Follow the steps below to create the Dynamic Action:
- Event: Selection Change (this is triggered when the user selects or deselects rows in the grid).
- Selection Type: Interactive Grid.
- Region: Choose the Interactive Grid region where the data is displayed.
- Action: Select Execute JavaScript Code.

Now, the JavaScript code below will extract the data from the selected rows and store it in the page item. The example assumes you want to capture a particular field (e.g., ID) from the selected rows.
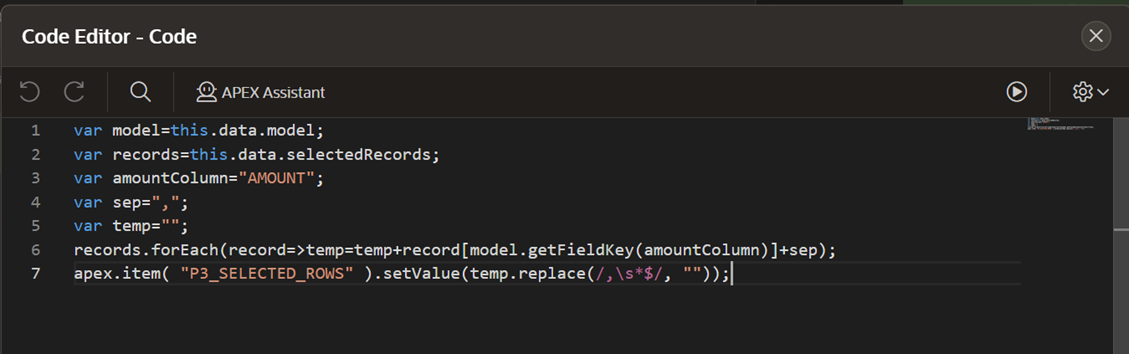
var model = this.data.model; // Get the grid model (data structure)var records = this.data.selectedRecords; // Get selected rows
var separator = “,”; // Separator for storing values
var selectedValues = “”; // Temporary variable to store the selected values
// Loop through each selected record and extract the required field
records.forEach(function(record) {
selectedValues += record[model.getFieldKey(“ID_FIELD”)] + separator; // Adjust field name as needed
});
// Remove the trailing separator and set the value in the page item
apex.item(“P3_SELECTED_ROWS”).setValue(selectedValues.replace(/,\s*$/, “”));
Explanation:
- this.data.model: Refers to the data model for the grid.
- this.data.selectedRecords: Retrieves all selected rows.
- model.getFieldKey(“ID_FIELD”): Specifies the field you want to extract from each row. Replace “ID_FIELD” with the actual field key you’re interested in.
apex.item(“P3_SELECTED_ROWS”).setValue(…): Stores the selected values (comma-separated) in the page item P3_SELECTED_ROWS.
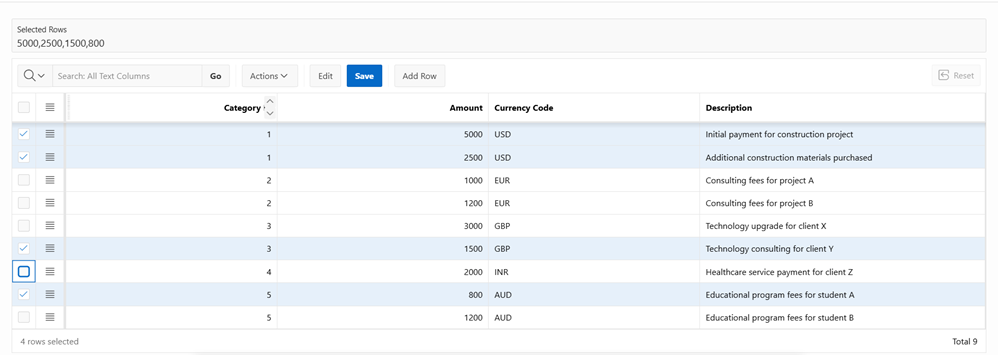
Step 4: Once the Dynamic Action is triggered by a row selection, the page item (P3_SELECTED_ROWS) will hold the selected values as a comma-separated string.
You can test the functionality by:
- Selecting multiple rows in the Interactive Grid.
- Checking the value of P3_SELECTED_ROWS.
This can be done through the Developer Toolbar or by displaying the value in a Static Content region on the page.
Use Cases and Extensions:
- Bulk Operations: After capturing the selected row IDs, you can use these values to perform bulk operations, such as updating or deleting records.
- Calculations: You can extract numeric fields from the selected rows (e.g., amounts, quantities) and use them for on-the-fly calculations.
- Subsequent Actions: Use the selected row data to populate other regions, trigger dynamic actions, or send the data to the server for further processing.
This method allows you to easily capture selected rows from an Interactive Grid and store them in a page item for further use. By leveraging Dynamic Actions and JavaScript, you can create powerful, dynamic applications in Oracle APEX that respond to user selections.
Next Steps:
- Customize the JavaScript code to capture additional fields from the selected rows.
- Use the page item values to trigger other actions, such as updating data in the database or navigating to another page.
- You can also build complex filters or calculations that use the selected row data as input for further analysis.
With this approach, you’re leveraging the full potential of Oracle APEX’s Interactive Grids to create rich, interactive user experiences.
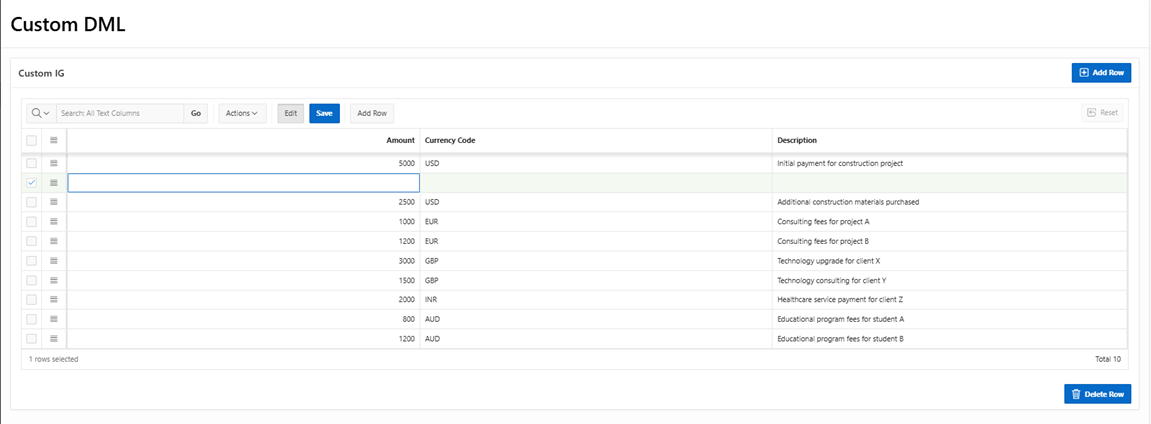
Part 3 – Custom DML Buttons and Operations in Oracle APEX Interactive Grids
Let’s assume we have an Interactive Grid in our APEX application where:
- Editing is disabled for certain attributes in the grid (e.g., “Edit” and “Delete” buttons are not enabled).
We want to allow users to dynamically add or delete rows using custom buttons placed elsewhere on the page (such as on the toolbar).
Solution Overview
To achieve this, we need to implement the following steps:
- Disable Editing on Specific Attributes: We will prevent editing on certain columns in the Interactive Grid using the grid’s settings.
- Create Custom DML Buttons: Add custom buttons for adding and deleting rows.
Use Dynamic Actions: Write a dynamic action to trigger the row addition and deletion using JavaScript commands.
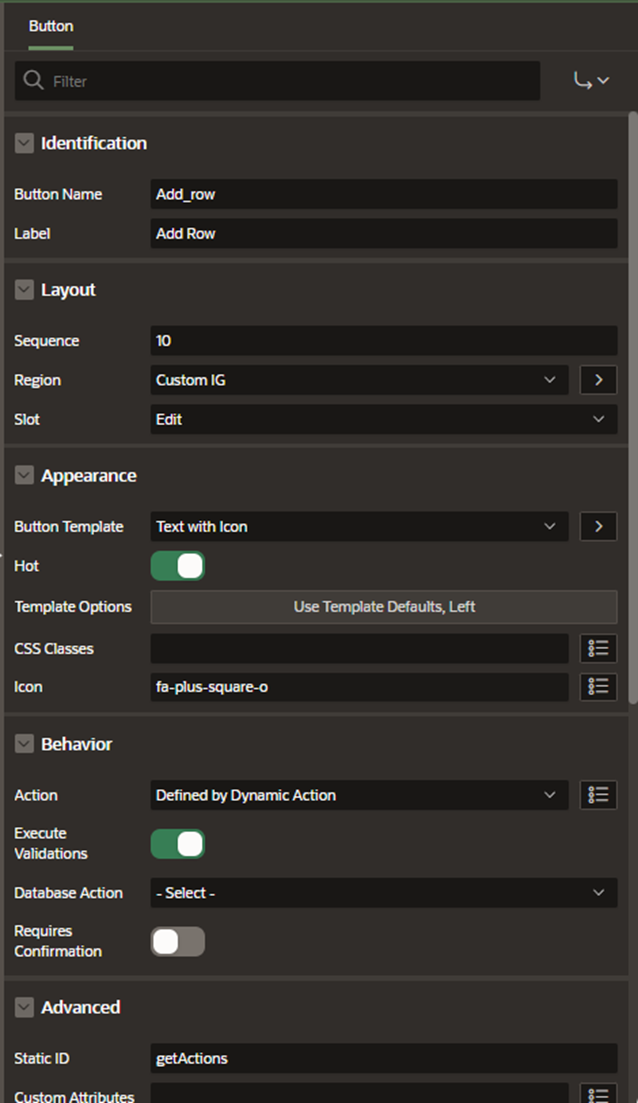
Step 1: Now that we’ve set up the grid, it’s time to create custom buttons for adding and deleting rows.
Add a Button for Adding a Row:
- Go to the Page Designer.
- Under the “Buttons” section, click Create to add a new button.
- Give the button a name like Add Row.
In the Action section, set the action to Defined by Dynamic Action. This is where we will trigger the JavaScript for adding rows.
Add a Button for Deleting a Row:
- Similarly, add another button for deleting rows and follow the same process.
Step 2: Now we will write the Dynamic Action code that will invoke the add and delete row functionality when the custom buttons are pressed.
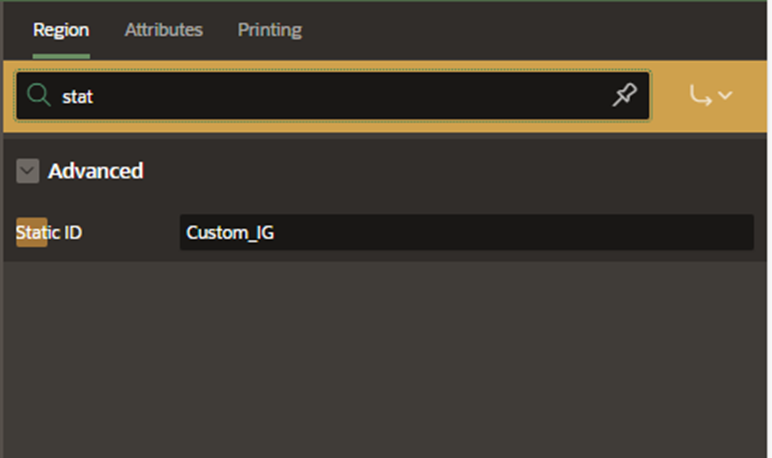
Make sure Static ID of interactive grid is used to refer it within the JavaScript code.
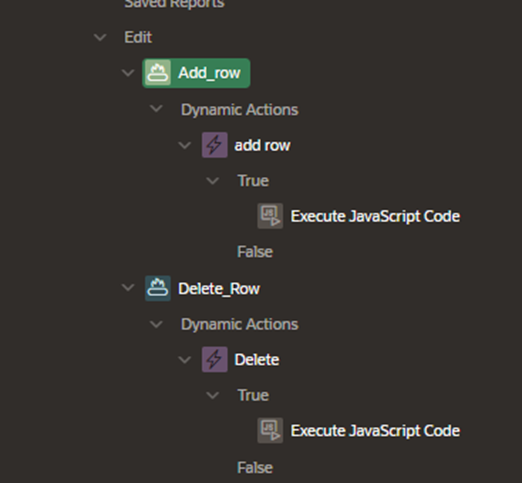
1. Dynamic Action for Adding a Row:
- In the Dynamic Actions section of the Page Designer, create a new Dynamic Action.
- Set the Event to Click.
- Select the button you created for adding a row (e.g., “Add Row”).
- Under True Actions, create a new Execute JavaScript Code
- In the JavaScript Code field, add the following code to invoke the row addition:
apex.region(“Custom_IG”).widget().interactiveGrid(“getActions”).invoke(“selection- add-row”);
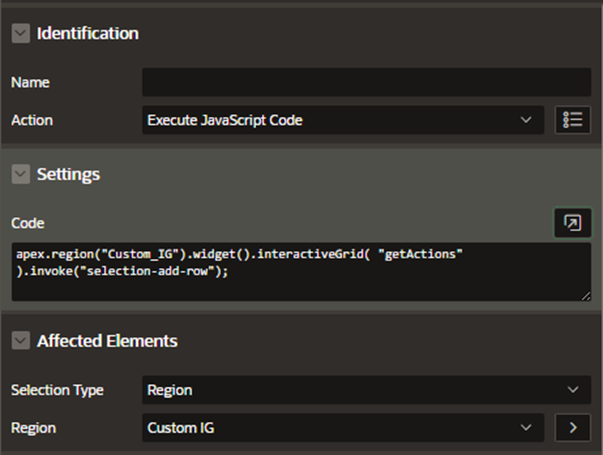
This code snippet calls the selection-add-row action of the Interactive Grid widget, which allows you to add a new row to the grid.
2. Dynamic Action for Deleting a Row:
- Similarly, create another Dynamic Action for the delete button.
- Set the Event to Click and select the delete button.
- Under True Actions, create another Execute JavaScript Code
- In the JavaScript Code field, add the following code to invoke the row deletion:
apex.region(“Custom_IG”).widget().interactiveGrid(“getActions”).invoke(“selection-delete”);
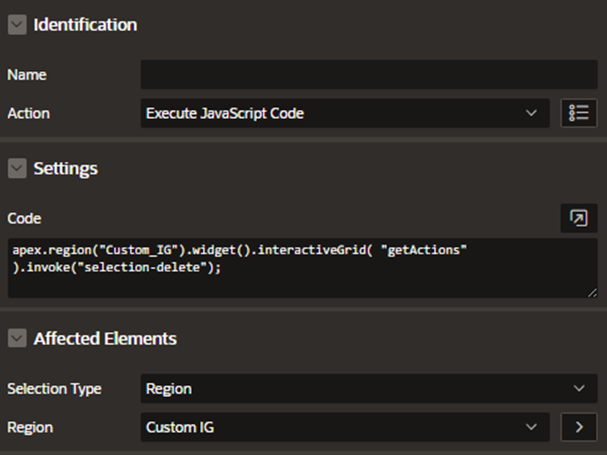
This code calls the selection-delete action, which will delete the selected row in the Interactive Grid.
Step 3: Customize Further (Optional)
Adding Validation: You can add validation to ensure that users only delete rows if they have selected at least one row. To do this, you can modify the JavaScript to check if a row is selected before invoking the selection-delete action.
Example:var grid = apex.region(“Custom_IG”).widget().interactiveGrid(“getActions”);
var selectedRecords = grid.getSelectedRecords();
if (selectedRecords.length > 0) {
grid.invoke(“selection-delete”);
} else {
alert(“Please select a row to delete.”);
}
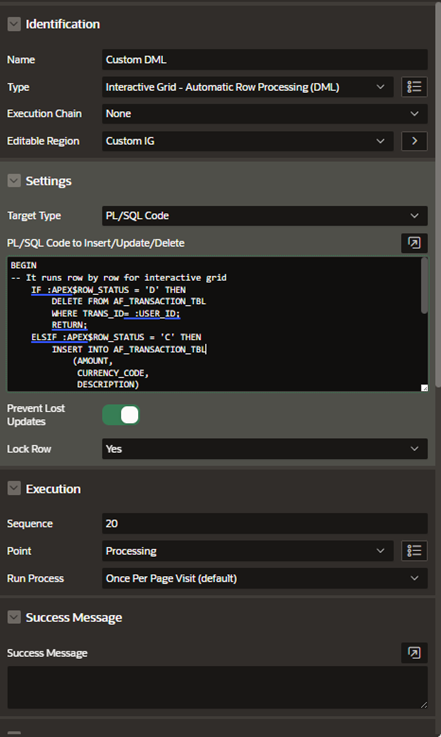
Step 4: Customize DML (Optional)
Adding Custom DML Operations: You can add custom DML operations for the required grid using the following code. Please note that these DML operations are executed row by row.
Example:BEGIN
— It runs row by row for interactive grid
IF :APEX$ROW_STATUS = ‘D’ THEN
DELETE FROM AF_TRANSACTION_TBL
WHERE TRANS_ID= :USER_ID;
RETURN;
ELSIF :APEX$ROW_STATUS = ‘C’ THEN
INSERT INTO AF_TRANSACTION_TBL
(AMOUNT,
CURRENCY_CODE,
DESCRIPTION)
VALUES
(:AMOUNT,
:CURRENCY_CODE,
:DESCRIPTION);
RETURN;
ELSIF :APEX$ROW_STATUS = ‘U’ THEN
UPDATE AF_TRANSACTION_TBL
SET AMOUNT = :AMOUNT,
CURRENCY_CODE = :CURRENCY_CODE,
DESCRIPTION=:DESCRIPTION
WHERE TRANS_ID = :USER_ID;
RETURN;
END IF;
END;
With the above steps, we have successfully implemented custom DML operations (adding and deleting rows) in an Oracle APEX Interactive Grid, even with certain attributes disabled for editing. By using dynamic actions and JavaScript commands, we can easily extend the functionality of the Interactive Grid, offering more control and flexibility in the user interface.
By customizing the Interactive Grid with dynamic actions and DML buttons, you can provide a seamless user experience that meets specific business requirements while ensuring that only authorized actions are performed on the data. If you have any questions or concern, kindly get in touch with us on [email protected].