In this post, we are going to configure the trusting relationship between Oracle Identity Cloud service and Oracle Fusion Applications. Here, Oracle Fusion Applications is the service provider and Oracle Identity Cloud Service is the identity provider. This configuration will create a user in the Oracle Identity Cloud Service when you create an account in Oracle Fusion Applications. It works both ways.
Obtain Copy of Oracle Identity Cloud Service Tenant Signing Certificate
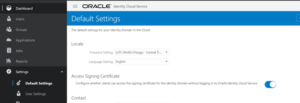
Step 1: In the Oracle Identity Cloud Service console, select the Settings tab and enable Access Signing Certificate. (It may already be enabled. You can disable the Access Signing Certificate control after you obtain the certificate.)
Step 2: Download the certificate data from this URL:
Copy https://<IDENTITY CLOUD SERVICE HOST>/admin/v1/SigningCert/jwk
The response includes two certificates, separated by a comma.
Step 3: Create two certificate files, idcs.cert and idcs_ca.cert, for the certificates in the response. Copy the data from each certificate paste it into the text files between the —–BEGIN CERTIFICATE—– headers and —–END CERTIFICATE—– footers.
![]()
Step 4: Get the issuer name and token endpoint from https://IDCS instance host/.well-known/idcs-configuration. Open the URL and copy the issuer value and token_endpoint value.
“issuer”:https://identity.oraclecloud.com/
“token_endpoint”:”https://idcs-5ff9**********.identity.oraclecloud.com:443/oauth2/v1/token”,
You’ll include the certificate files when you file a service request, later in this process.
Enable Federation with Oracle Identity Cloud Service
You can enable federation with Oracle Identity Cloud Service as the service provider, and set up OAuth trust with Oracle Fusion Applications Cloud Service.
Configure a New Identity Provider in Oracle Identity Cloud Service
Use the Oracle Identity Cloud Service console to add and configure a new identity provider.
Before you get started, download the SAML 2.0 identity provider metadata from your Oracle Fusion Applications Cloud Service identity provider and save it as an xml file. For example, download the metadata from https://<identity domain>.login.<data center>.oraclecloud.com/fed/idp/metadata and save it as FA-IdP-metadata.xml.
Login to ERP and download below URL
https://[ERP_POD].login.us2.oraclecloud.com/fed/idp/metadata
Step 1: Sign in to the Oracle Identity Cloud Service console.
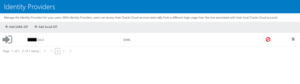
Step 2: Select the Security tab. In the side navigation bar, select Identity Providers.
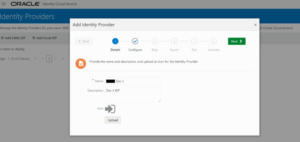
Step 3: Click Add SAML IDP.
Step 4: In the Details pane, enter a name and description for the Oracle Fusion Applications Cloud Service identity provider, and click Next.
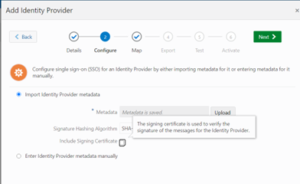
Step 5: In the Configure pane, select Import Identity Provider metadata, upload the SAML 2.0 identity provider metadata xml file, and click Next.
Step 6: In the Map pane, set the following settings:
- Set Identity Provider User Attribute to Name ID.
- Set Oracle Identity Cloud Service User Attribute to Username.
- Set Requested NameID Format to Unspecified.

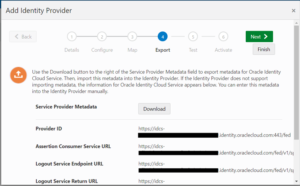
Oracle Identity Cloud Service adds and deactivates the identity provider. You need to export metadata for the identity provider, which you will provide to Oracle later in this procedure. The wizard has the Export, Test, and Activate panes.
Step 7: In the Export pane, click Download, and save the Metadata.xml file.
Don’t test or activate the new identity provider yet. It won’t work until Oracle configures your instance of Oracle Fusion Applications Cloud Service.
Step 8: Click Finish.
The new identity provider is appears in the Identity Providers panel. Do not turn on the Activate Federated SSO control yet.
Repeat above for all other instances.
Create an Oracle Identity Cloud Service OAuth Resource and Client
Create an Oracle Identity Cloud Service application to define the OAuth resource and OAuth client relationships. This Oracle Identity Cloud Service application can be configured as an OAuth resource server for accessing data resources using OAuth. You can choose to limit which data resources applications are permitted to access.
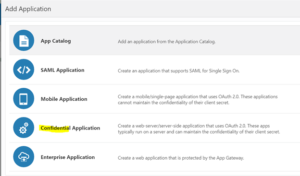
To set up OAuth, you need to create a new Oracle Identity Cloud Service application.
Step 1: In the Oracle Identity Cloud Service console, select the Application tab, click Add, and then in the Add Application window, select Trusted Application.
Step 2: On the Details page of the Add Trusted Application wizard, give the new application a name. If you want, set other values such as description and tags. Click Next.
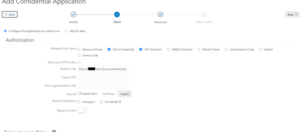
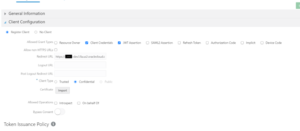
Step 3: On the Client page, select Configure this application as a client now.
Additional options appear on the page. Set the following values:
- Allowed Grant Types: Client Credentials and JWT Assertion.
- Redirect URL: Enter a Redirect URL for the user to be sent after authentication, such as the Oracle SaaS application home page
https://[POD]-dev3.fa.us2.oraclecloud.com/fscmUI/faces/FuseWelcome
- Client Type: Select the Confidential option.
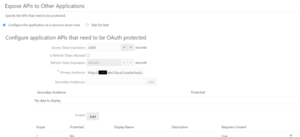
Step 4: On the Resources page, select Configure this application as a resource server now.
Additional options appear on the page.
Step 5: Set the following values:
- Primary Audience: <your Oracle Fusion Applications Cloud Service REST API host name>.
https://[POD].fa.us2.oraclecloud.com
- Allowed Scopes: Click Add, and create a scope with the value /. Check the Requires Consent box.
Step 6: Click Next, and on the Authorization page, click Finish to save the application.
An “Application Added” notification is shown. Make a copy of the Client ID and Client Secret: you’ll need to provide them to Oracle Support later. If you need them later, the Client ID and Client Secret also appear on the Configuration tab in the Details section for the application.
Step 7: With the app created and saved, select the Configuration tab, and expand the Client Configuration section. In the Accessing APIs from Other Applications section, under Allowed Scopes, click Add. In the Add Scope dialog, add one or more Resources. You can check the box for a resource to add all of its scopes, or click the right arrow for a given resource to select individual scopes. You can check the box for the whole app to add all resources. Click the Add button. Click Save to save your changes.
As you add scopes, they are listed by application and allowed scope in the Allowed Scopes area. You can select a scope in this area and click the Remove button to remove it.
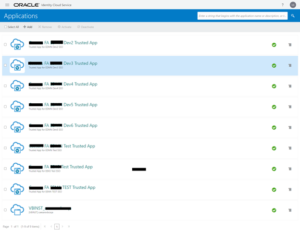
Step 8: To activate the application, from the Oracle Identity Cloud Service console, select Applications, and select the application. Click the Activate button to the right of the application name. Repeat above for all other instances.
File a Service Request with My Oracle Support
Oracle Support will configure your instance of Oracle Fusion Applications Cloud Service as an identity provider and set up OAuth.
- File a service request with Oracle Support. Include the following information in your service request:
- Your Oracle Identity Cloud Service service provider Metadata.xml file, which you got earlier.
- The Name ID format value: Unspecified
- The Name ID value: uid
- The Oracle Identity Cloud Service Tenant Signing Certificate, including the Root Certificate Authority and Issuer Name, that you got earlier.
- The Oracle Fusion Applications Cloud Service service name and identity domain name
- The client ID and client secret from your trusted OAuth application.
- Monitor your support ticket and provide any additional information requested by Oracle Support.
Hi
You need to import that provided OWSM at your side and also you have to configure your IDP metadata(which was not done and caused the error) ,as we have imported the SP metadata from our end.
Please get the IDP metadata from the below URL and configure then test the SSO. I believe you are using SHA-25g
https://[POD].login.us2.oraclecloud.com/oamfed/idp/metadata?signid=osts_signing_sha256&encid=osts_encryption_sha256&sigalgm=SHA-256
I hope you are following your document .
Thanks and Regards,
Oracle Support will add your Oracle Identity Cloud Service as a Service Provider partner, and set up Issuer Trust (to enable OAuth). Oracle Support will notify you when the task is complete, and send you a copy of your Oracle Fusion Applications Cloud Service OWSM signing certificate. You’ll need the signing certificate for the next procedure.
Update Your Oracle Fusion Applications Cloud Service OAuth Trusted Client
In Oracle Identity Cloud Service, update the Oracle Fusion Applications Cloud Service OAuth trusted client application that you created earlier to add the OWSM certificate provided by Oracle Support.
Step 1: In the Oracle Identity Cloud Service console, select the Application tab, and select the OAuth trusted client application that you created earlier.
Step 2: Expand the Client Configuration section.
Step 3: Select the Security check box for Trusted Client.
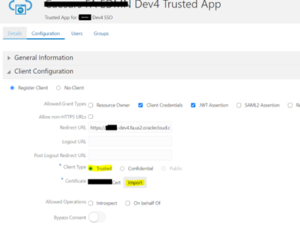
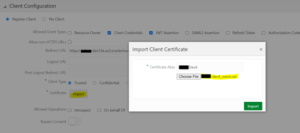
Step 4: Next to the Security control, click Import to import the Oracle Fusion Applications Cloud Service OWSM signing certificate you received from Oracle Support.
Step 5: Click Save.
To activate the application, from the Oracle Identity Cloud Service console, select Applications, and select the application. Click the Activate button to the right of the application name.
Next, you should test the application before activating federation.
Test and Activate Federation
Test whether the identity provider is correctly configured, and then activate federation. If you want, you can enable SSO.
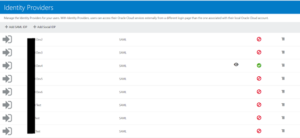
Step1: In the Oracle Identity Cloud Service console, select the Security tab. In the side navigation bar, select Identity Providers.
Step 2: Import new metadata xml from oracle
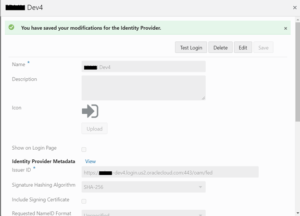
Step 4: Save
Step 5: Test the login
Step 6: activate
Step 7: In the Identity Providers panel, in the Oracle Fusion Applications Cloud Service identity provider Action menu, click Test.
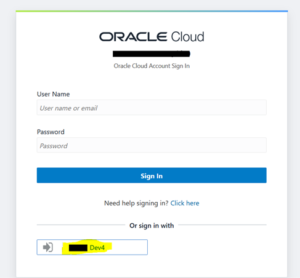
If the identity provider is correctly configured, the Oracle Fusion Applications Cloud Service login page loads in a new tab or window.
- Enable the setting Activate Login Chooser to show the identity provider on the login page. If you want, you can leave this setting turned off to support embedded applications and other mash-up use cases.
- Activate the identity provider by opening the menu and selecting Activate.
- If you want, enable SSO by turning on the Activate Federated SSO control
Step 8: Enable the setting Activate Login Chooser to show the identity provider on the login page. If you want, you can leave this setting turned off to support embedded applications and other mash-up use cases.
Step 9: Activate the identity provider by opening the menu and selecting Activate.
Step 10: If you want, enable SSO by turning on the Activate Federated SSO control.
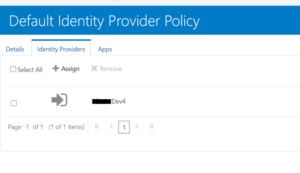
Go to IDP policy > default policy remove default and assign new IDP
After above step, IDCS login page should have option for login with [POD]